
Best Ever Instant Pot Pot Roast
I’m thrilled to share my recipe for the most amazing Instant Pot Pot Roast you will ever have. While I am a huge fan of a classic, tender pot roast, I am NOT a fan of mushy veggies. If you have tried a few recipes in your electric pressure cooker, you know that it cooks everything in a fraction of the time. Also, if you add the veggies with the meat, as most recipes ask you to, you will end up with very mushy veggies. But not with this one!

Instant Pot recipes are a huge time saver; you can make your favorite meals in just a fraction of the time on a busy weeknight, without waiting for the weekend or special occasions. I love hearty dinners, like this Mississippi Pot Roast, or this fancy Red Wine Beef Roast that is perfect for a lovely Sunday dinner. Now, I can cook them quicker, with less effort, and without planning ahead of time, all thanks to my magical Instant Pot.
Table of contents
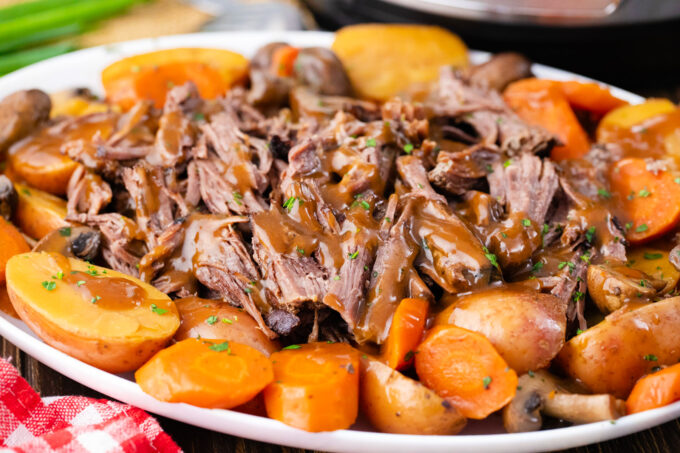
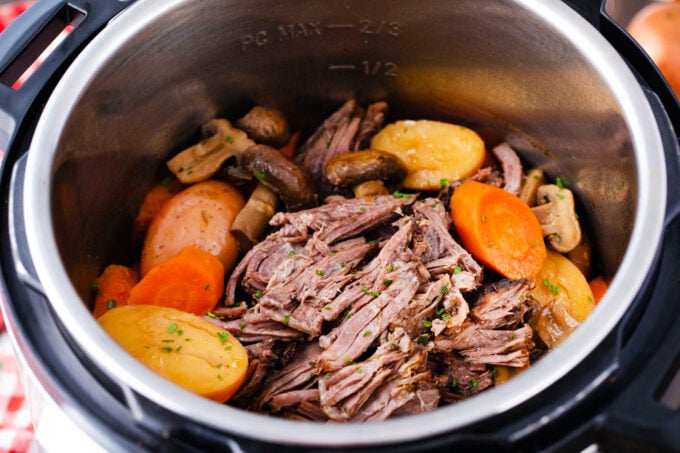
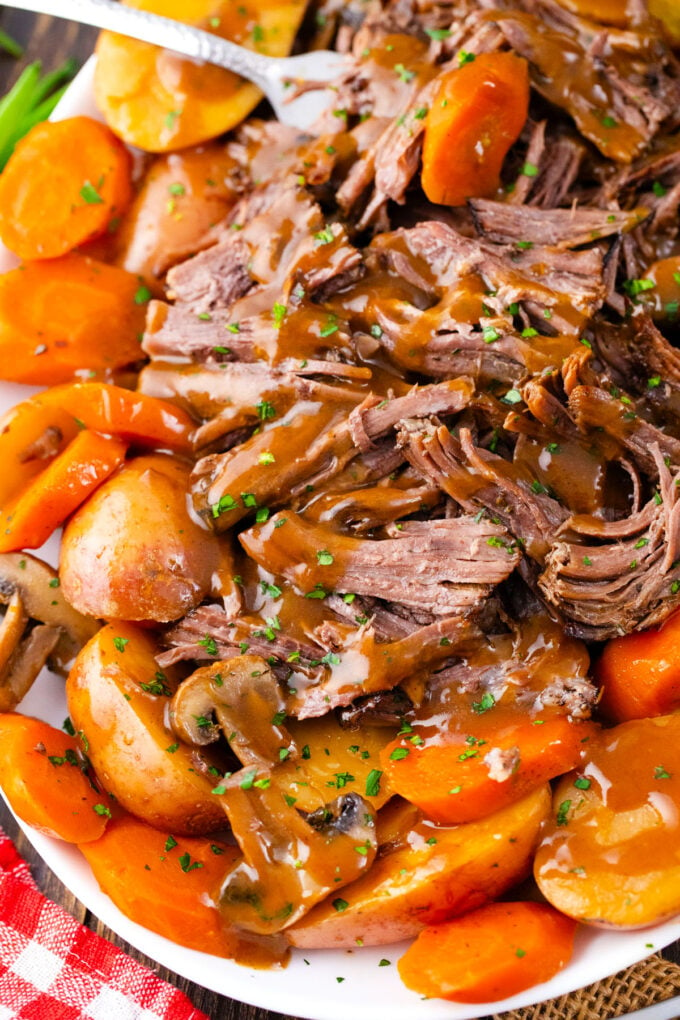
This pot roast is incredibly rich and tender, as if it had been slow-cooked all day. The meat is unbelievably juicy, infused with the flavor of the sauce made with red wine. The veggies are not mushy, but just soft enough to be enjoyed and savored. This is such a comfort meal that not only makes your taste buds happy, but it feeds your soul. This dish is fantastic and it’s great as a hearty family meal or served for a memorable holiday dinner.
I prefer to take the extra step, and first cook the beef, after which I remove it to a plate, sieve the gravy, and only after that add the veggies and cook them for just a few minutes. Although this step takes 20-30 minutes, it’s worth it to bring the IP to pressure and cook everything. Using this method, your beef and veggies will be perfectly cooked with a delicious gravy as well.
Why you will love this recipe
- Effortless: Instead of waiting eight hours for a slow-cooked pot roast, I can achieve a tender, flavorful result in minutes with my Instant Pot. My instant pot recipe is incredibly easy; it takes just 20 minutes to prepare, and then it cooks for two hours. Spend that extra time with family.
- No soggy veggies: Following my simple instructions, the vegetables come out perfectly. Not waterlogged or soggy like in some recipes. There are only a few easy steps that anyone can follow.
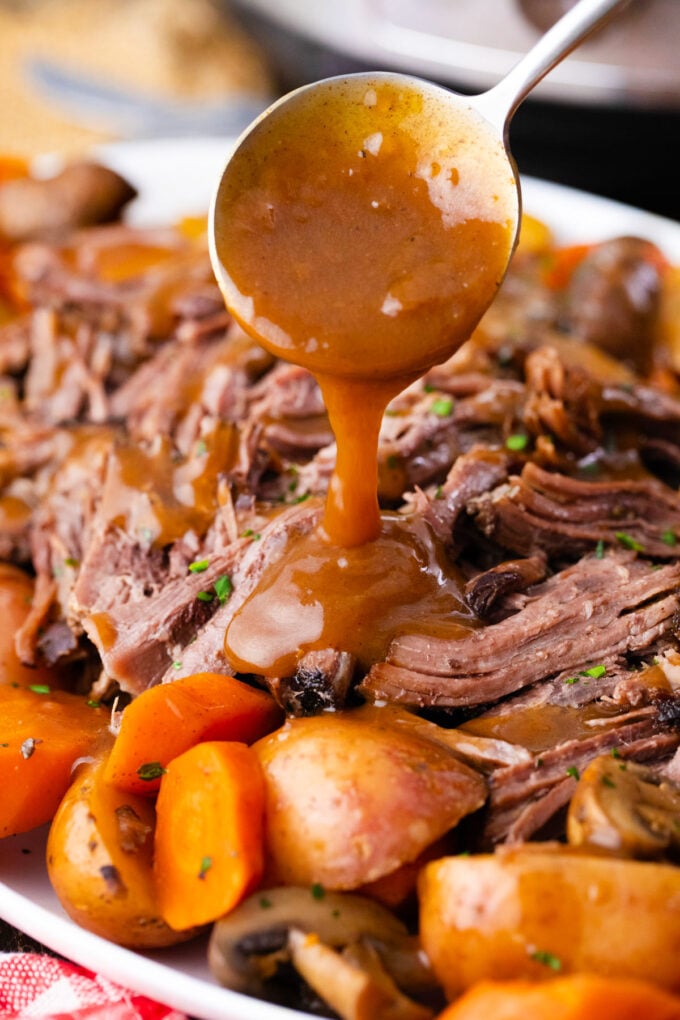
- My special blend of herbs: With my special blend of herbs and spices, the broth turns into a gravy that should be bottled, bringing out the flavors of the meat and other ingredients. I hate to toot my own horn, but I really love this sauce.
- It serves eight or more: With plenty of leftovers in my house, we can have seconds or save some for later. I love having sandwiches or making a second plate for lunch the next day.
- Meal-prep: This is the ideal meal to make in a day or two in advance, as the flavors get to meld and the beef will taste even better. Also, the leftovers refrigerate well and can even be frozen.
What you will need
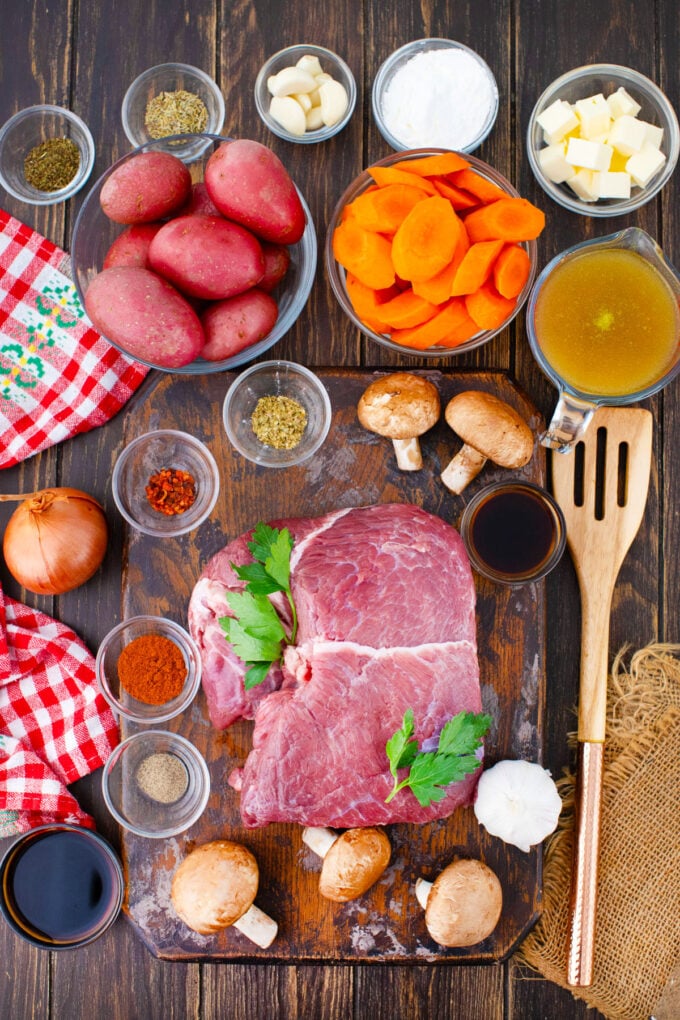
- Chuck roast: A chuck roast is the best cut of meat for this recipe. The collagen melts, making it juicy, flavorful, and so tender after being cooked in a pressure cooker.
- Aromatics and herbs: The usual onion and garlic, I never skip these. Thyme to add complex notes of mint, wood, and pepper with hints of lemon and earth. Piney rosemary, bold and pungent oregano, and smoked paprika.
- Liquids: The best red wines for cooking are those with low to medium tannins. I never use expensive wine because I consider it a waste. But cheap wine can ruin a whole meal. Get something you would like to drink. I like Cabernet Sauvignon or Pinot Noir. I also add low-sodium beef broth or stock to prevent the gravy from getting too salty, along with soy sauce and Worcestershire sauce for their umami flavor.
- Veggies:
- Butter: This is my secret ingredient that adds the silky and smooth rich flavor that makes my sauce and my beef taste so incredible. I believe it makes a big difference.
- Basics: Salt, pepper, vegetable oil, and water.
- Thickener: I make a slurry of cornstarch and water to thicken the gravy.
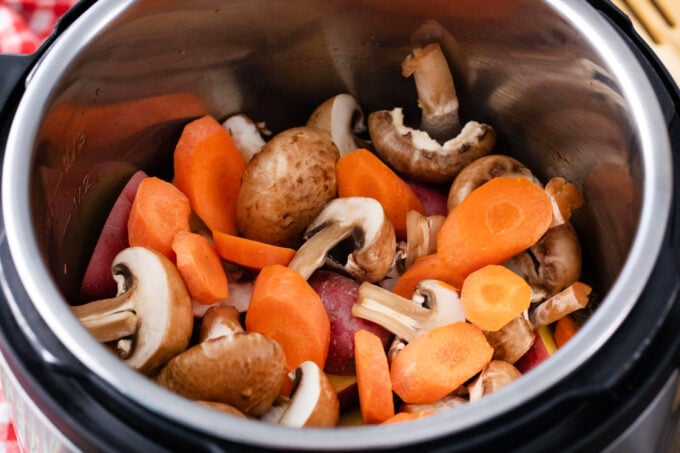
- For the veggies: I use whole baby red potatoes because they hold their shape better and taste so buttery and tender. Other waxy potatoes, cut in half, will also work. Baby Bella mushrooms cut into thick slices or even whole if they are small enough. Their meaty taste is perfect for this dish. Plus, I cut three large carrots into one-inch chunks, but baby carrots will also work.
How to make
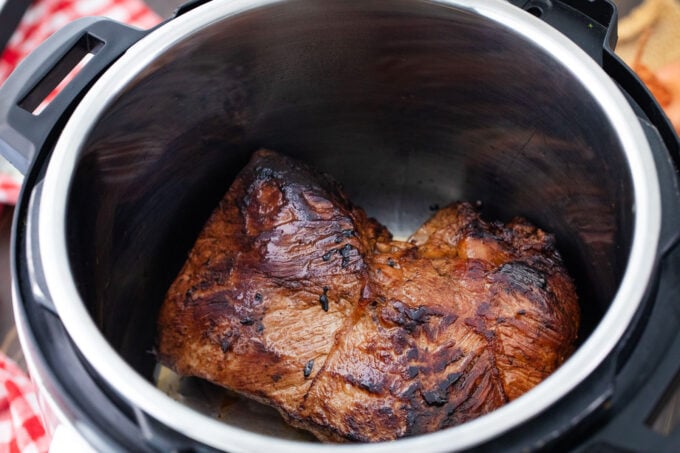
Brown the beef: First, I set the pot to saute. When it reads “hot,” I add the oil and wait for it to heat up. Once it is hot, I brown it on each side before removing it to deglaze the pot.
Cook the meat: Next, I turn off the sauté mode, return the beef to the pot, add the remaining ingredients, except veggies, and seal the pot. If the meat is up to two inches thick, I cook it for 75 minutes. Mine was four inches thick, and I cooked it for 100 minutes. It came out perfectly. Once it beeps, I let it do a 15-minute natural pressure release.
Strain the juice: Afterward, I release the pressure manually and check to see if the meat is tender enough. If not, I cook it for another 15 to 20 minutes with a 15-minute natural pressure release. The meat then goes into a large serving dish. I strain the liquid through a fine mesh sieve, adding one cup to the meat and the rest to the pot.
Cook the vegetables: Next, I add the vegetables to the pot with the liquid. If the potatoes are cut in half, I cook them for four minutes. If they are whole, I cook them for six minutes. Either way, they get a quick release afterward. I use a spider strainer to put the veggies into the dish with the meat.
Thicken the gravy: Next, I set the pot to sauté and let it heat up. While I wait, I mix the cornstarch slurry until the cornstarch dissolves. When the pot is hot, I add the mixture and stir. After it simmers for two minutes, I turn it off and serve it with the meat and vegetables.
Expert tips
Cooking the vegetables separately
Because the Instant Pot cooks things so quickly and under so much pressure, vegetables can become soft and soggy if left to cook for an extended period. If they are put in with the meat when you first start the cooking process, they will end up mushy. That is why I ask that the vegetables be cooked separately after the roast is finished cooking. Then, once the vegetables are finished cooking, they can be removed from the liquid, and the gravy can be thickened. Of course, the vegetables could also be cooked separately in a different pot or the microwave. However, I like them to be soaked in the rich flavors from the distinct blend of my special sauce and herbs.
Choosing the best cut of beef for pot roast
Chuck roast is the most commonly used cut of beef in pot roast recipes. You want to go with marbled chuck roast, which is widely available at most grocery stores. This results in a super tender and flavorful meal. You can also go with other cuts, such as chuck eye, blade roast, shoulder roast, shoulder steak, arm steak, arm roast, cross-rib roast, or seven-bone roast. In addition, brisket will be an excellent option for this recipe.
More tips to consider:
- Be sure to deglaze the pot well so the burn notice does not shut it down.
- Other reasons the burn notice may come on are if the silicone ring is dirty, damaged, or not in place. It could also be a problem if the steam release switch is stuck open or the pot does not have enough liquid.
- Always use low-sodium broth and soy sauce, or the roast will end up salty.
- Having a damaged or dirty gasket, a sticky float valve, or a sealing ring out of position can cause the pot to release pressure while cooking.
- The best cuts of meat for a pot roast are chuck roast, brisket, bottom round, or top round.
- Be sure that the meat is cooked long enough by poking it with a fork. If not, let it cook for another 15 minutes.
Recipe variations and add-ins:
- Bacon ranch roast: The kids like it when I leave out the wine and add some of my ranch seasoning and bacon bits for bacon ranch roast.
- Pork roast: I love this with pork as well, and the cooking time is the same as long as the thickness of the meat is the same.
- Other vegetables: Add or replace the veggies with others like zucchini, green beans, asparagus, and corn.
- Cajun roast: Make this a spicy roast by adding some of my Cajun seasoning to the pot.
- Make it Asian: To give this a more Asian taste, add a quarter cup of teriyaki sauce and use rice wine instead of red wine.
- Slow Cooker: First, brown the beef on all sides and add it to the slow cooker. Next, add the rest of the ingredients. Then, cover and cook on low for 8 hours or on high for about 5 hours. You can find my other popular slow cooker beef roasts here: Slow Cooker Pot Roast and also this incredibly delicious Slow Cooker Yankee Pot Roast.
Serving suggestions:
Instant Pot Pot Roast is a delicious and crowd-pleasing option for when you have company, but also doubles for a weeknight family dinner. Always let the meat rest for 10-15 minutes before slicing it or shredding it. I like to serve this roast with my homemade breadsticks so my family can soak up the delicious gravy. One side dish I like to serve with this pot roast is fluffy rice or mashed potatoes, which I sometimes top with my gravy and meat.
It also goes great with a large salad. I make it easy with just some spinach, tomatoes, and cucumbers, or if we have company, I like to fix this pear salad or this broccoli salad. My favorite wine to enjoy with this instant pot roast is Chianti because of its hints of cherry and spice. Speaking of cherry, I serve my no-churn cherry ice cream with this for a light, refreshing dessert. Or if it’s a special occasion, I make this white chocolate cheesecake.
How to store leftovers
- Cool: First, make sure the dish is completely cooled.
- Refrigerate: Then, store the shredded roast in a large airtight container in the fridge. Make sure that the gravy liquid covers at least partially the shredded beef so that it won’t dry out. Store for up to 3-4 days.
- Freeze: First, ensure the leftovers are at room temperature or have been chilled in the fridge. After that, add the meat with the gravy to a freezer-safe airtight container or freezer bag and freeze for up to 3 months.
- Thaw: Plan to transfer the frozen roast from the freezer to the fridge to thaw overnight.
- Reheat: Reheat in a preheated oven at 350 degrees F for 15 to 20 minutes in a pan covered with foil.

Frequently Asked Questions
The cooking time will vary based on meat size and whether it is thawed or frozen. For a fresh or thawed 2-2.5-pound roast, the cooking time will be about 45-55 minutes on HIGH. Now, for a fresh or thawed 4-5 pound roast, the cooking time will be about 75-85 minutes on HIGH. For the same-sized frozen roast, you’ll have to add about 20-30 minutes to the cooking time. However, check on the meat and see if it’s tender and shreddable; if not, pressure cook for longer.
First of all, make sure you deglaze the pot well after browning the beef. If there are any browned bits stuck to the bottom of the pot, the burn notice will come on, and it will keep shutting off. If there is insufficient liquid in the pot or if the liquid burns away, the burn notice will be triggered. Other possible reasons include the silicone ring being dirty, damaged, or not in place, or the steam release switch being stuck open.
I mentioned in my ingredients two essential things. The beef broth and the soy sauce should both be low in sodium. If either one of them (or both) is not low-sodium, the liquid will become too salty, and everything in it will taste salty, regardless of the amount of salt added. Taste both of these ingredients and see for yourself. They are very salty.
It may be undercooked. If it is still firm when poking with a fork, let it cook for another 15 minutes. Then, let it have another 15-minute natural pressure release before releasing the rest of the pressure. Another reason could be that the wrong cut of meat was chosen. The best ones are chuck roast, brisket, bottom, or top round. Do not get a lean cut. Also, make sure there is enough liquid in the pot.
Browning will lock in all the fantastic flavors and will give the beef that delicious, caramelized top on the outside, which reveals a juicy and tender inside. Also, I highly recommend cutting the chuck roast in half to fit it in the pressure cooker. Be sure to brown it well for a few minutes on each side without moving the beef.

More popular Instant Pot recipes:


Loved this recipe? I’d love to hear from you! 💛 Leave a 5-star rating ⭐️ in the recipe card below and share your thoughts in the comments – I read and appreciate every single one!
Let’s stay connected! Follow me on Facebook, Instagram, Pinterest, and YouTube for more delicious, sweet and savory recipes. Have a question? Ask in the comments, and I’ll be happy to help! 😊 with love Catalina!

Homemade Instant Pot Pot Roast
Ingredients
For the Beef:
- 4-5 lbs chuck roast if needed cut into 2 pieces that would fit in the pot
- 3 tablespoons vegetable oil or canola oil
- 1/2 cup water
- 1 small onion quartered
- 8 cloves garlic crushed
- 1 teaspoon thyme
- 1 teaspoon rosemary
- 1 teaspoon oregano
- 1 teaspoon paprika
- 1/4 teaspoon ground black pepper
- 1/4 teaspoon red pepper flakes
- 1 cup red wine use water or broth if you want to avoid alcohol
- 1 cup beef broth low sodium
- 1/4 cup soy sauce
- 2 tablespoons Worcestershire sauce
- 4 tablespoons butter unsalted
For the Veggies:
- 1 lb mini red potatoes whole or cut in half, I prefer whole as they keep their shape better
- 8 oz baby Bella mushrooms whole or halved
- 3 large carrots cut into 1-inch chunks
Cornstarch Slurry:
- 1/4 cup cornstarch
- 1/3 cup water
Instructions
Brown the Beef:
- Set Instant Pot to Sauté. When it reads "Hot", add the three tablespoons of canola oil and wait for the oil to heat up.
- If needed, cut the beef into two and brown it in batches, so it fits in the pot. Cook each piece on EACH side for a full 5 minutes without turning, until it's nicely golden brown.
- If needed, add a bit more oil to the pot when searing the rest of the pieces.
- Remove the browned beef to a plate and cover with foil to keep warm.
- Once all the beef has been browned and set aside, it's time to deglaze the pot.
- Add 1/2 cup of water to the pot. Using a wooden spoon, scrape the bits stuck to the bottom and sides of the pot until it is clear.
- Turn off the sauté mode.
Cooking the Pot Roast:
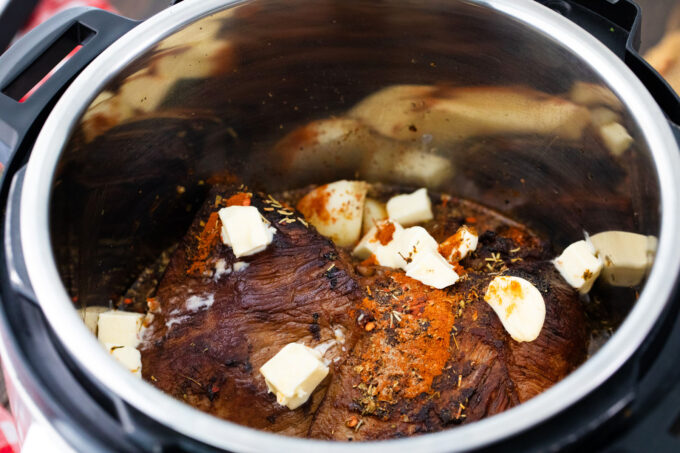
- Add the beef back to the pot.
- Add the remaining ingredients, starting with the onion and finishing with the butter.
- Close the lid and seal the valve.
- If you have a pot roast cut into pieces no thicker than 2 inches, cook it for 75 minutes on High Pressure. For pieces thicker than 2 inches—such as a roast that is 4 inches thick at the center—cook for 100 minutes.
- After the Instant Pot beeps, allow for a 15-minute natural pressure release, then manually release any remaining pressure.
- Open the lid and check if the beef is tender enough to shred. If it's not, cook for another 15-20 minutes on HP with a 15 min NPR.
- Remove beef from the pot and add it to a large serving deep dish.
- Place a fine mesh over a mixing bowl and sieve the cooking liquid from the pot. Add one cup of liquid to the beef and return the rest to the pot.
- Shred the beef and cover it with aluminum foil. Place a towel on top to keep it warm.
Veggies:
- After you added the sieved cooking liquid to the pot, add the prepared veggies to it.
- If you cut the potatoes in half, cook on HP for 4 minutes, followed by a Quick Release. If you used whole mini potatoes, cook on HP for 6 minutes, followed by a Quick Release.
- Open the lid, and using a spider strainer, transfer the vegetables from the pot to the dish with the beef. Arrange the vegetables around the sides of the beef.
Make Gravy:
- Select Sauté and wait for it to read Hot.
- If you want thicker gravy, mix cornstarch with water in a small bowl until fully combined and the cornstarch is dissolved.
- Add the mixture to the pot and gently stir. Let it simmer for 2-3 minutes. The sauce will thicken more as it cools off as well.
- Transfer the gravy to a gravy boat.
Serve:
- Drizzle the gravy over the shredded beef and garnish it with freshly chopped parsley.
- Serve and enjoy!
Video
Notes
Cooking the vegetables separately
Because the Instant Pot cooks things so quickly and under so much pressure, vegetables can become soft and soggy if left to cook for an extended period. If they are put in with the meat when you first start the cooking process, they will end up mushy. That is why I ask that the vegetables be cooked separately after the roast is finished cooking. Then, once the vegetables are finished cooking, they can be removed from the liquid, and the gravy can be thickened. Of course, the vegetables could also be cooked separately in a different pot or the microwave. However, I like them to be soaked in the rich flavors from the distinct blend of my special sauce and herbs.Choosing the best cut of beef for pot roast
Chuck roast is the most commonly used cut of beef in pot roast recipes. You want to go with marbled chuck roast, which is widely available at most grocery stores. This results in a super tender and flavorful meal. You can also go with other cuts, such as chuck eye, blade roast, shoulder roast, shoulder steak, arm steak, arm roast, cross-rib roast, or seven-bone roast. In addition, brisket will be an excellent option for this recipe.More tips to consider:
- Be sure to deglaze the pot well so the burn notice does not shut it down.
- Other reasons the burn notice may come on are if the silicone ring is dirty, damaged, or not in place. It could also be a problem if the steam release switch is stuck open or the pot does not have enough liquid.
- Always use low-sodium broth and soy sauce, or the roast will end up salty.
- Having a damaged or dirty gasket, a sticky float valve, or a sealing ring out of position can cause the pot to release pressure while cooking.
- The best cuts of meat for a pot roast are chuck roast, brisket, bottom round, or top round.
- Be sure that the meat is cooked long enough by poking it with a fork. If not, let it cook for another 15 minutes.
You had me at NO MUSHY VEGGIES. I always end up with mushy veggies when I cook a roast. I’ll have to try this recipe as I love cooking in my Instant Pot
Yes, I dislike those too! You will love the recipe!
A roast is my favorite thing to make in the IP. It’s just so easy!! Your gravy looks so good.
The gravy was perfect!
I was just given one of these things. Haven’t used it yet. Might give your pot roast a go
OMG start using it, you will love it!
That meat looked so moist and tender and the instant pot is a great way to cook it. I will keep this recipe for all the meat lovers in my family.
The meat is amazing!
I have never tried an INSTA-POT. I just have 4 air fryers LOL! So I really have no space for one! LOL! BUT THIS LOOK BOMB!
wow I need to get an air fryer too!
Yum, I just love pot roast. I’ve never made it in the Instant Pot before. I should! Normally I just use the crock pot.
The Instant Pot cooks it so much quicker!
This recipe looks like the prefect comfort food for the cold weather we’re having. Looking forward to making this recipe for my family.
Its a family favorite around here!
Wow, that looks amazing! I’m saving this recipe for later. I love pot roast, but I’ve never had it in the instant pot before. I can’t wait to try it out.
This looks so good. I have been craving a good pot roast lately.
This is very similar to my Nana’s pot roast. The only difference is, she takes the juice and some of the carrots and blends them to make a gravy.
That dish looks so hearty and delicious! I’ve just realized I hate pork roasts. It’s too gamy and chewy and dry for me. But a nice beef pot roast is delicious and the meat just falls apart. This looks devine!
I don’t have an IP, but I have friends who love theirs! I will definitely have to share this with them – I bet they will love it!
Wow! What a delicious-looking pot roast. Just looking at your gorgeous images I can almost smell the tasty goodness. This recipe deserves five stars!
Is it bad that I have an Instant Pot but have never used it?? I need to try this roast recipe ASAP!!
Wow and another wow for this recipe. It looks so delicious and I can honestly tell you that upon seeing this it makes me feel so hungry! I wanna try this!
Oh yum! This pot roast recipe makes my mouth water. I’m looking forward to finally getting an instant pot this year. Can’t wait!
I have been wanting a good pot roast in forever. What a great way to put the instapot to work this fall!
This pot roast looks not only delicious but also juicy . I like instant pot help to make delicious dishes without my efforts.
Oh my gosh! I have been toying with the idea of getting an InstaPot for a long time now, but that picture of your pot roast just pushed me off the fence. This looks fantastic!
Instant pot newbie here! ? I just wanted to let you know that this recipe was the one we chose for our instant pot maiden voyage, and we were not disappointed! It was absolutely delicious! Fall apart meat and tender vegetables! This is definitely going to be a staple at our house ?? Thanks for sharing!
I can make a roast in the oven in less time. I am new to the insta pot, so wondering the advantage on this? I thought it was to make things faster..?
How do you make it so tender in less time in the oven, I am truly intrigued?
If I am using a smaller chuck roast for only two people… like 2-2.5lbs could I just half the recipe? Would I need to make any alterations to the cooking time for the roast? It looks so delicious!
I would do 60 minutes, once done check if its tender and if needed cook more.
For cooking a roast in the instant pot will a meat thermometer survive the pressure cooking cycle.
Thanks !!
oh I would NOT do that!!!!
I made this recipe tonight for dinner and it came out FANTASTIC! I couldn’t believe that after all of these years slow cooking for 8 hours I could Instant Pot cook Pot Roast to have it ready in an hour and a half!
I did everything that this recipe called for, but decided to throw all of my veggies (carrots, whole red + yellow baby potatoes, and onions) in together. They came out perfect – probably because I threw them on top and around the roast!
I did also put a cup of red wine in as well which helped enhance the flavor. All in all – AMAZING recipe!! I will definitely be doing this again and may say goodbye to my slow cooker for an easier and quicker delicious roast recipe! Thank you!
I’m an InstantPot newbie, going to make this tomorrow night. Should I use the rack?
you don’t need the rack 🙂
Thank you!
Awesome Recipe Thank you
Turned out Devine!! TWICE!! ?
I used my instant pot today for the first time and made you roast. It is so yummy and juicy! I think that will become a family favorite. Love it!
Hi and thank you visiting! Yes, this is one delicious dish, and making it in the pressure cooker is surely amazing! Glad you have enjoyed it. We have plenty more IP recipes if you want to take a look and give them a try.
Made to take to my father-in-law. He LOVED it!! The meat was tender, the veggies were delicious, and even though I was hesitant to use mushrooms, they added a wonderful flavor. This recipe is a keeper!
Family loved this recipe.
I just made this ,it was great. In sautéing the meat, the oil was splattering all over the place, was I doing something wrong or is there some kind of splattering lid I can put over the top to prevent oil spatter but still be able to vent?
What if I have a 2 lb roast, how long should I cook it for? I am notorious for overcooking meat and really want this to turn out well!
35-40 minutes should be enough time.
I just made this recipe! It was delicious! The gravy was really good. I agree about mushy veggies! I cooked the veggies for 15 minutes and even that was too long. I would salt and pepper the meat before searing. Thank you for a “keeper”!
Hands down the BEST pot roast I’ve EVER made. This will be a regular recipe for us!
Made this for dinner and it was a hit!! Great directions. Thank you!!
Glad you loved it Cindi. Thanks for your feedback!
I made this last night and it turned out really well! The only changes I made or would suggest are: A) don’t use a roast that has a lot of fat. I did this by accident (the fat was on the inside – yuck), and it made everything greasier than I wanted. B) I cut the potatoes and celery and carrots into 1 1/2” pieces and 4 minutes cooking with quick release made them mush! Next time if the pot and liquid is hot I will only cook for 2 minutes with quick release.
Thank you! Made this for our Christmas Eve dinner. Turned out AMAZING! The extra step of cooking the potatoes and carrots separately is worth it and really is not a big deal as far as time goes, but it is a big deal in terms of taste and non mushy veggies!! Yay! So glad I found this recipe. Thank you for sharing!!! Anxious to try more of your recipes.
Thank you Ann for your review. Happy you love it. Please try our other recipes. Also, we have a ton of pressure cooker recipes you can pick from. Thanks!
How much cook time for a 3.5 pound roast?
For about 70 minutes.
Beef was super tender however was a little dry as it was 4” thick, so I put it on for 100 mins which was too long and dried out the meat a little. Gravy made up for it. I think starting on 75 mins would have been perfect. Best beef roast I’ve done so far just those minor tweaks.
Best roast I have ever made love this recipe my go to from now on thanks
Glad you loved it Jeannie!
I NEVER leave reviews for recipes, but for this one, I had to. It is the absolute best Instant Pot pot roast recipe I have found. The flavor is incredible, the cook time is perfect (no mushy veggies guaranteed), and don’t even get me started on the gravy! This will forever be my go-to roast recipe!
Thank you! Appreciate your review, and happy you loved this recipe!
Delish! Was so suprised at how it turned out. The gravy made the beef a star!
I have made this several times and it always turns out perfect! I keep buying bigger and bigger roasts in hopes of having left overs to use in a beef pot pie but we NEVER have any. My family begs me to make this often
Hi Mandy! That is funny) Happy you love this recipe!
This is a DELICIOUS recipe! Definitely worth the trouble/time to sear the meat 5 minutes on EACH side. I’ve made it twice and the first time I didn’t follow that very diligently. The second time. Oh my gosh; SO tender, moist & delicious!
Thanks for the post!
Glad you loved it Laurie! Thanks for the review!
Thank you for such a well write and very tasty recipe. We shall eat well tonight. I agree with others that cooking the veggies separately from the roast is the way to go.
I’ve made this twice. Perfect both times. Thank you.
I am so happy! Thank you for the feedback!
I would like to substitute the potatoes with sweet potatoes, would the time be the same?
hi, yes, the same time.
Made this tonight in my 8 qt Instant Pot. Followed the recipe exactly and it turned out fantastic! My 1st Pot Roast in the IP. Will not make a pot roast any other way!
One way to not have mushy veggies is wrap them in aluminum foil and lay on top of the roast. Works everytime for me and I don’t have to make them separate.
We love this recipe! I made it 3 times now and it’s one of our favorites, so easy and delicious. My hubby says that I may only make him pot roast from now on. Thanks so much for your recipe!
Mercer Lynda
https://www.kitchenfolks.com
I am so happy that you like it!
Thanks for your great reply.
I made this for the first time today based on the ratings. The texture of the beef and vegetables turned out great according to the instructions provided. My husband said that it was too salty and tangy for his taste. If I do make it again, I will cut the garlic in half, cut the Worcestershire Sauce in half, and cut the soy sauce in half to reduce the overpowering salty and tangy flavor.
This is a go to for pot roast –
Love lots of wine, garlic veg etc
The juice that turns into gravy is always super flavorful.
perfect! I made no appreciable changes (no mushrooms. didn’t have corn starch so used flour and water. eye-balled the spices to my taste). I was worried that it would be too salty (I maybe didn’t use as much soy sauce as was called for but added a bit of salt) but not at all. Delicious!
Excellent tip… I’ll try for future recipes!
I made this yesterday using a 3 lb. Veal Roast, did heavy dry rub before searing, decreased cook time to 65 minutes due to weight and fact it was veal which takes less time, increased vegetable cook time to 9 minutes because potatoes were a tad bigger and carrots in NZ are super hard… I also added back some of the onions/garlic to the gravy and immersion blended before adding the corn starch slurry… It turned out PERFECT and my hubby loved it! Really appreciate this recipe as it has many variation ideas and cooking method options! Printed the recipe and it’s going into my custom recipe book! Wish I could post a photo…haha, just sayin’!
thank you for the feedback
I made this last night and we loved it. You would never know it hadn’t been cooked for hours and hours.
Absolute perfection. Even with the added 30 minutes using the separate veggie method, it’s still so much faster than baking or slow cooking!
I actually never really minded the veggies being so soft, but now that I tried your recipe, I’ll never go back to cooking my pot roasts the other way!
I love this pot roast. It is easy to make, yet it’s full of some incredible flavors!
This recipe really stands out for the amount of tips you are sharing. Five stars for sure!
I can’t describe how awesome the flavor turned out. Thank you for sharing all the bits and pieces – they really helped get to that point!
This Instant Pot Roast was so delicious and easy to make. The familly loved it. I can’t wait to make it again!!