
Godiva Chocolate Cheesecake Recipe
Anytime I want to impress my guest with a magical dessert that looks like it came from a high-end bakery, I make this mouthwatering Godiva Chocolate Cheesecake. This luxurious treat, while it looks fancy and tastes fantastic, requires minimal effort, and anyone can easily make it at home! No complicated steps or ingredients, blend into a delicious combination of a chocolate crust, chocolate cheesecake filling, and a layer of chocolate ganache.

I am a Cheesecake Factory fan; hence, I have recreated many of their popular dishes, such as the famous Cheesecake Factory Original Cheesecake Copycat and the Banana Cream Cheesecake. You will see that once you try making cheesecakes and see how easily they come together, you will also become hooked. In that case, when you don’t want to heat your house, I also have a No-Bake Biscoff Cheesecake recipe.
Table of contents
Godiva Chocolate is a renowned brand of Belgian chocolate, founded in 1926 in Brussels, Belgium. It was named after Lady Godiva, obviously, and had its first shop outside Brussels in Paris in 1958. If you have had the double chocolate cheesecake at Cheesecake Factory, you will recognize this dessert because they are basically the same thing.
This is my go-to dessert when I want to wow my guests; it’s also ideal for being made in advance. I usually make the cheesecake a day or two in advance and garnish it with whipped cream and berries before serving. You can taste the premium chocolate in every single bite, delivering a rich and decadent flavor. This dessert is what I call elegance on a plate!

Why you will love this recipe
- I use only pure and fresh ingredients: In my recipes, I do not use extra sugars or additives. Just the purest ingredients and fresh items are all that is needed to make this cake taste perfect.
- The triple chocolate layers make it extra flavorful: The chocolate crumble crust provides a crunchy base for the creamy Godiva chocolate cream cheese filling, and the chocolate ganache topping triples the goodness to make it lavishly sinful. It does not get any better than that.
- There is no need for a water bath: I do not worry about cracks in the cheesecake because it is covered with chocolate ganache after it cooks, so a water bath is not necessary. But if you want to use one, that is fine too.
- It is much less expensive to make: Save over $100 by making this cheesecake at home. The Cheesecake Factory near my home charges $10 per slice, but my recipe yields 12 slices.
What you will need
- Crust: I use a mixture of chocolate wafer cookies, unsalted butter, and granulated sugar. I wanted the cheesecake to be extra chocolaty, that’s why I opted for chocolate cookies.
- Cheesecake: I used standard ingredients, including sugar, cream cheese, eggs, vanilla extract, and a pinch of salt. Additionally, I added melted Godiva dark chocolate bars and a hint of freshly brewed coffee to enhance the chocolate flavor.
- Ganache: Here, I also used Godiva dark chocolate and heavy cream to make a more decadent and thicker ganache.
- Whipped cream: For the whipped cream, the heavy cream must be freezing to trap air bubbles and create a stable structure. If the cream is too warm, the fat melts, and the air escapes, resulting in whipped cream that doesn’t reach the desired volume and texture. I also added sugar and pure vanilla extract.
How to make
Preheat the oven: First, I preheat the oven to 325 degrees F and grease the bottom and sides of a springform pan.
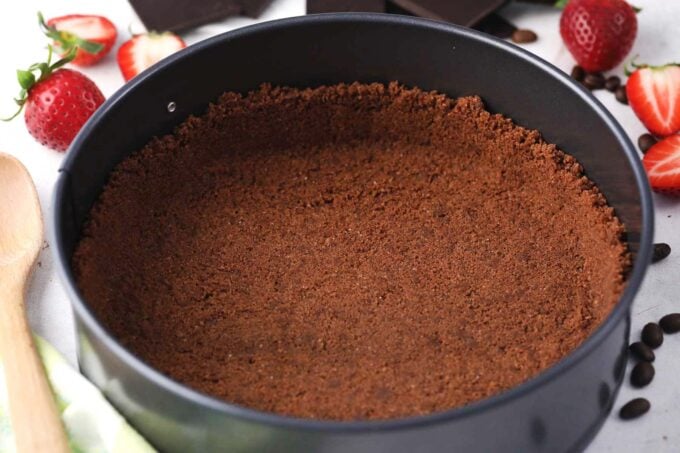
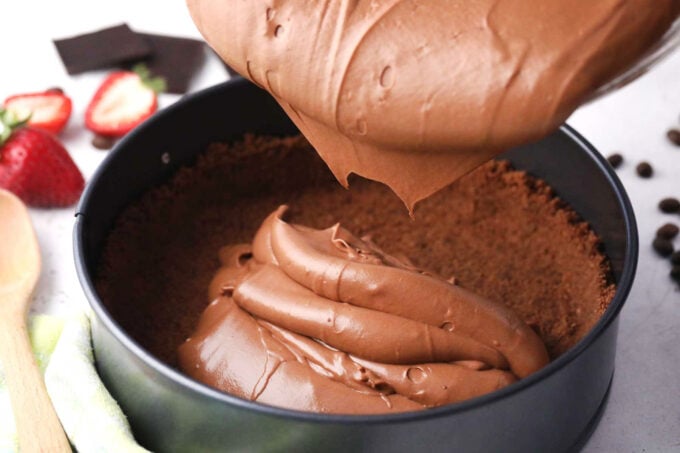
Make the crust: In a large bowl, I mix the crust ingredients. After, I press the mixture into the bottom of a 10-inch springform pan. It goes into the fridge to chill while I make the cheesecake batter.
Melt the chocolate: Next, I melt the chocolate in the microwave for one minute before stirring. I continue to melt the chocolate in 30-second increments, stirring every time, until it is smooth. Then, I let it cool for several minutes.
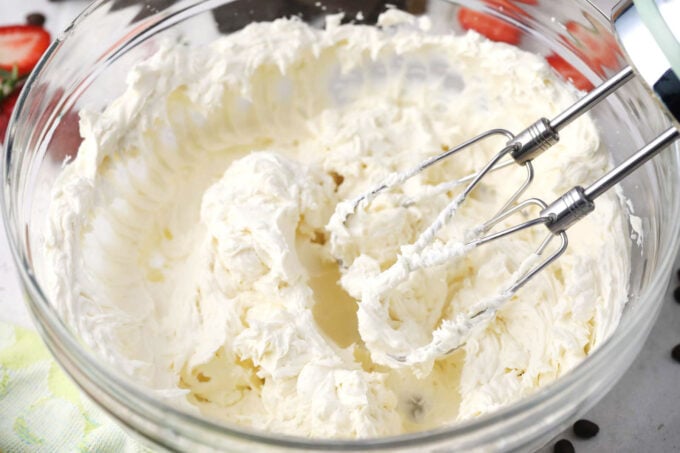
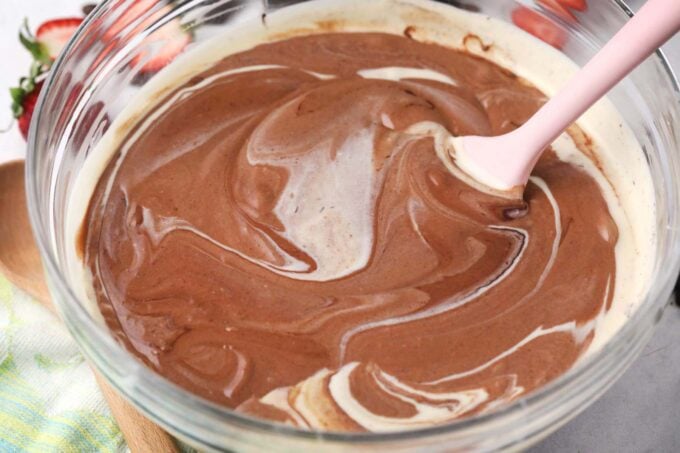
Start the batter: While I wait, I put the cream cheese in my stand mixer and beat it on low speed until it is smooth, for about three minutes. Then, I add the sugar and beat it for another one or two minutes until it is well combined.
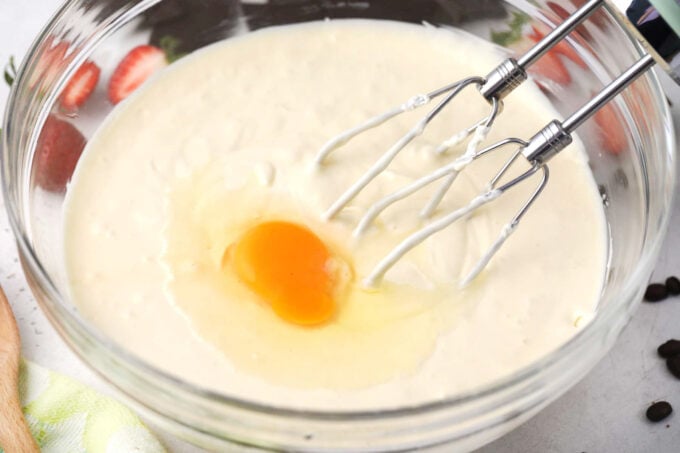
Add the eggs: The eggs are added one at a time, beating after each addition.
Finish the batter: Now, I slowly add the coffee mixture and the vanilla extract, beating on low speed until the ingredients are well combined. The chocolate gets mixed in next.
Bake the cake: Then, I pour the batter over the chilled crust and bake it for 55 to 60 minutes or until the edges are puffed but the middle is still slightly jiggly. After, I put the cheesecake on a wire rack to cool completely.
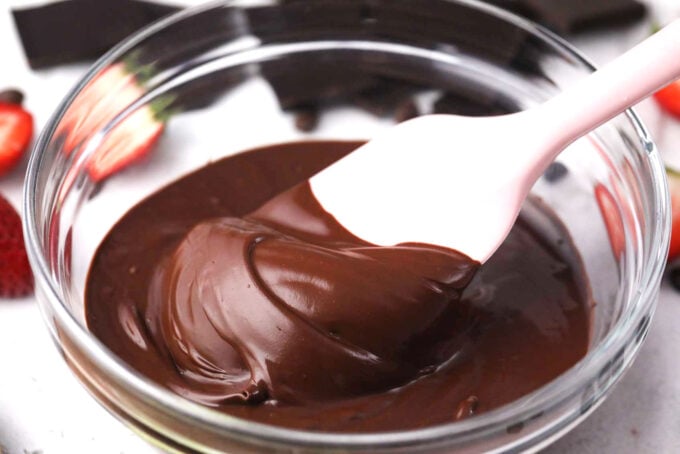
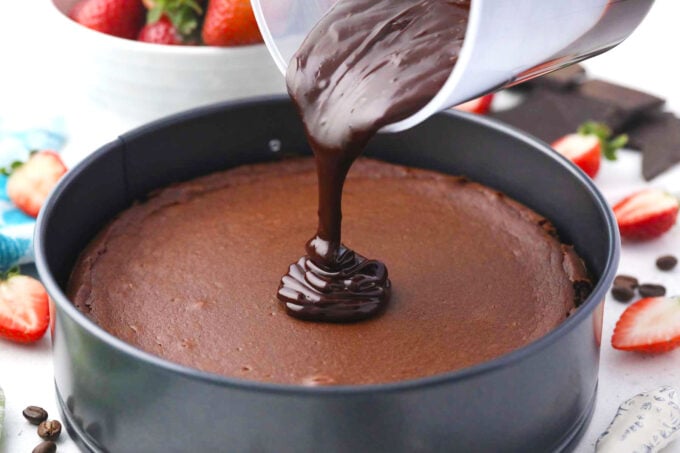
Ganache: I put half of the chocolate into a bowl. The heavy cream is heated in a saucepan over medium-high heat until it comes to a boil. Then, I pour the cream over the chocolate and stir until the chocolate is melted. I add the rest of the chocolate then and stir until it melts as well. After letting it cool until it is thick but still pourable, I pour it on the cheesecake and spread it to the edges carefully. Finally, it is placed in the fridge to chill for six to eight hours.
Whipped cream: Before making the whipped cream, I chill a large metal bowl and mixer beaters for 20 minutes. Then, I add the cold cream and beat it with the mixer on low, gradually increasing the speed to medium. Gradually adding the vanilla and sugar, I beat for two to four minutes, just until stiff peaks form.
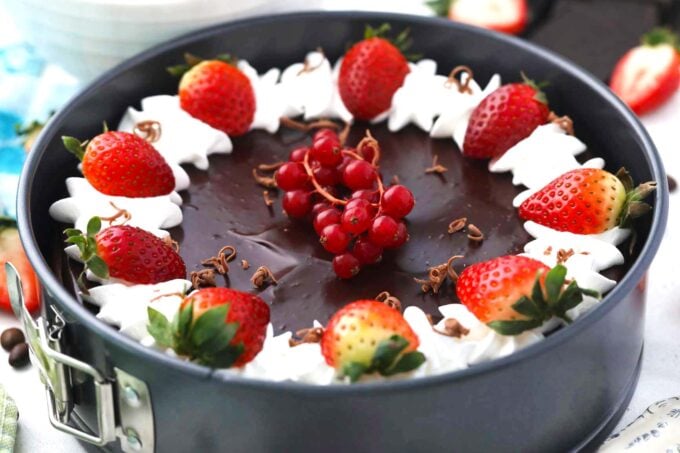
Garnish and serve: Finally, I serve it with whipped cream, berries, and shaved chocolate.
Expert tip
Using a water bath
Because this Godiva chocolate cheesecake is topped with chocolate ganache after it is cooked and cooled, it does not require a water bath. That is because I am not worried about cracks. Even if there are cracks in the cake, the chocolate will cover them up. Therefore, a water bath is undoubtedly an option to prevent dryness, cracks, and deflation.
It can also help prevent the cake from becoming grainy. Wrap the outside of the springform pan in heavy-duty aluminum foil twice to prevent water from getting in. Then, place it into a roasting pan. After, fill the roasting pan with hot water until it is about halfway up the side of the cheesecake pan. Be sure that none of the water gets into the cheesecake pan when moving it. This can cause the cake to have a runny or watery consistency.
More tips to consider:
- No springform pan? Use a cake pan lined with parchment paper.
- Crush the cookies with a food processor or in a baggie with a rolling pin.
- To soften the cream cheese quickly, microwave it for 15 to 30 seconds. Remember to take the wrapper off first, though.
- Cool the melted butter before using it for the crust, as it will become greasy if not.
- Use the lowest speed possible when mixing the batter, as this will prevent too much air from being incorporated into it.
- Chill the bowl and beaters for 20 minutes in the freezer before beating the cream for the whipped cream to keep it cold.

Recipe variations and add-ins:
- Make it nutty: Sometimes, I like to top my Godiva chocolate cheesecake with nuts. Candied pecans are my favorite, but slivered almonds are great, too.
- Add fruit: Another delicious topping for this cheesecake is my sweet and tangy strawberry sauce.
- Milk chocolate: I also like to use milk chocolate instead of dark chocolate sometimes. If that’s too sweet, feel free to use unsweetened chocolate instead.
- Different cookies: Instead of chocolate wafers, use vanilla wafers, Oreos, shortbread, or graham crackers.
- Other flavors: For a more chocolatey flavor, add some chocolate chips or try a different variation with white chocolate, butterscotch, or peanut butter chips.
- Brownie base: Make this Godiva cheesecake triple chocolatey with a brownie base instead of a crust. First, prebake your favorite boxed brownie mix in the pan for 15 minutes or until it has set. Then, let it cool before adding the cheesecake batter on top.
Serving suggestions:
My Godiva chocolate cheesecake is the perfect luxurious dessert for holidays and celebrations; it complements this juicy slow-cooker turkey breast or slow-cooker red wine pot roast. To make it even more decadent, I serve it with a drizzle of homemade caramel sauce and a side of cherry ice cream.
But when I want to have an extra chocolatey drink with a kick of something special, I serve this cake with my Grown-up Bailey’s S’mores milkshakes. Around the holidays, I have the cheesecake with freshly made hot chocolate and any leftover pieces I use to dip in this chocolate fondue.
How to store leftovers:
- Refrigerate: Keep leftovers in an airtight container to prevent them from drying out. They will stay fresh in the fridge for up to four days.
- Freezing: To keep them longer, I like to cut mine into individual pieces, wrap them in plastic, place them in freezer bags, and freeze them for up to three months.
- Defrost: For optimal taste and texture, thaw overnight in the refrigerator.

Frequently asked questions
Using low-fat or fat-free cream cheese or cream is one of the most common mistakes people make, often causing a runny cheesecake. A cheesecake needs rich, thick, fatty ingredients to set properly. It may also happen when using whipped cream cheese because it contains too much air. Overmixing can also be a problem because it lets too much air into the batter.
Be sure to mix the ganache when the cream is still hot. If you wait until the cream is under 90 degrees F, it can become grainy. On the other hand, if it is too hot, it can also become grainy. That is why it is essential to stir in half of the chocolate first and then add the remaining chocolate. If it has become too cool, warm it up a bit. If it is too hot, add a bit more cool cream.
If a water bath was used, it is possible that some of the water may have leaked in and made the crust soggy. If not, maybe there was too much butter added. Low-fat cream cheese can also cause the crust to become soggy as it absorbs the excess moisture. If the crust is soggy, it is too late to fix it. Just plate the cheesecake as crustless pie and forget about it.
Ensure all ingredients are at room temperature but not warm. If they are warm, the cheesecake will not set. Additionally, avoid using low-fat ingredients or whipped cream cheese. Another thing is never to overmix the batter. Overmixing will add too much air, causing the batter to become too soft. Then, ensure the cake is completely baked before removing it from the oven. The edges should be puffy, and the center should be just slightly jiggly. Finally, be sure to let it chill for at least eight hours, but preferably overnight.

More cheesecake recipes to try:


Loved this recipe? I’d love to hear from you! 💛 Leave a 5-star rating ⭐️ in the recipe card below and share your thoughts in the comments – I read and appreciate every single one!
Let’s stay connected! Follow me on Facebook, Instagram, Pinterest, and YouTube for more delicious, sweet and savory recipes. Have a question? Ask in the comments, and I’ll be happy to help! 😊 with love Catalina!
Godiva Chocolate Cheesecake
Ingredients
Crust:
- 30 chocolate wafers finely crushed
- 1/4 cup unsalted butter melted
- 2 tablespoons granulated sugar
Cheesecake:
- 1 cup granulated sugar
- 1/4 cup hot brewed coffee plus 1/4 cup very hot water
- 1/4 teaspoon salt
- 14 ounces Godiva 72% dark chocolate bars divided
- 24 ounces cream cheese softened
- 4 large eggs room temperature
- 1/2 tablespoon vanilla extract
Ganache:
- 7 ounces Godiva dark chocolate finely chopped
- 1/3 cup heavy cream
Whipped cream:
- 1 1/4 cups heavy whipping cream cold
- 1 tablespoon granulated sugar
- 2 teaspoons vanilla extract
Instructions
Crust:
- Preheat the oven to 325°F.
- In a bowl, mix the crust ingredients until fully combined.
- Press the crust mixture firmly onto the bottom of a 9-inch or 10-inch springform pan. Chill the crust while you prepare the cheesecake batter.
Cheesecake:
- Stir the hot water and the salt into the coffee. Set aside.
- Chop the dark chocolate bars into small pieces and add them to a microwave-safe bowl. Microwave for 1 minute and stir. Microwave again in 30-second increments and stir after each one until the chocolate is smooth and melted. Cool for 5 minutes before using.
- Add the cream cheese to a large bowl and beat it with an electric mixer on low speed until it is softened and smooth, which takes about 3-4 minutes.
- Next, add the sugar and beat for 1-2 minutes or until well combined.
- Add in the eggs, one at a time, beating well after every addition.
- Gradually add the coffee mixture and the vanilla extract, beating on low speed until combined.
- Next, add the cooled melted chocolate and mix until fully combined.
- Pour the batter into the prepared pan over the crust.
- Bake for 55 to 65 minutes or until the cheesecake is puffed on the edges but still slightly jiggly in the middle.
- Let the cheesecake cool on a wire rack completely before topping it with chocolate ganache.
Ganache:
- Add half of the chocolate to a medium mixing bowl.
- Heat heavy cream on medium-high heat until it comes to a boil. Immediately pour the chocolate over the mixture and stir until it is completely melted.
- Add the remaining chocolate and stir until completely melted. If needed, microwave for only a few seconds.
- Cool until the ganache is thickened but still pourable.
- Add chocolate ganache on top of the cheesecake, spreading to the edges.
- Refrigerate until ready to serve.
Whipped cream:
- Chill in the fridge in a large metal bowl.
- Add the whipping cream and beat it with a mixer on low speed. Gradually increase the speed to medium while adding the sugar and vanilla. Beat until stiff peaks form, which takes about 2 to 4 minutes.
- Top the cheesecake with whipped cream roses, shaved chocolate, and fresh berries.
Notes
Using a water bath
Because this Godiva chocolate cheesecake is topped with chocolate ganache after it is cooked and cooled, it does not require a water bath. That is because I am not worried about cracks. Even if there are cracks in the cake, the chocolate will cover them up. Therefore, a water bath is undoubtedly an option to prevent dryness, cracks, and deflation. It can also help prevent the cake from becoming grainy. Wrap the outside of the springform pan in heavy-duty aluminum foil twice to prevent water from getting in. Then, place it into a roasting pan. After, fill the roasting pan with hot water until it is about halfway up the side of the cheesecake pan. Be sure that none of the water gets into the cheesecake pan when moving it. This can cause the cake to have a runny or watery consistency.More tips to consider:
- No springform pan? Use a cake pan lined with parchment paper.
- Crush the cookies with a food processor or in a baggie with a rolling pin.
- To soften the cream cheese quickly, microwave it for 15 to 30 seconds. Remember to take the wrapper off first, though.
- Cool the melted butter before using it for the crust, as it will become greasy if not.
- Use the lowest speed possible when mixing the batter, as this will prevent too much air from being incorporated into it.
- Chill the bowl and beaters for 20 minutes in the freezer before beating the cream for the whipped cream to keep it cold.
I am drooling! This cheesecake looks like my kind of dessert.
This has to be the most decadent cheesecake I have ever seen. I can’t wait to get this in my belly!
Godiva chocolate is the best. This is a cheesecake that I need to make.
You had me a cheesecake and then you had me even more at chocolate. I’m in heaven right now.
You had me at cheesecake. But add in the Godiva chocolate and I’ll be in heaven.
Looks totally irresistible! You had me on this!
It’s my birthday today and I WANT THIS!!! I need to find someone to make it for me!
I need to make this Godiva chocolate cheesecake immediately, this looks absolutely decadent!
I’m in chocolate heaven, I must make this for my birthday. thanks for sharing this with us
I love making cheesecake for my husband, and this recipe has been his favorite for years.
There’s something new about this recipe for me! I’m glad I found out about it! Thanks!
I really need to try this out! It looks really good! Thanks for sharing this recipe
My kids even my husband are surely gonna love this! Can’t wait to prepare this for them
My kids couldn’t stop eating this!! So good and delish!
This is an insanely good recipe dessert. Yum!
This looks so good! Can I use another chocolate if I don’t have Godiva? Will it change the flavor too much?
Oh wow, that’s one amazing cheesecake! I was pleasantly surprised with the outcome – too delicious!
Godiva is my favorite kind of chocolate. Perfect in this cheesecake. Delicious!
This chocolate cheesecake was so rich and incredible. I loved the depth of flavors and how easy it was to make.
This chocolate cheesecake recipe turned out so delicious! The entire family loved it…I can’t wait to make it again!!