
Best Instant Pot Cheesecake
Most people worry about cracks when they make a cheesecake. However, using an instant pot should eliminate this concern, delivering a crack-free, rich and indulgent cheesecake. This Instant Pot Cheesecake gets its mini water bath to keep it moist and creamy, resulting in a luscious, velvety dessert achieved with minimal effort.

I like a simple recipe that stands out while still delivering exceptional results. The instant pot’s consistent and uniform heat, plus the built-in humid environment, eliminate common pitfalls, resulting in a fool-proof recipe that even novice bakers can make. You may have noticed that I love cheesecakes because I have more than 30 recipes on my food blog. Many of them have been made in the instant pot, like this pina colada cheesecake and always a crowd-please the Oreo-loaded cheesecake.
Table of contents
When I first tried making cheesecakes in my pressure cooker, I was a bit skeptical, but to my delight, the results exceeded my expectations. Now, I am happy to use the Instant Pot and not heat the house or use the oven in the meantime to make a quick and delicious dinner, like this oven-baked Italian chicken, which is perfect before you have a rich and creamy dessert.
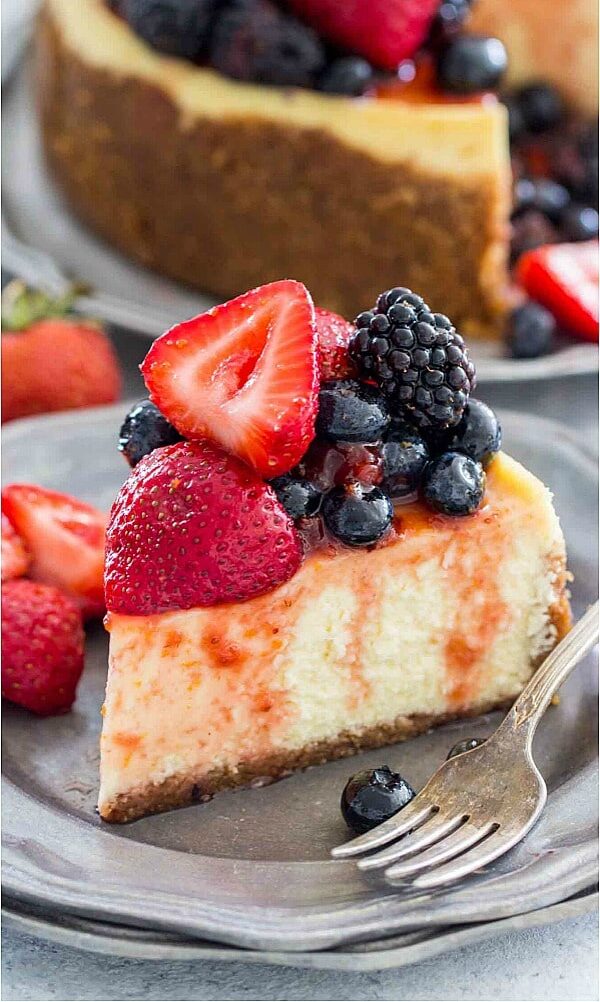
This Instant Pot Cheesecake, with a nutty and flavorful crust and a sweet berry topping, has become my go-to dessert for friend’s gatherings, church potlucks, or special occasions. I know I can rely on it, and the process is straightforward and stress-free. Whether topped with glossy, sweet berries coated in jam or enjoyed plain with just some whipped cream and a drizzle of chocolate, I know it will be a crowd-pleaser!

Why you will love this recipe
- It is easy to make. You don’t need many fancy tools and ingredients for this easy cake. You need the essential ingredients: a springform pan and an instant pot. Not heating the oven and making it available to make other things is a big convenience.
- Cooks in 30 minutes: Instead of waiting over an hour for the cake to cook, this one is done in half an hour, and you don’t have to pick to see if it’s ready.
- No long cooling process: You won’t have to remember to crack the oven door and let the cheesecake slowly cool, praying it doesn’t sink or crack. Transfer it from the Instant Pot to a wire rack before cooling it in the refrigerator.
- Never cracks: With the built-in water bath and constant temperature, there is no way you can crack this cake.
What you will need

- For the crust: I prefer to make my graham cracker crumbs from Honey Maid graham crackers, walnuts, dark brown sugar for a rich flavor, and a blend of cinnamon and nutmeg for a warm, sweet aroma.
- For the filling: I use regular cheesecake filling ingredients like full-fat cream cheese, sugar, eggs, and heavy cream. I add cornstarch to make it thicker, so you don’t have to worry about runny filling. I also add vanilla and almond extract for a sweet and refreshing flavor.
- For the berry topping: I prefer to heat my homemade strawberry jam and water, plus some lemon zest, to make it bright and fresh. Usually, I mix in a bunch of berries, such as strawberries, blackberries, and blueberries.
How to make
Prep: I start by bringing the ingredients to room temperature and covering the outside of the springform pan with foil to avoid leaks.
Crust: First, I combine the ground walnuts with the rest of the crust ingredients, mix well, and spread the mixture into the prepared pan. I chill the pan in the freezer while I work on the filling.

Chill: Using a small measuring cup or spoon, I press the crust into the bottom and half up the sides of the pan.

Whip: I beat the cream cheese until light and fluffy. Next, I mix in sugar and cornstarch until creamy, scraping the sides of the bowl as needed.

Continue to add: I beat in the eggs one at a time, followed by heavy cream, vanilla, and almond extract.

Combine: I transfer the batter to the prepared crust and cover the pan with foil. Then, I place a metal trivet in the Instant Pot, add 1 1/2 cups of water, and gently transfer the cheesecake pan on top of the trivet.

Pressure cook: I close and seal the Instant Pot and cook the cake on high pressure for 30 minutes, followed by a 20-30 minute natural pressure release. After that, I quick release the remaining pressure and transfer the cheesecake onto a cooling rack. I let it cook for one hour and then transfer it to the refrigerator to chill for 6 hours or overnight.
Serve: To make the topping, I microwaved the strawberry jam with the water. Then, I stirred the berries and lemon zest until the fruits were evenly coated. Before serving, I removed the cheesecake from the pan and topped it with the berry mixture.

Expert tip
Choosing the right cream cheese for cheesecake
Full-fat, brick-style Philadelphia cream cheese is the best choice for a creamy filling. Using fat-free cream cheese can leave the filling dry or crumbly, and using a generic or cheap brand can cause it to be grainy. Using low-fat cream cheese can also cause your cake to be runny. The higher moisture in the cheese makes it harder for the filling to firm up. Also, the low-fat cream cheese uses a different type of stabilizer, causing it to be runny or crumbly. The stabilizers break down when heated, separating them from the rest of the batter.
More tips to consider:
- Instead of a stand mixer, you can use a hand mixer and a large bowl.
- Ensure the ingredients are softened to room temperature so everything mixes better and cooks evenly.
- Always cover your cheesecake when cooking it in the instant pot, or the condensation will drip into it, making it runny.
- Be sure to run a knife around the pan to loosen the cake so it does not crack when removing it from the pan.
- Use a springform pan if you have one. If you don’t, place parchment paper in the pan and leave some excess hanging out to remove your cake when it is done.

Recipe variations:
- Chocolate chips: Chocolate chip cheesecake with berries is a delicious idea. Just add 1/2 cup of mini chocolate chips to the batter.
- Gluten-free: Use gluten-free graham crackers; the remaining ingredients are naturally gluten-free.
- Other flavors: Instead of using almond extract, add strawberry, blueberry, or blackberry for a fruitier flavor overall.
- Different crust: Instead of making a graham cracker crust, you could make an Oreo crust.
- Other fruits: If you don’t like those fruit choices, use your favorites or skip the topping altogether.
- Zest it up: To give the filling a citrusy flavor, stir in a pinch of lemon zest and add a few dollops of lemon curd.
- Topping: Another option is to top it with cherry pie filling, strawberry pie filling, or caramel sauce.

Serving suggestions:
The cheesecake is best served chilled, with whipped cream or vanilla ice cream on the side. First, slice it into even, clean slices. Run the knife under warm water and wipe it clean after each cut. Another option is to use unflavored dental floss, a trick I love to use. I like to serve this cheesecake topped with strawberry curd or sweet and tangy blueberry sauce.
Rich cheesecake, juicy berries, and chocolate go hand in hand. Drizzle each slice with chocolate sauce, or cut this cheesecake into cubes and serve it with slow cooker chocolate fondue. A warm cup of coffee pairs nicely with this dessert, and if you are serving during warmer weather, I recommend a refreshing sparkling strawberry lemonade.
How to store leftovers:
- Refrigerate: First, let it cool on a cooling rack. After that, add it to an airtight container or wrap it loosely in aluminum foil or plastic wrap and refrigerate for up to one week.
- Freeze: First, wrap it tightly with aluminum foil or plastic freezer wrap and place it in a heavy-duty freezer bag. Properly stored, it will maintain its best quality for about 2 to 3 months.
- Thaw: Transfer the dessert from the freezer to the fridge to thaw overnight. Serve and enjoy!
Frequently asked questions
First, cover the top of the cake with foil so it does not get water from the condensation. It could also be that it needs to be cooked longer. Close the lid and let it cook for another three to four minutes. Then, let it release naturally for 10 minutes. If that does not work, let it chill for 24 hours and see if that helps.
Usually, the cornstarch is added to the batter to avoid cracks. About one tablespoon to 1/4 cup of cornstarch (depending on how much batter you have) is added to the batter with the sugar.
First, ensure the cake has been chilled for at least 6-8 hours. After that, run a long, sharp knife under hot tap water and slice the cake. Then, clean the knife and run it under hot water before making another cut. Another mess-free and precise way of cutting even slices is to use cheese wire or unflavored dental floss. Also, clean the bits stuck to the wire/floss before every cut.
First, ensure the cake has been refrigerated for at least 8 hours. After that, carefully run a small knife around the side of the pan. Starting up, gently push the knife down the edge of the cheesecake to loosen the bits stuck to the sides of the pan. Next, unbuckle the springform pan and remove the circular band, or if you are using a push-pan, carefully push the bottom with the cake up. To transfer the cake to a serving dish, place a thin spatula between the crust and the pan bottom and gently slide the cake onto the serving dish.

More Instant Pot cheesecake recipes


Loved this recipe? I’d love to hear from you! 💛 Leave a 5-star rating ⭐️ in the recipe card below and share your thoughts in the comments – I read and appreciate every single one!
Let’s stay connected! Follow me on Facebook, Instagram, Pinterest, and YouTube for more delicious, sweet and savory recipes. Have a question? Ask in the comments, and I’ll be happy to help! 😊 with love Catalina!
Best Instant Pot Cheesecake
Ingredients
Crust:
- 1 1/4 cups graham crackers crumbs
- 1/2 cup walnuts
- 1 tablespoon brown sugar
- 1 teaspoon ground cinnamon
- 1 teaspoon ground nutmeg
- 5 tablespoons unsalted butter melted
Batter:
- 2 8-ounce packages cream cheese, at room temperature
- 1/2 cup white granulated sugar
- 1 tablespoon cornstarch
- 3 large eggs at room temperature
- 1/2 cup heavy cream at room temperature
- 1 teaspoon vanilla extract
- 1/2 teaspoon almond extract
Mixed Berry Topping:
- 5 tablespoons raspberry or strawberry jam
- 2 tablespoons water
- 1 1/2 cups strawberries halved
- 3/4 cup blackberries
- 3/4 cup blueberries
- 1 tablespoon lemon zest
Instructions
Cheesecake Crust:
- Lightly coat a 7×3-inch springform pan with nonstick spray and set it aside.
- Finely chop the walnuts or add them to a food processor.
- Add all the graham crackers crumbs, ground walnuts, cinnamon, nutmeg, brown sugar, and melted butter to a large bowl and stir until well combined.
- Press the mixture into the prepared springform pan. Using a measuring cup, press the crust and try to line the sides about to the middle of the pan edges.
- Freeze for at least 20 minutes.
Cheesecake Batter:
- Make sure all the ingredients are at room temperature before you begin.
- In a stand mixer or a large bowl, using a hand mixer, beat the cream cheese on medium-low speed until light and fluffy.
- Add the sugar and cornstarch and continue beating until well combined and creamy. Scrape the sides and bottom of the bowl.
- Add the eggs one at a time and beat after each addition until well combined.
- Add heavy cream, vanilla extract, and almond extract. Beat well, stopping to scrape the sides and bottom of the bowl.
- Remove the crust from the freezer, pour the cheesecake batter mixture into the prepared pan, and cover the top with foil.
Cook:
- Place metal trivet into a 6-qt Instant Pot and add 1 1/2 cups water.
- Gently transfer the cheesecake pan to the top of the trivet.
- Select the manual setting and adjust the pressure to high. Set the time to 30 minutes. For a denser cheesecake, you can do 35 minutes.
- After cooking and the Instant Pot beeps, release pressure naturally for about 20-30 minutes.
- Carefully open the pot and transfer the cheesecake to a cooling rack. Let it cool for 1 hour, then run a paring knife around the edges.
- Transfer the cheesecake to the refrigerator for at least 6 hours or overnight.
Berry Topping:
- In a large bowl, combine strawberry jam and two tablespoons of water. Microwave for 30 seconds. Stir to combine.
- Stir in strawberries, blackberries, blueberries, and lemon zest until the berries are evenly coated in the jam mixture.
- Remove the cheesecake from the pan before serving, and top with the berry mixture.
- Serve immediately.
Video
Notes
Choosing the right cream cheese for cheesecake
Full-fat, brick-style Philadelphia cream cheese is the best choice for a creamy filling. Using fat-free cream cheese can leave the filling dry or crumbly, and using a generic or cheap brand can cause it to be grainy. Using low-fat cream cheese can also cause your cake to be runny. The higher moisture in the cheese makes it harder for the filling to firm up. Also, the low-fat cream cheese uses a different type of stabilizer, causing it to be runny or crumbly. The stabilizers break down when heated, separating them from the rest of the batter.More tips to consider:
- Instead of a stand mixer, you can use a hand mixer and a large bowl.
- Ensure the ingredients are softened to room temperature so everything mixes better and cooks evenly.
- Always cover your cheesecake when cooking it in the instant pot, or the condensation will drip into it, making it runny.
- Be sure to run a knife around the pan to loosen the cake so it does not crack when removing it from the pan.
- Use a springform pan if you have one. If you don’t, place parchment paper in the pan and leave some excess hanging out to remove your cake when it is done.
I know I’d love this. I am a huge fan of cheesecake! I like all the berries on top too. Then I can say, well, at least it’s kinda healthy 😉
I have to try this. I love cheesecake, and it’s one of the few things I haven’t tried making in my instant Pot yet.
Pretty sure there used to be a break down of exactly how to make this, including the measurements for the ingredients……. Wish I had written it down instead of saving the link as they appear to no longer be listed.
sorry it has been restored, it works now
Cheesecakes are one of my favorite desserts. I pretty much like any topping as long as is not nuts. I have not made one in my instant pot yet but I definitely want to because your recipe looks delicious!
I’ve never made cheesecake before, and this sounds like a neat way to make it. And that fresh fruit looks awesome – great way to use up all those berries that the kids pick during the summertime.
I’ve seen so many recipes using the Instant Pot. I would love to get one someday!
I am not a cheesecake lover bu this recipe makes want to eat one right now. I love that it is the easy method. Thank for the tips!
I have an instant pot that’s been sitting in the box for a year now. I’m kinda scared of it. But, this looks amazing! I think I might have to pull it out and try this.
Just got one this week and the two dishes i have made have come out perfect. It really is quite amazing.
This doesn’t sound near as hard as I thought it was going to be. I have wanted to get into the instant pot for a while but it intimidates me lol
This is a gorgeous instant pot cheesecake! I’ve seen some and they were nowhere near as gorgeous as this. Loving it!
Would you believe I’ve never made a cheesecake, in an Instant Pot or otherwise? With your help, I totally feel confident trying it!
This is such a creative recipe!
This cheesecake looks perfect and I can’t believe it’s made in an instant pot, so cool!
Wow, never did i think a cheesecake can be done in Instant Pot, its just amazing. I did not have cracks and its way easier to do then conventional way. Glad I give it a try sure i am proud of what came out)) thank you very much!!!
I love cheesecakes and making it in the IP could not have been better. My whole family was amazed how good this came out, its really tasty!
Right? Its so easy 🙂
I loved the cheesecake its soo yummy and no cracks really loved it a lot!!
I am so happy that you loved it!
so happy that you liked it 🙂
Do you have to change anything if you’re using the 8 qt size Instant Pot with a 8″ x 3″ pan? Wondering if I should change the amount of water or cooking time.
most likely no
I have one question. Hopefully I did it right as my first attempt is in the pot as I write this. So…in the written recipe it says to place the cheesecake gently into the IP. Then it says to place foil over it. Over what? The inner cheesecake pot? The inner pot? And then I watch the video for clarification…but guess what! No foil being used! Anywhere! Please help.
Brian
Hi Brian, I am sorry for the confusion. You can not cover the Instant Pot inner pot with foil, please cover the cheesecake pan with foil. I am sorry, that part turned blurry on video so I had to cut it out. I hope this helps. thanks
In the directions you said to cover the pan with foil before turning the pot on, but on the video, no foil was put on. Do you need to put one or not needed?
Yes, please cover the cheesecake pan with foil.
Can I substitute the nuts with more graham crackers?
yes, sure!
quick question: What if it has a (not sure what to call it) gooy or soft spot in the middle when I pull it our of the pot?
if its too soft it means its not done, I would cook for another 3-5 minutes, depending on how soft it is. If its just slightly soft, it usually hardens in the fridge.
The foil caused a ton of condensation and a soft spot in the middle 🙁 Any digestion’s on avoiding the on the next go round?
make a few holes using a fork for the air to circulate.
Noticing that it says put the crust in the refrigerator, but take it out of the freezer. Which is it? 🙂
sorry, its the freezer 🙂
This is amazing! Cheesecake is one of my favorite foods, but it usually takes me many hours to make it. This was so quick and easy! I have a 6″ springform pan, so I cooked it for 35 minutes. The cheesecake is creamy, rich, and tastes just like the one that takes hours. I omitted the nutmeg (too strong I think) but otherwise followed the recipe. I wish I could post a picture of the finished cheesecake.
Great Recipe.It is cooling right now on my counter. I made the crust with chocolate crumbs but with the same amount of crumbs and nuts; however, when I placed the foil over the cake prior to placing in the Instapot, I noticed it was touching the batter as if there was too much batter in the pan. When I took the cheesecake out of the pot, the foil was indeed baked right onto the cake. How do I prevent this next time. I feel like I took off what would have been that nice smooth top that cheesecakes get when they are done and done well. I intend to cover it with salted caramel and fudge and pecans for a turtle cheesecake so I am not so worried about the looks of the top but very curious. Has any one else experienced this?
One trick we found that works great is wrapping aluminum foil around the inside of the bottom plate of the spring form pan. Then after the cheesecake has cooled you can flip it and peel the foil off the bottom of the crust and then flip it back on its bottom. Never mess the bottom up this way. 🙂
This is the best cheesecake recipe ever. I didn’t add the fruit because someone in our home cannot have it. I covered it with foil and poked a few holes in the top. I used the pan with the detachable bottom so the cheesecake slid right out.
I just made one in my 8 qt. timed it for 40 min. let it release naturally and it was perfect!
Hi there,
I wanna give this recipe a try in my oven. Is it possible and what settings would you recommend?
Thanks!
Cook in a water bath at 350 degrees for about 40 minutes if you are using a small cheesecake pan.
Do I turn off the IP during the natural release or leave it on warm?
both options are ok.
Can I use that daddio removable bottom instead of spring form?
it should work
Oh my goodness! This was so good! I have always been afraid to try my hand at making cheese cake. I am relatively new to the instant pot and wanted to try a dessert! So easy and it came out looking picture perfect! I followed the instruction/recipe exactly as stated. I have already decided on the next cheesecake I am going to make in the instant pot!
I am so happy! Thank you for the feedback!
Ever since I came across this recipe, I dare not try any other. This has become my go-to dessert and it’s ALWAYS a hit. (just be sure not to overwhip, or whip at high speed, otherwise you’ll get a souflee like cake, like i did the first time).
Thank you for your feedback! Glad you love it!
I don’t have and cream, can I use sour cream or mascarpone instead?
sour cream will work
This will be my second time making this cheesecake. It’s for sure my go to cheesecake recipe. I used cashews in the crust. And I used sour cream instead of heavy cream. I cook for 30 min and both times it’s been extra soft almost like soufle. Thank you all for the tips. I want to make this in a chocolate now. Any suggestion? I will poke holes in the foil and try not to mix the filling so much. I had alot if lumps to get out because I put 1 egg in before noticing the sugar needed to go first. Great job on figuring out cheesecake in the instant pot. It my husband and girls favorite.
The Conways
Thank you very much for your feedback Tanna. Happy you and your family love this recipe!
Wondering if you have any suggestions for GF alternatives for the graham cracker crumbs? I haven’t found any that actually taste good.
Use crispy gluten free vanilla cookies and make them into crumbs
Mind is totally blown that you can make a cheesecake in the instant pot! This turned out SO GOOD!
I was very pleasantly surprised by this recipe! The cheesecake tastes fantastic, and it cooks perfectly in the Instant Pot. I love it!
This recipe is such a game-changer. I love how much easier it makes the entire process without sacrificing flavor or texture.
I would have never thought you could make a cheesecake in an instant pot. Super awesome – thanks!