
Instant Pot Meyer Lemon Cheesecake
Anytime I hunt for some fresh Meyer lemons at my local grocery store, I instantly make this Instant Pot Meyer Lemon Cheesecake – a delightful blend of sweet and tangy, with a rich, silky lemon-flavored cheesecake filling. It is a beautiful, elegant dessert that anyone can make, and it is much easier to make in a pressure cooker.

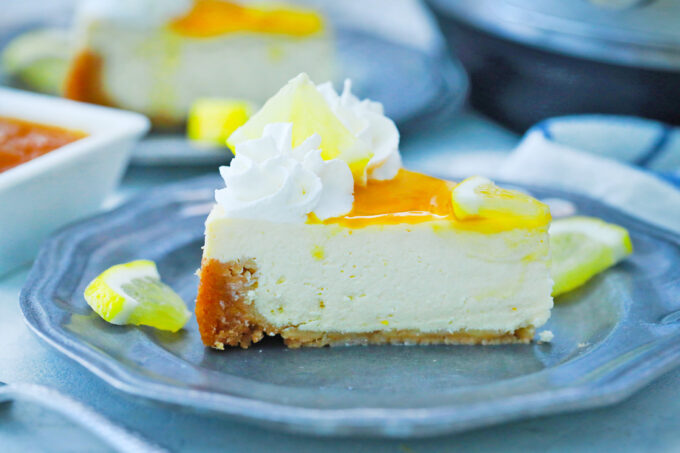
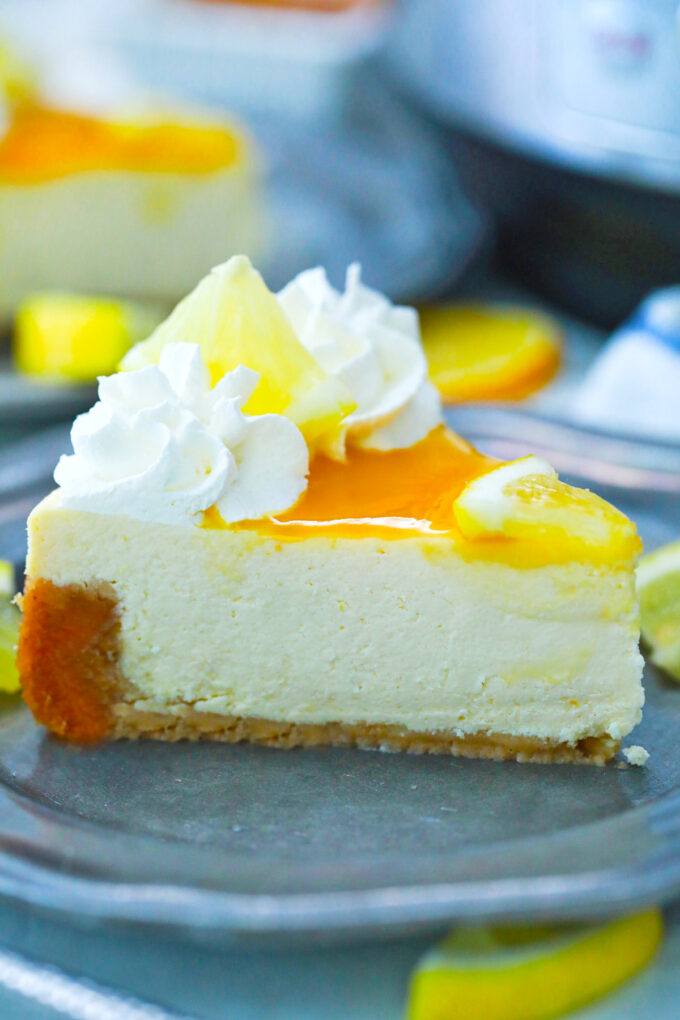
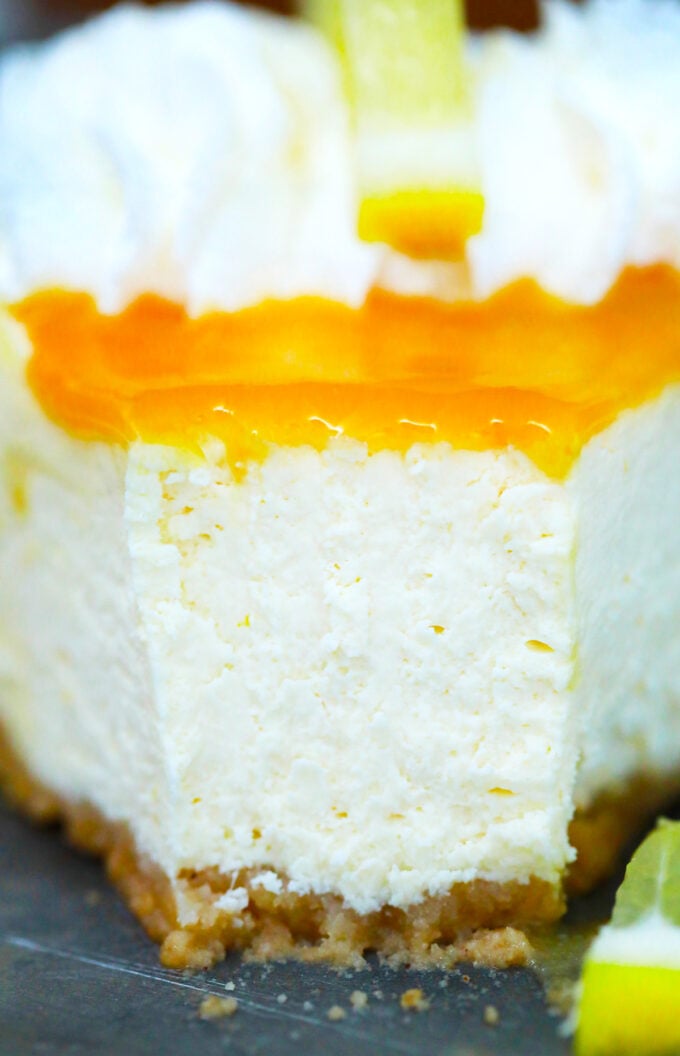
Cheesecake recipes are among my favorites to make because they are so decadent and come in so many flavors. This one is velvety-smooth, full of lemon flavor and aroma, and has a sweet, crumbly crust. Made with real Meyer lemon juice and zest, it has just the right amount of zing, tartness, and refreshment in every bine. Topped with lemon curd and homemade whipped cream, this cheesecake is a must-try.
Table of contents
Meyer lemons are actually a hybrid citrus, a cross between citron and pomelo/mandarin orange. It’s actually easy to tell them apart! The regular ones are bright yellow, have rougher skin, and are much tarter than Meyers. On the other hand, Meyers are smaller and have smoother skin with a slight orange tint. Taste-wise, they’re less tart and are sweeter than the regular kind.
Meyer Lemon Cheesecake made in the Instant Pot is a gorgeous blend of sweet and tart lemons and the creamiest cheesecake filling. Since I am “baking” it in the Instant Pot, the moisture inside gives the cake a velvety, tender consistency and creates a natural water bath, preventing cracks in the cheesecake. Turns out perfect all the time!
Why you will love this recipe
- The tangy blend of lemons and creamy cheesecake is phenomenal: This dessert has a delightful fresh lemon taste mixed with the buttery crust and rich, thick cheesecake filling.
- It is fancy enough for a celebration: I like to serve it at a dinner party or a birthday party; it never fails to impress and instantly becomes a crowd favorite.
- It only takes an hour: Only minutes to prepare and 35 minutes to cook in the Instant Pot. Then, it can be set in six hours, so you can serve it for dessert tonight.
- Leftovers can be frozen for months: Thanks to technology, leftovers can be frozen and saved for several months, so nothing gets wasted.
What you will need

- Crust – A mixture of graham cracker crumbs, melted butter, white sugar, and just a hint of cinnamon.
- Dairy – Use full–fat blocks rather than tubs of whipped cream cheese. The former have too much air and water, which prevents the right consistency. Sour cream also softens the cheesecake and adds a tangy flavor. Heavy cream adds extra fat for thickness and richness, softens the texture, and adds moisture.
- White granulated sugar – Granulated sugar is fine enough to dissolve in the batter but coarse enough to create air pockets when creamed with butter.
- Large eggs – At room temperature, the eggs will improve the incorporation of the other ingredients and help avoid lumps. They also whip up better and stay more stable.
- Flavor – Meyer lemons are sweeter and have a hint of orange, so the zest is much sweeter but still has a lot of tang. I zest my own lemons for the freshest taste. Squeezing the juice myself gives this cheesecake its incredibly authentic and intensely scrumptious taste. Plus some pure vanilla extract.
- Stabilizer – Cornstarch has twice the thickening power of flour and stays clear, so I find it the best choice for this recipe.
- Topping – Easy and rich whipped cream, Meyer lemon zest, and slices.
How to prepare
Prep the pan: To begin, I lightly coat a seven-inch springform pan with non-stick baking spray and set it aside.
Make the crust: Then, I stir all the crust ingredients in a large bowl until combined and press it into the bottom and up the sides of the pan with the bottom of a measuring cup and my fingers. After, it goes into the freezer for at least 20 minutes while I prepare the batter.

Make the batter: I beat the cream cheese with a hand mixer on medium-low speed until light and fluffy. Then the cornstarch and sugar go in while I continue beating, scraping the sides and bottom of the bowl as needed. I add the eggs one at a time, beating after each one until they are well mixed in.
Fill the crust: After filling the crust, I mix in the sour cream, heavy cream, vanilla, lime zest, and lime juice until combined. Then, it all goes into the chilled crust, and I cover it with aluminum foil.

Bake and cool: I place the trivet in the pot, add 1.5 cups of water to the bottom, then place the cake on the trivet. I set it to high and cook it for 35 minutes, then do a natural release for 20 minutes. Then I remove it, take off the foil, and place it on a cooling rack to cool for 1 hour.
Chill, garnish, and serve: Lastly, I put the cake in the fridge overnight (or at least for six hours) to set. When it is ready, I garnish it with whipped cream and lemon slices.

Expert tip
How to make sure not to overmix the batter
Overmixing the batter is one of the most detrimental mistakes one can make when making a cheesecake. It incorporates too much air into the batter, which can cause all sorts of issues, from cracks and wrinkles to deflation and failure to set. But there are ways to prevent this from happening. First, start with room-temperature ingredients. The cream cheese, sour cream, and heavy cream, as well as the eggs, all need to be at room temperature. Trying to mix cold ingredients is the number one cause of overmixing because they do not want to meld when cold.
Also, never use high speed on a mixer from the start; begin on low and slowly build up to medium speed. Never beat at high speed. Only whisk until the ingredients are combined. Then, add the eggs slowly, one at a time. Do not use food processors or blenders. If there are a few small lumps, do not worry about them. They will melt when baking. Scrape the sides and bottom of the bowl as you go and be patient. Do not try to rush things. It takes time. Also, make sure everything is measured accurately.
More tips to consider:
- Do not let the ingredients get too warm, or the cake will be too warm to set properly.
- Using cold ingredients will also cause the cake to rise too much and then sink as it cools.
- To keep the crust from becoming soggy, only make it one inch up from the bottom of the pan.
- Be sure to cook the cheesecake long enough to set. If the edges are not set when it comes out, put it back in for five minutes.
- Also, using low-fat cream cheese, cream, or sour cream can cause the cheesecake to look wet.
- Sudden temperature changes can also make it look wet as it sweats.
Recipe variations and add-ins:
- Top with peels: Add some candied citrus peels for an extra-special sweet-and-tangy topping.
- Different cookies: Instead of graham crackers, I sometimes use lemon Oreos or some other cookie.
- Add berries: Certain fruits would be delicious in this cheesecake, such as blueberries and raspberries.
- More citrus: Instead of berries, add extra citrus, such as orange or lime juice and zest.
- Make it festive: Top it with rainbow sprinkles or other decorations for a party or celebration.
- More lemon flavor: Add some of my lemon curd to the batter of this delicious cheesecake for even more lemon flavor.
Serving suggestions:
Since this is such a luxurious dessert, I like to serve it with a dollop of fluffy homemade whipped cream on the side, along with lemon sorbet. This is also a wonderful dessert to serve after a comforting dinner, like these tender, juicy baked lemon-and-garlic pork chops or baked lemon tilapia. My favorite wine to pair with it is Moscato d’Asti for its natural sweetness and citrus hints.
I love serving this cake alongside lemon tarts, muffins, scones, and my boozy watermelon lemonade at Sunday brunch. It would also taste delicious with a scoop of my easy no-churn tangerine sorbet made with just one ingredient. Spread some lemon curd or lime curd on top! Or drizzle some blueberry sauce or strawberry sauce for some contrast on individual slices.
How to store:
- Refrigerate: Store in an airtight container for up to 5 days.
- Freezing: Flash-freeze each slice for about two hours. Then, wrap each slice in plastic and place them in freezer bags to keep them frozen for up to three months.
- Defrost: Thaw overnight in the refrigerator for the best flavor.
Frequently asked questions
It probably needs to cook a little bit longer. If the edges are not set after it has finished cooking, return the pan to the Instant Pot and cook again on high pressure for another 5 minutes. Then, let the pressure release naturally for 10 minutes before using the fast release to remove it right away. Also, make sure the ingredients are at room temperature, so they are easier to incorporate. Stirring too much can turn it into a soupy mixture.
Although the ingredients need to be softened to room temperature, ensure they are not too warm. If warmed too much, the cheesecake will still be wet on top and runny in the middle. Also, using low-fat ingredients will make the cheesecake runny. Sudden temperature drops will cause the cake to sweat, making it look wet. It is important to cool it slowly so that it does not happen.
Overmixing the batter introduces too much air, causing the cheesecake to rise too much and collapse and crack as it cools. Using cold ingredients can also cause the cake to rise too much and sink in the middle when it cools. It is essential to let the ingredients reach room temperature before using them. Also, undermixing the batter can cause an uneven, light meringue top that may collapse.
It is possible that this happened because the cheesecake was too dry. This typically only happens when it is overcooked. The main thing to remember is to follow the instructions carefully. My recipe calls for 35 minutes in a seven-inch pan. However, if using a six-inch pan, 40 minutes is better.

More Instant Pot cheesecake recipes:


Loved this recipe? I’d love to hear from you! 💛 Leave a 5-star rating ⭐️ in the recipe card below and share your thoughts in the comments – I read and appreciate every single one!
Let’s stay connected! Follow me on Facebook, Instagram, Pinterest, and YouTube for more delicious, sweet and savory recipes. Have a question? Ask in the comments, and I’ll be happy to help! 😊 with love Catalina!
Instant Pot Meyer Lemon Cheesecake
Ingredients
Crust:
- 1 1/2 cups graham crackers crumbs
- 1 tablespoon sugar
- 1/2 teaspoon ground cinnamon
- 6 tablespoons unsalted butter melted
Batter:
- 16 ounces cream cheese at room temperature
- 3/4 cup white granulated sugar
- 1 tablespoon cornstarch
- 2 large eggs at room temperature
- 1/2 cup heavy cream at room temperature
- 1/4 cup sour cream at room temperature
- 1 teaspoon vanilla extract
- 2 tablespoons Meyer lemon juice
- Zest of 1 Meyer lemon
Topping:
- Whipped cream
- Meyer Lemon slices
- Meyer Lemon zest
Instructions
Cheesecake Crust:
- Lightly coat a 7×3-inch springform pan with nonstick spray and set it aside.
- Add all the crust ingredients to a large bowl and stir until well combined.
- Press the mixture into the prepared springform pan. Press the crust and try to line the sides to the middle of the pan edges.
- Freeze for at least 20 minutes.
Cheesecake Batter:
- Using a hand mixer, beat the cream cheese in a large bowl until light and fluffy at low to medium speed.
- Add the sugar and cornstarch and continue beating until well combined. Scrape the sides and bottom of the bowl.
- Add the eggs one at a time, beating after each addition until well combined.
- Add heavy cream, sour cream, vanilla extract, lime juice, and lime zest. Beat until just combined.
- Remove the crust from the freezer and pour the cheesecake batter mixture into the prepared pan. Cover the top with foil.
Cook:
- Place the metal trivet into a 6-qt Instant Pot and add 1 1/2 cups of water.
- Gently transfer the cheesecake pan to the top of the trivet.
- Select the manual setting and adjust the pressure to high. Set the time to 35 minutes.
- After cooking and the Instant Pot beeps, release pressure naturally for about 20-30 minutes.
- Carefully open the pot and transfer the cheesecake to a cooling rack. Let it cool for 1 hour, then run a paring knife around the edges.
- Transfer the cheesecake to the refrigerator for at least 6 hours or overnight.
- Garnish with whipped cream and lemon slices before serving.
Video
Notes
How to make sure not to overmix the batter
Overmixing the batter is one of the most detrimental mistakes one can make when making a cheesecake. It incorporates too much air into the batter, which can cause all sorts of issues, from cracks and wrinkles to deflation and failure to set. But there are ways to prevent this from happening. First, start with room-temperature ingredients. The cream cheese, sour cream, and heavy cream, as well as the eggs, all need to be at room temperature. Trying to mix cold ingredients is the number one cause of overmixing because they do not want to meld when cold. Also, never use high speed on a mixer from the start; begin on low and slowly build up to medium speed. Never beat at high speed. Only whisk until the ingredients are combined. Then, add the eggs slowly, one at a time. Do not use food processors or blenders. If there are a few small lumps, do not worry about them. They will melt when baking. Scrape the sides and bottom of the bowl as you go and be patient. Do not try to rush things. It takes time. Also, make sure everything is measured accurately.More tips to consider:
- Do not let the ingredients get too warm, or the cake will be too warm to set properly.
- Using cold ingredients will also cause the cake to rise too much and then sink as it cools.
- To keep the crust from becoming soggy, only make it one inch up from the bottom of the pan.
- Be sure to cook the cheesecake long enough to set. If the edges are not set when it comes out, put it back in for five minutes.
- Also, using low-fat cream cheese, cream, or sour cream can cause the cheesecake to look wet.
- Sudden temperature changes can also make it look wet as it sweats.
Any kind of cheesecake makes me happy. Lemon is one of my most favorite.
That looks delicious. I love cheesecake, it is my favorite dessert.
wow this cheesecake looks amazing, I have never made cheesecake before but I am tempted to make this
This is a stunning cheesecake! Blows my mind you can make this in an Instant Pot!
Can I bake this cheesecake in the oven if I don’t have an instant pot? Is so, please give instructions. Thanks
Yes, sure you can, just bake it as you would a regular cheesecake and since its smaller the cooking time may be 45 minutes at 320 degrees F.
This is one of the best cheesecakes I’ve ever had! I made it this weekend for our dessert, and it was gone by Monday.
Cheesecake from my instant pot! Sign me up. Lemon is my favorite too!
This completed my day!
I would love a BIG slice of this amazing lemon cheesecake! YUM!
This lemon cheesecake sounds AMAZING!! I am so excited to try it!
Count me in for this Lemon Cheesecake!
This cheesecake is seriously amazing! Everyone at my house was really impressed!
Wow! Great flavor and so easy to make!
Totally love this flavor, and so cool you can make it in an instant pot!
Oh my, this looks amaaazing! I would love a BIG slice!
This is one incredible cheesecake! I love the lemon flavor! This is a must for spring!
Omg, looks beyond delicious! Everyone would definitely love this!
Everyone at my house loved this cheesecake! Really impressive! Thanks for the recipe!
This week’s my birthday! I can’t wait to give this a try <3
Sooo delicious! Love the lemon taste
I was a little nervous about making a cheesecake in the Instant Pot, but it came out unbelievably creamy! And it didn’t crack at all!
I had no idea you could make cheesecake in an Instant Pot. This was a fun one. It was easy, and I didn’t have to jump through a lot of hoops.
This is a beautiful cheesecake and so bright and perfect for summer. I absolutely LOVED it!
Just finished a slice of this and wow! This is easily my new favorite cheesecake recipe!