
Instant Pot Pumpkin Cheesecake
It seems magical how, every time I make this Instant Pot Pumpkin Cheesecake, it comes out smooth, perfectly creamy, and with no cracks. This is a foolproof recipe that does not involve a water bath, and even novice bakers can make it. A quick and easy dessert, made with simple ingredients, bursting with flavor and fall spices, ideal for Thanksgiving or fall gatherings.

I can’t stop making Instant Pot cheesecake recipes. They are so easy to make, and they always turn out amazing. Check out my collection, and you will find one for every occasion! There is a strawberry cheesecake, an Oreo cheesecake, and even a Pina Colada cheesecake! No more water baths, no more cracked cheesecakes, no more stressing about messing something up with these easy, fool-proof recipes!
Table of contents
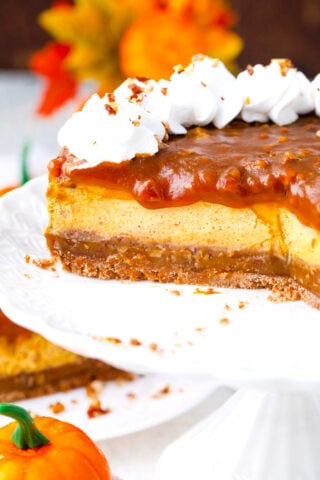
A delicious Pumpkin Cheesecake in the Instant Pot is one of my favorite fall-themed desserts. Rich, indulgent, made with fresh pumpkin puree and cozy fall spices like cinnamon, ginger, and nutmeg, each bite has the perfect balance of sweet and creamy. Serving this irresistible seasonal cheesecake to friends and family is always a treat and guaranteed to impress.

Why you will love this recipe
- It is perfect for the holidays: Bursting with fall spices, this is the ideal fall dessert, great for Thanksgiving or other holidays. Always a crowd pleaser, and guaranteed to be immediately devoured.
- No need to make a water bath: The Instant Pot has its own instant water bath ready for you, so if you have been avoiding making cheesecakes, this is the right moment to give it a try.
- Just a few ingredients: Besides the pumpkin and baking ingredients, it is mainly just spices, and most of them are pantry staples.
- Freeze leftovers or make it in advance: Wrap in plastic and put in freezer bags for up to three months in the freezer. This spiced pumpkin goodness can be made a few days in advance, stored wrapped in plastic wrap in the fridge, and the whipped cream can be made when ready to serve.
What you will need

Crust: Since I am very detail-oriented, I believe that every ingredient counts, so I tend to find ways to add something special to each layer of the cheesecake to bring more flavor. I make the crust using Graham crackers, brown sugar, and butter. To boost its aromas, I also add pecans, cinnamon, nutmeg, and ground ginger to the mix.
For the cheesecake:
- Dairy – Only get the full-fat, brick-style cream cheese for this recipe. The whipped kind has too much air, and the low-fat has too much water. Also, make sure it is softened to room temperature, so it mixes more easily. Too much mixing increases the air in the batter. I also add heavy cream, which contains more than 35% milk fat, to give the cheesecake its velvety smooth texture.
- Sweetener and thickener – I use white granulated sugar for its fine, uniform crystals that cream well with butter. Cornstarch thickens liquid ingredients to set when they cool, preventing cracks. The starch evens out the ratio of liquid to fats if it is off, so everything is stabilized.
- Large eggs – Make sure the eggs are at room temperature as well. This also helps avoid too much mixing and adding air to the batter.
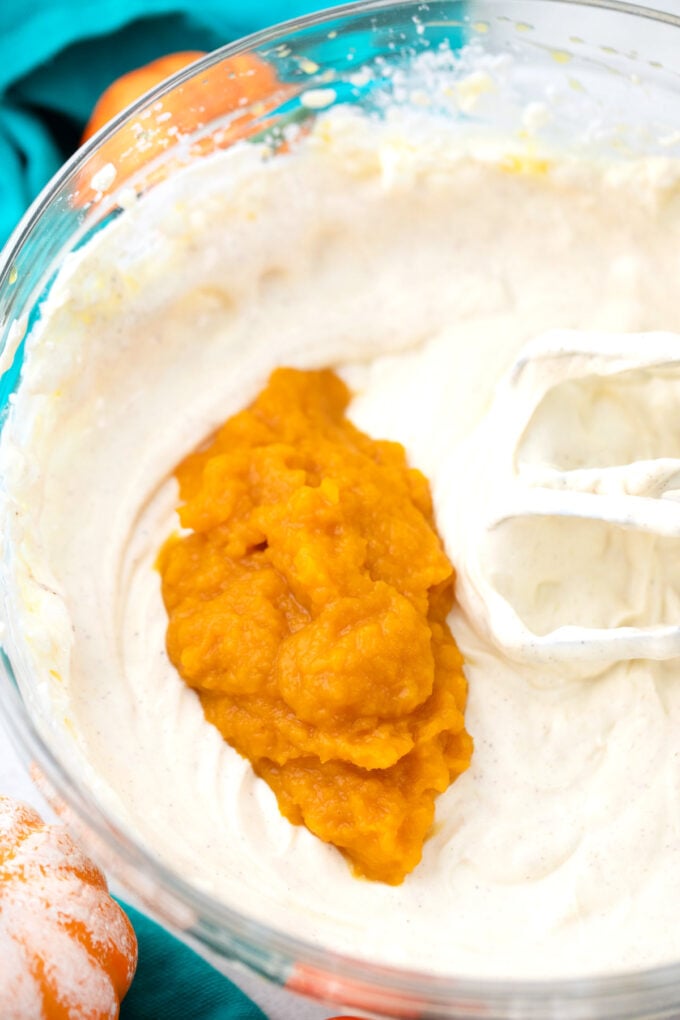
- Pumpkin and flavorings – I use homemade pumpkin puree and pumpkin pie spice mix. Using real vanilla extract adds complexity, richness, and flavor. However, avoid the artificially flavored vanilla because it has a bitter aftertaste.
How to make
Graham Cracker Crust: First, in a large bowl, I mix the cookie crumbs with the remaining ingredients. After that, I press the mixture into the bottom of the pan and up the sides and chill it in the freezer while I make the cheesecake filling.

Make the Filling: Next, in a large mixing bowl, I add the cream cheese and sugar. Using an electric hand mixer or stand mixer, I beat until fluffy. I add the rest of the ingredients and beat until combined.
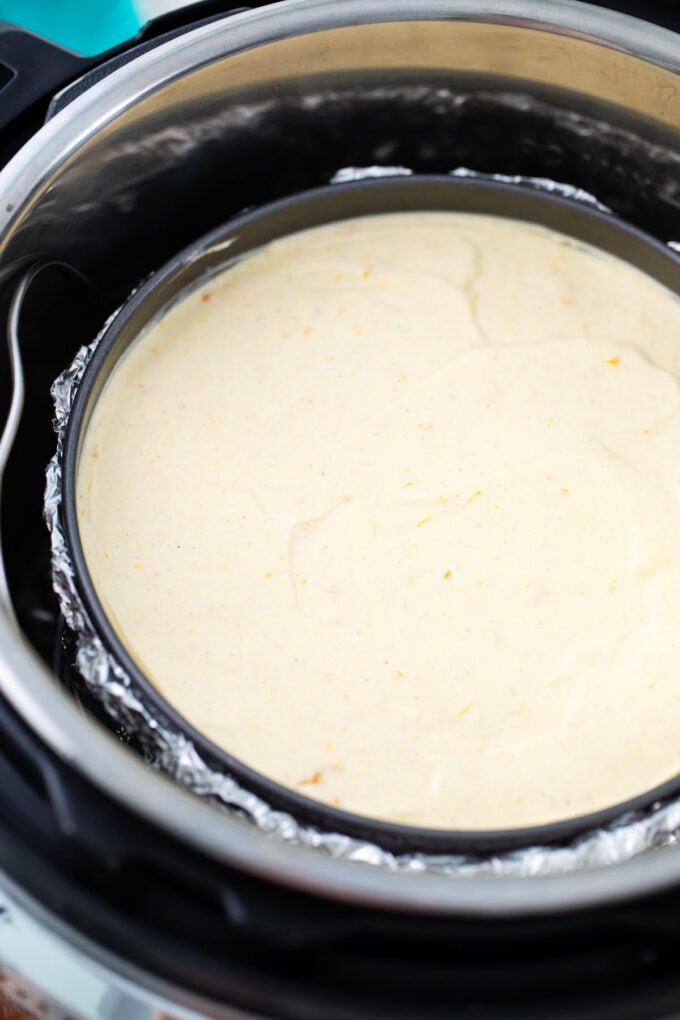
Transfer to the spring form pan: I transfer the cheesecake batter to the prepared 7-inch pan and cover the top of the pan tightly with foil.
Pressure Cook: Now, I add water to the inner pot of the Instant Pot and place the trivet and the pan into the pot. After that, I close the lid of the Instant Pot and cook on high pressure for 40 minutes.
Natural Release: Once done cooking, I do a Natural Pressure Release for 30 minutes.
Quick Release: I open the valve to release the remaining steam and open the pressure cooker to remove the cheesecake.
Cool: Afterward, I place it on a wire rack to cool thoroughly, and after that, refrigerate it for 5 hours or better overnight, before serving.
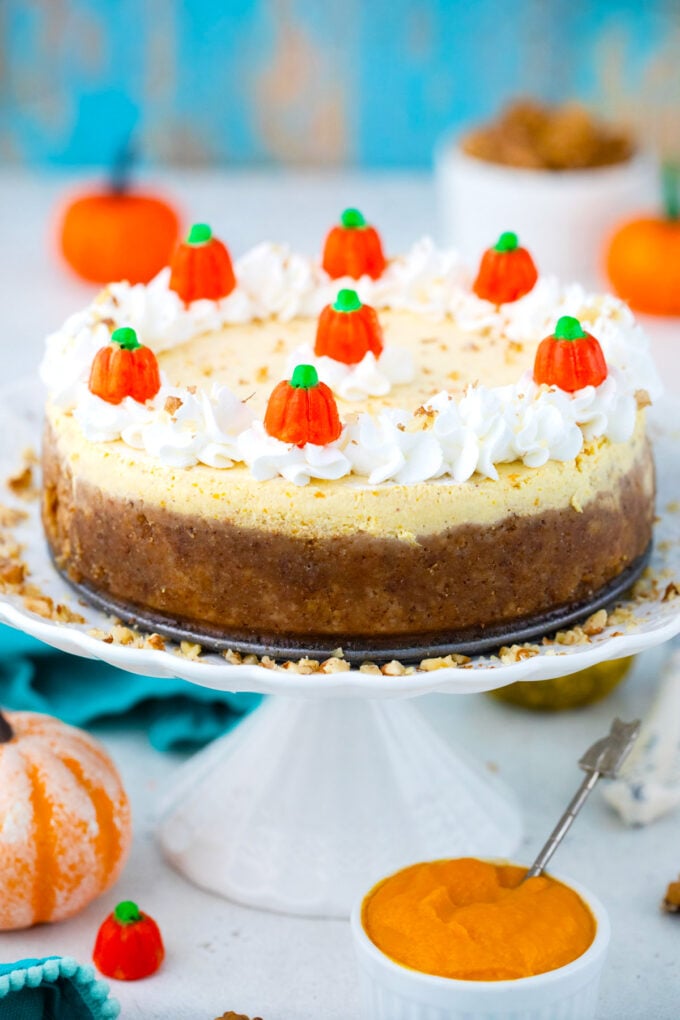
Garnish: Using cold heavy whipping cream and powdered sugar, I make some homemade whipped cream and pipe it onto the dessert. I top with pumpkin candies before serving.
Expert tip
Why and how to use a springform pan
A springform pan is a two-piece baking pan designed to open up and come apart from the sides, preventing the cake (or any other item in the pan) from being ruined in the process. There is a clip that lets the sides expand, allowing the bottom to be released. The round base is connected to the sides by a clamp that expands and contracts to secure and release it.
Just lock in the base and make sure it is sealed, grease the inside, and pour in the batter. Then, if you are using a water bath, wrap it in foil. In this recipe, place it on the trivet and cover the top with foil instead. Then, after it is done and cooled, release the clamp and remove the band. It can be lifted over the top if the cake is on a counter or table. Or drop down the band by placing it on a cake stand or large jar.
How to remove a cheesecake from the springform pan
- First, make sure the cheesecake has been properly chilled and is still cold.
- Next, carefully run a small butter knife around the inside edge of the pan, starting all the way up and working your way down. This is how you loosen any bits that stuck to the pan.
- After that, unbuckle the springform pan and remove the circular band.
- To transfer the cheesecake to a serving dish, place it on a flat surface and run a long, thin spatula between the crust and the pan bottom. Afterward, gently slide the cheesecake onto the serving dish.
More tips to consider
- Make sure to use pumpkin puree instead of pumpkin pie filling. The pie filling is too sweet.
- Beat the ingredients on low or medium to avoid overbeating.
- To tell when the cheesecake is finished cooking, tap the pan. The middle of the cheesecake will be slightly wobbly, only in the middle.
- A more accurate way to tell is with a thermometer. The center of the cheesecake should be 145 to 150 degrees F when it is done. However, this can also leave a dent in the top of the cake.
- It is better to undercook a cheesecake than overcook it. It can always be cooked longer.
- Wrap the top of the pan in foil instead of the bottom to keep the moisture out.
- An Instant Pot has its own automatic water bath and cooks more evenly than an oven.
- If your cake has cracks on it, refer to this post on how to fix cracks on a cheesecake.

Recipe variations and add-ins:
- Other cookies: Try a different flavor cookie for the crust, like Oreos or peanut butter cookies.
- Caramel: Stir in some dulce de leche into the batter for a caramel-flavored dessert.
- Sour cream: For a tangy and creamy cheesecake, stir a half cup of sour cream into the batter.
- Gluten-free: Use gluten-free cookie crumbs for the crust to make this pumpkin cheesecake gluten-free.
- Decorate it: Make it a festive cake with some colored sprinkles and drizzled syrup on top.
- Frosting: Another way to dress up this delicious cake is with my cream cheese frosting. It is easy to make with just four ingredients.
- Crustless: Another option is to make a crustless pumpkin cheesecake by entirely omitting the crust. However, ensure that you use a pan that does not leak; a bundt pan would also work.

Serving suggestions:
This cheesecake is ideal to make for Thanksgiving when the oven is busy cooking a whole turkey and delicious sides. Using the Instant Pot to make it saves you oven space, time, and results in an ideal, crack-free pumpkin cheesecake. I always serve it chilled, topped with fluffy whipped cream and candy pumpkins, along with a scoop of butter pecan or vanilla ice cream, and warm caramel sauce.
If you are making it on a weeknight, it would be an indulgent finish to a copious meal, such as this pumpkin pot roast, made with tender beef seasoned with pumpkin and pineapple for a juicy delight. To serve with a beverage, I have the creamiest pumpkin pie smoothie recipe ever. So cool and delicious. Additionally, the cranberry margarita or pumpkin spice latte pairs well with the pumpkin-spiced cheesecake.
How to store:
- Refrigerate: First, make sure the cheesecake has thoroughly cooled. After that, add plastic wrap on top of the cheesecake and store it in the fridge for 4-5 days. Another option is to slice it and add it to an airtight container.
- Prep for freezing: I recommend freezing the pumpkin pie cheesecake WITHOUT whipped cream or any other sauces on top. Before freezing, make sure the cheesecake has thoroughly cooled and is also refrigerated for at least 6 hours.
- Freeze: After that, wrap it tightly in plastic wrap and then in aluminum foil, or place it in a heavy-duty freezer bag. Properly stored, it will maintain the best quality for about 2 to 3 months.
- Thaw: Finally, when ready to serve, plan and transfer it from the freezer to the fridge to thaw overnight.

Frequently asked questions
After the timer goes off and the natural release goes for 30 minutes, open the pot and tap the pan with a spoon. If it wobbles slightly in the middle, it is done. Take it out and let it cool on the cooling rack for one hour before rechecking it. If it still seems like it is not set, cook for another five minutes and let it naturally release for 10 minutes. Another way to tell is to check it with an instant-read thermometer. It will be 145 to 150 degrees F when done.
It is always better to undercook than overcook, no matter what it is. With a delicate dessert like cheesecake, cooking it for even a minute too long can cause it to crack and become dry. If it is undercooked, it can always be cooked a little bit longer. But once it is overcooked, there is no way to take that back. The center of the cheesecake should still be a little bit wobbly, and the outer ring will be firm and puffy when it is done.
An up to a seven-inch springform pan fits into an Instant Pot, which is what I use in this recipe. A six-inch pan can also be used, but it would take five minutes longer because it is deeper. Use it as you would in the oven, except the bottom does not have to be wrapped in foil because it does not sit in water. Instead, it is placed on a trivet above one and a half cups of water, with aluminum foil covering the top to prevent moisture from dripping down the sides.

More pumpkin desserts:


Loved this recipe? I’d love to hear from you! 💛 Leave a 5-star rating ⭐️ in the recipe card below and share your thoughts in the comments – I read and appreciate every single one!
Let’s stay connected! Follow me on Facebook, Instagram, Pinterest, and YouTube for more delicious, sweet and savory recipes. Have a question? Ask in the comments, and I’ll be happy to help! 😊 with love Catalina!
Instant Pot Pumpkin Cheesecake
Ingredients
Crust:
- 1 cups graham crackers crumbs
- 1/2 cup pecans or walnuts ground
- 2 tablespoons brown sugar
- 1 teaspoon ground cinnamon
- 1 teaspoon ground nutmeg
- 1 teaspoon ground ginger
- 5 tablespoons unsalted butter melted
Cheesecake Batter:
- 2 8-ounces packages cream cheese at room temperature
- 1/2 cup white granulated sugar
- 1 tablespoon cornstarch
- 2 large eggs at room temperature
- 1/2 cup heavy cream at room temperature
- 1/2 cup pumpkin puree
- 1 teaspoon vanilla extract
- 1/2 teaspoon ground cinnamon
- 1/2 teaspoon ground nutmeg
- 1/4 teaspoon ground ginger
- 1 teaspoon pumpkin spice
- pinch ground cloves
- pinch all spice
Instructions
Cheesecake Crust:
- Lightly coat a 7×3-inch springform pan with nonstick spray and set it aside.
- Finely chop the pecans or walnuts, or add them to a food processor.
- Add the graham cracker crumbs, ground pecans, cinnamon, nutmeg, ginger, brown sugar, and melted butter to a large bowl and stir until well combined.
- Press the mixture into the prepared springform pan. Using a measuring cup, press the crust and try to line the sides up to the middle of the pan edges.
- Freeze for 20-30 minutes.
Cheesecake Batter:
- Make sure all the ingredients are at room temperature before you begin.
- In the bowl of a stand mixer or a large bowl, beat cream cheese and sugar until light and fluffy on medium-low speed, using a hand mixer if preferred.
- Add the remaining ingredients and continue beating until well combined and creamy. Scrape the sides and bottom of the bowl with a spatula.
- Remove the crust from the freezer and pour the cheesecake batter mixture into the prepared pan.
Pressure Cook:
- Place the metal trivet into a 6-qt Instant Pot and add 1 1/2 cups of water.
- Gently transfer the cheesecake pan onto the top of the trivet. Cover the top of the cheesecake pan (not the IP) with foil.
- Select the manual setting and adjust the pressure to high. Set a timer to 40 minutes.
- After cooking, and when the Instant Pot beeps, release the pressure naturally for about 30 minutes.
- Carefully open the pot and transfer the cheesecake to a cooling rack. Let it cool for 1 hour, then run a paring knife around the edges.
- Note: If the cheesecake middle is not settled, cook for another 5-10 minutes and 15 minutes NPR.
- Transfer the cheesecake to the refrigerator for at least 6 hours or overnight before slicing and serving.
Video
Notes
Why and how to use a springform pan
A springform pan is a two-piece baking pan designed to open up and come apart from the sides, preventing the cake (or any other item in the pan) from being ruined in the process. There is a clip that lets the sides expand, allowing the bottom to be released. The round base is connected to the sides by a clamp that expands and contracts to secure and release it. Just lock in the base and make sure it is sealed, grease the inside, and pour in the batter. Then, if you are using a water bath, wrap it in foil. In this recipe, place it on the trivet and cover the top with foil instead. Then, after it is done and cooled, release the clamp and remove the band. It can be lifted over the top if the cake is on a counter or table. Or drop down the band by placing it on a cake stand or large jar.How to remove a cheesecake from the springform pan
- First, make sure the cheesecake has been properly chilled and is still cold.
- Next, carefully run a small butter knife around the inside edge of the pan, starting all the way up and working your way down. This is how you loosen any bits that stuck to the pan.
- After that, unbuckle the springform pan and remove the circular band.
- To transfer the cheesecake to a serving dish, place it on a flat surface and run a long, thin spatula between the crust and the pan bottom. Afterward, gently slide the cheesecake onto the serving dish.
Please let me know if the same recipe will work in the 3 qt in a 6 x 3″ pan. So want to make this! Can you email me the answer?
emailed you
Can this be made in a regular crockpot?
no, sorry
Just in time for fall love this recipe !!
LOVE this! So excited for fall!
Scrumptious! I am going to try this out. Thank you for sharing this great recipe. YUM!
Love this recipe! Looks yummy. Thank you.
Such a gorgeous dessert! Perfect for fall!!
I’d like to make this in an 8×3 inch cheesecake pan in an 8 qt Instant Pot. I know it won’t be as thick but wonder if you’d cook it for the same amount of time or less. Any thoughts?
yes, same amount of time for cooking, that does not change.
I need to try this immediately, it looks so good!
Can you do this with a 6×3 pan?
Yes, but you will have leftover batter that you will have to discard.
This cake sounds amazing. I can’t wait to make it.
You advise to put the crust in the refrigerator for a least 20 minutes. Then when it’s time to put the batter in it, you say to take it out of the freezer. Does it go in the refrigerator or the freezer? Also, when do you actually take the cake out of the pan? This looks delicious and I’m looking forward to making it. Thank you for posting the recipe.
Hi Pamela, 20 minutes in the freezer. To take cheesecake out of the pan, I usually wait until serving it. But you can also remove it from the pan once it has completely cooled and you are ready to refrigerate it.
Always wanted to try this, it looks so cool and IP is just great. Delicious and gorgeous cake!! Thumbs up!!!
What a good looking cake. Could not have been happier how the cake turned out. Instant pot does have its glory! Love it!!!
Probably one of the easiest yet delicious cheesecake I have done. Never thought it can be done so perfectly in the instant pot. Way to go!!!
Good looking and easy to make cheesecake. I love it!!!
I made this recipe last night and it came out amazing! My roommate is not a big pumpkin fan but he really liked it too! I’m going to make it again for a fall party I’m going to in a couple weeks!
so happy that you liked it!
This is so freaking easy. I also love the addition of the walnuts– is a delicious twist.
You have just made my holidays so much easier. I can’t wait to make this for Halloween and thanksgiving
Wow…this looks delicious! I can’t wait to make it. Thanks for sharing.
Instant pots are so versatile! And that recipe looks delicious! I’m always a fan of cheesecake. And great tips for saving the cheesecake in the freezer. Wouldn’t want any of it to go to waste.
I think I need to put an Instant Pot on my holiday gift list. I keep seeing all these amazing recipes and it makes me wish I had an Instant Pot to try them out.
You totally should!
Looks like a nice treat this coming weekend. My family will surely love this.
I made this pumpkin recipe and it looks really yummy. It’s in the instant pot now as I speak. But I have a lot of leftover pumpkin filling. Did I do something wrong? I followed the instructions to the T.
what pan did you use?
Help- just made this, cooked 35 minutes, natural release for 25 – took it out and the center is still very soupy- should I put it back in and cook it longer?
put it back for another 10 minutes.
Made this dessert yesterday. Cut into this morning & the taste was like heaven on my palette. I made a few substitution; I can’t eat gluten so I used gluten free ginger snaps and I added some ginger syrup to help the ginger snap crumbs stick better. Not being a real cook, I didn’t know what the difference was between light cream and heavy cream(learned it’s the fat content). I purchased the light because that’s all that was left, it was 3 days before Thanksgiving so heavy cream was gone from the supermarket shelf. The desert turned out great, even with all of the substitutions. I would definitely make this again. Wonderful!
Hello. Do you have the recipe for the whipped cream? Thank you.
Check my Pumpkin Cheesecake Bars, I used the same whipped cream.
Great! Thank you! Happy Thanksgiving!
Catalina – how long can I leave this in the fridge for? Making it for Thanksgiving on Thursday but is it okay to make it tonight and then bring with me on Thursday? Just trying to cut down on my Wednesday prep.
Hi Kirra, the cheesecake can be easily stored in the fridge for a few days so you are good to make it in advance. If you plan on topping it with whipped cream, make the whipped cream the same day. Other than that, you can make the cheesecake two days in advance.
Just curious, why don’t you use the cake pre set?
Only the new generation IPs have that function, to not confuse people its easier to just say for how long to cook on HP.
Is the crust soft or firm/crisp after baking? I’m hoping for firm/crisp. Not a fan of soft graham crusts. Would it be acceptable to pre-bake the crust in the oven for 15 mins (instead of freezing) before filling and baking in the IP? Thank you for any thoughts!
The crust I would not say is soft, but is not as crispy as with the pre-baking method. Yes, you can totally pre-bake it instead of freezing if that is more how you prefer it!
I made this once and loved it. I used sour cream for the heavy cream. What do u use exactly as heavy cream making for Christmas. Thanks
Just took this out of the ip and some of the filling is in tahewater, and the filling is soupi. Can I put it back in for 10-15 minutes?
What do you mean its in the water? If the filling licked and water got in, I don’t think cooking again will help.
What does NPR mean?
Natural Pressure Release
Not a fan of nuts. Anything else you suggest putting into the crust? or just adding more graham cracker crumbs
more cracker crumbs for sure
I made this for Thanksgiving… folllowed the recipe exactly and it was AMAZING. The texture is so soft… I like that it isn’t quite a dense as some of the other cheesecakes I’ve made. Absolutely perfect. A keeper for sure.
Thanks Linda for your feedback! Glad you love it!
Do you turn the Instant Pot off during the natural release or leave it on keep warm setting?
It is up to you, it does not make a difference.
Hi – I’m guessing it’s just a typo but it says this recipe is 0 calories per serving lol. I WISH but hoping you can update it with the correct info!
Hi, it actually says 432 calories per slice.
I made this a few times in 2018 and it was perfect. In 2019 I could not find puree anywhere so I used pure pumpkin and the center was okay but a little loose. I didn’t think there was much difference between the two. This year I made my own puree and it set up perfect. I noticed on this recipe, compared to mine from 2 yrs. ago, that you changed 1 cup of puree to 1/2 cup of puree and the time from 28 minutes to 40 minutes. I always left it in for 32 minutes regardless. I’m wondering why the change in the puree amount and the time were made.
I made the change because some people were having trouble cooking the cheesecake so I retested it many times with different IPs and elevation, and found a time that would work for everyone.
By far one of the best cheesecakes I’ve had. It was so good. I was a huge fan of the Trader Joe’s pumpkin cheesecake, but this recipe blew it out the water. After settling it overnight in the fridge, the cheesecake was absolutely perfect. I did end up pressure cooking it for an additional 10 minutes with NPR of 15 min but otherwise the rest of the recipe was perfect. The best part was that it wasn’t too sweet! Loved it and and I’m definitely going to make another one with the rest of the pumpkin I have.
Topping recipe?
its just whipped cream
Love this recipe as written. Delicious! Just one recommendation… don’t keep the instant pot on the keep warm setting after its done. I did that once and the cheesecake was rubbery.
I made this and it was and is a big hit!! Everyone absolutely loves it!! ❤️ I only wish I could upload a pic of mine on here. This will be a hit at our Thanksgiving table this year!! Thanks for sharing this recipe!! 🧡
Can I replace the sugar with monk fruit sweetener to make this sugar free or would it ruin the cheesecake. I would only probably use a 1/4 cup instead of a 1/2.
Hi Jennifer, yes, that will work fine.
This recipe looks great!
I have an 8 qt IP. Can you advise on time needed for this size, please?
I brought this to thanksgiving dinner and everyone loved it. I had to add 5 minutes to the cook time
This is delicious and easy. I make the crust with Trader Joe’s triple ginger snaps. I always have to cook it longer in the instant pot, but it turns out great every time.
so happy, thank you for the feedback