
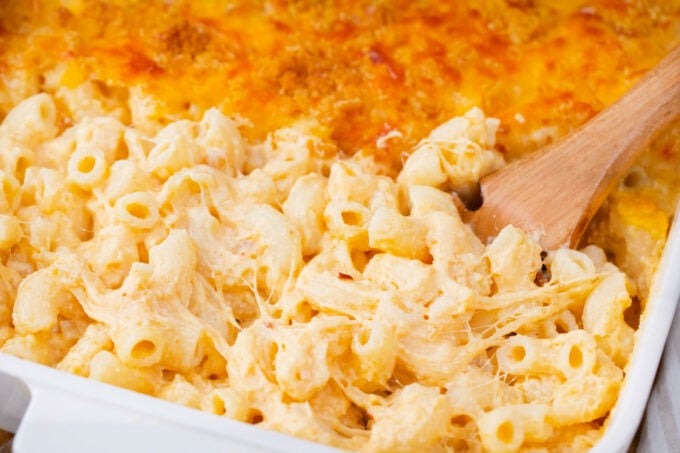
Easy Gluten Free Macaroni and Cheese
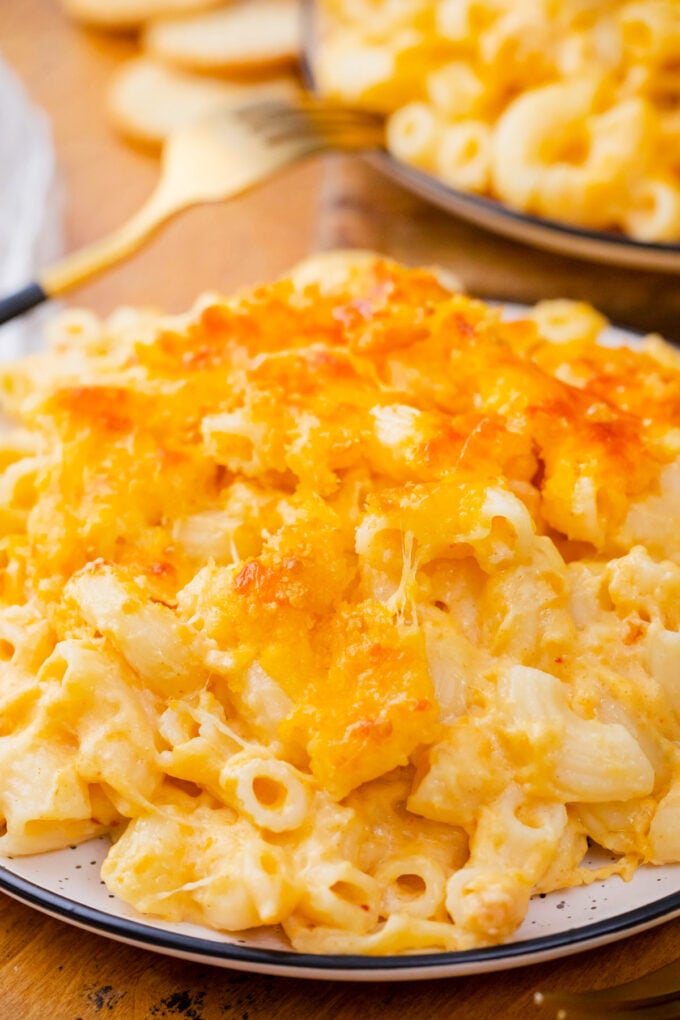
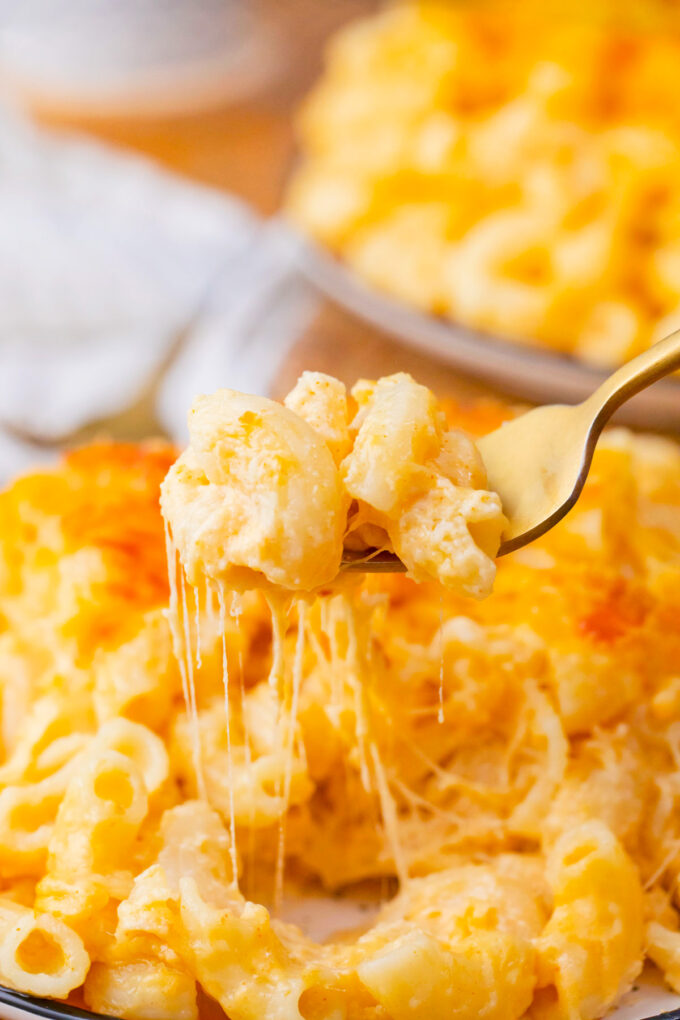
I will start today’s blog post by declaring my love for this classic American side dish, yes, friends, it’s me talking about mac and cheese. Since moving to America, I have fallen in love with it, but because my daughter is gluten intolerant, making gluten-free mac and cheese that everyone loves has been my mission. Mission accomplished – this version features a sauce made with three cheeses that coats pasta in a blanket of velvety smooth and creamy goodness. It takes less than 30 minutes to prep and 15 minutes in the oven.

You all know by now my classic macaroni and cheese version – it’s truly fantastic. There’s no reason to miss out on it just because you’re avoiding gluten. Trust me, once you make my gluten-free version, you will not even taste the difference. Even the pickiest eaters had no clue and raved about it when I served it at our potluck party with my famous oven barbecue ribs and corned beef. Everyone just went for seconds, and that says it all.
Table of contents
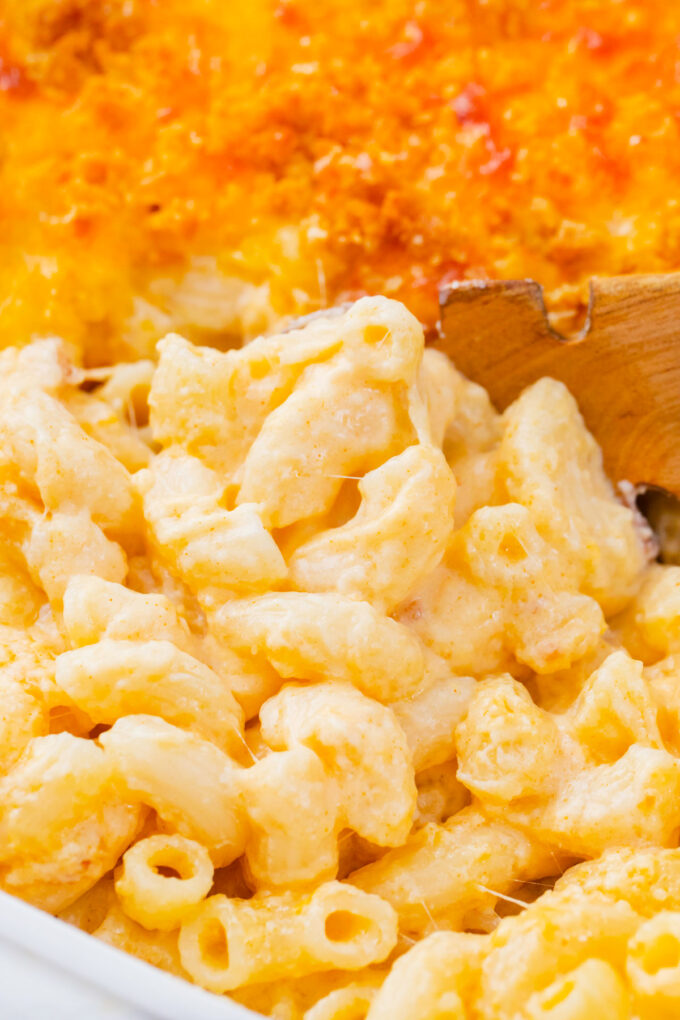
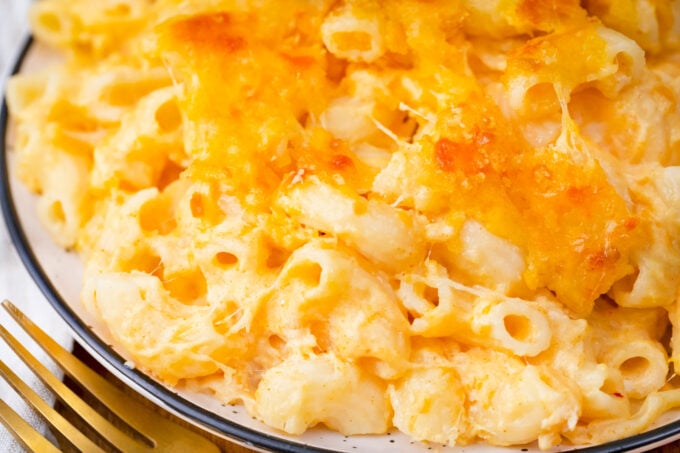
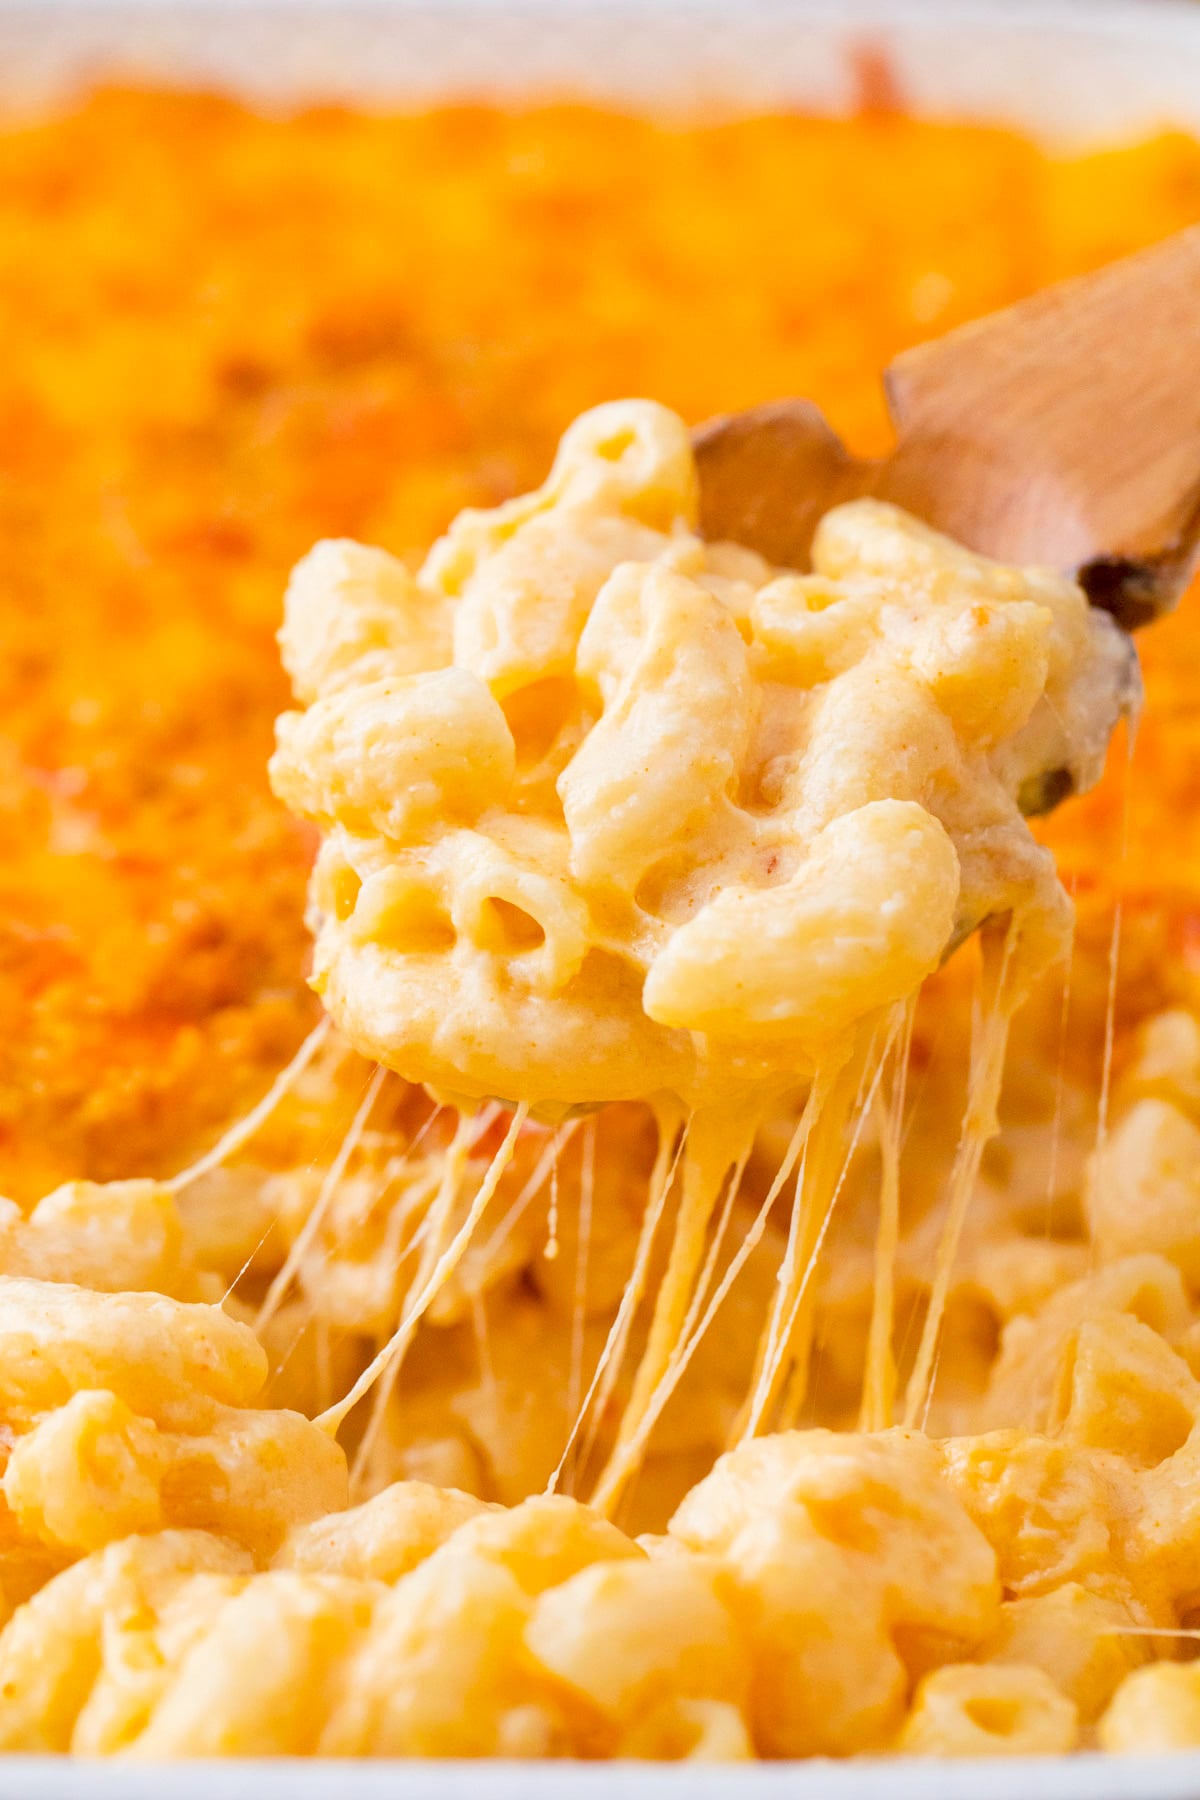
I am the type of person who goes all in when it comes to comfort food. If I invest time, I will not spare the cheese, so here we go: Cheddar, Colby, and Parmesan to make the most luxurious cheese sauce. Additionally, the same three-cheese mixture, sprinkled with crushed buttery crackers, is spread on top of the casserole to create a crisp top that elevates this classic dish. All I can add here is that you have to try it, you won’t regret it; this is the type of recipe that gets everyone talking and raving about it.
Why you will love this recipe
- Ready in minutes: I can make this creamy casserole in less than 30 minutes, and after that ot goes into the oven. It’s so easy and decadent, perfect for a fuss-free weeknight dish, but fancy enough to serve on special occasions like a side for Thanksgiving turkey.
- Easy to make: With just a handful of ingredients and a few steps, delicious macaroni and cheese is easy to prepare, and everyone can enjoy it. Don’t be fooled by how easy this recipe is; with three types of cheese, the sauce is so flavorful and creamy that it tastes as if you ordered it from a fancy restaurant.
- Serve a crowd: It serves up to 8 people, so I can have the whole family over or save leftovers for tomorrow’s lunch. I usually bring this cheesy dish to potlucks and church, and no one can even tell it’s gluten-free.
- Versatile meal: I love that I can add things to this recipe to customize it. For instance, my kids love it when I add a tablespoon of Ranch seasoning and replace the sour cream with Ranch sauce. It’s their favorite Ranch mac and cheese, served with crunchy veggies on the side.
What you will need
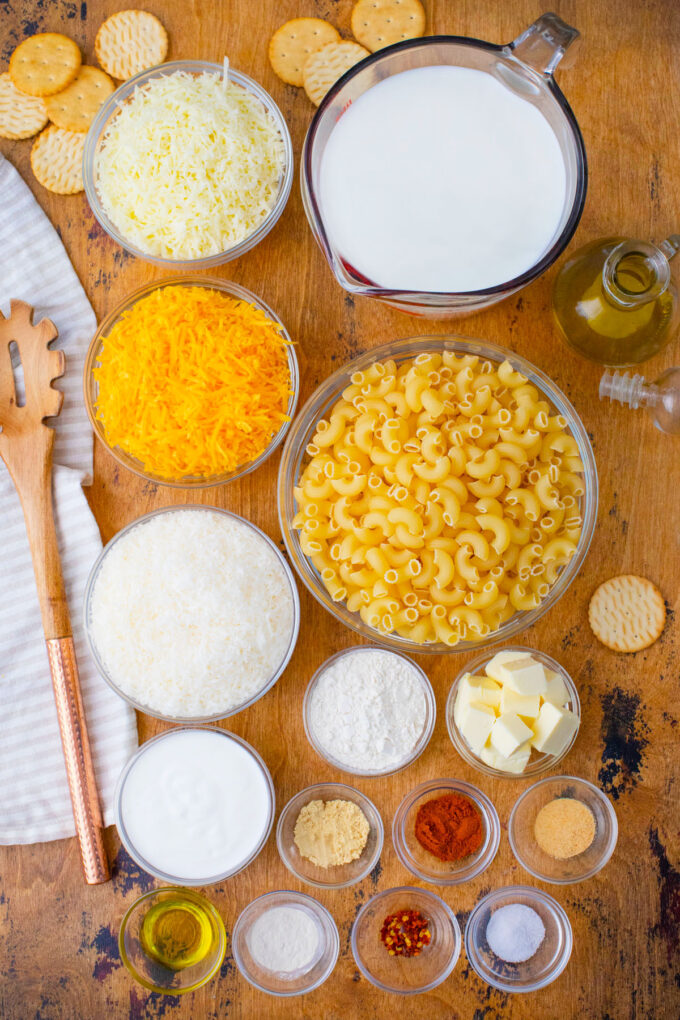
- Pasta: I use gluten-free elbow macaroni.
For the cheese sauce
- Cheeses: I use sharp cheddar for its bold, robust flavor, white Colby for its excellent melting properties, and freshly grated parmesan for its smooth, nutty taste.
- Wet ingredients: I use unsalted butter to make a rich, creamy roux without added salt. Then I add whole milk for a smooth, indulgent mouthfeel. I add the sour cream last to provide a velvety texture and a slightly tangy taste.
- Dry ingredients: Gluten-free all-purpose flour thickens when combined with butter and milk to make a roux. This helps thicken the cheese sauce without clumping or separating.
- Seasonings: Garlic powder enhances the savory flavor without altering the sauce’s texture. Onion powder adds sweetness and depth without adding any moisture. Paprika provides an orange color and a smoky flavor. Mustard powder heightens the cheesy flavor and balances the richness. A pinch of red pepper flakes provides a subtle hint of heat. And I use salt to enhance all the other flavors.
For the cracker topping:
- Crackers: I prefer gluten-free Ritz Cracker which I make into crumbs.
- Butter: I mix the crumbs with melted unsalted butter.
How to make
Preheat oven and prepare pan: First, I preheat the oven to 350 degrees F, lightly grease a 9×13 baking dish with oil, and set it aside.
Cook the pasta: I cook the pasta to just under al dente, then drain it and run it under cold water to stop the cooking process. I also add just a touch of olive oil to keep the pasta from sticking.
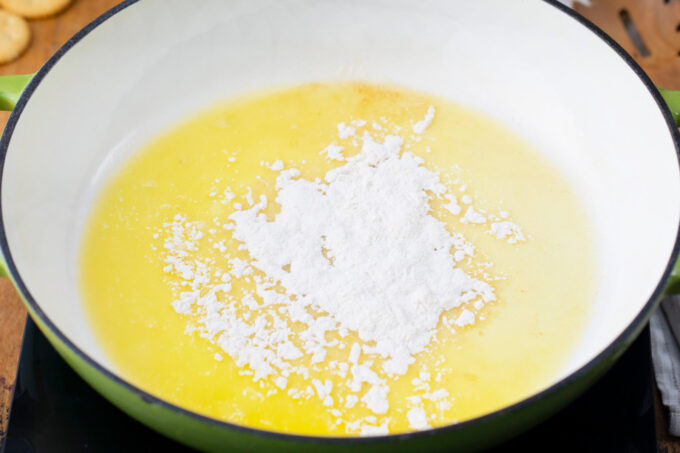
Make the roux: I heat a skillet over medium heat, melt the butter, then add the flour. I whisk the flour until it is completely combined.
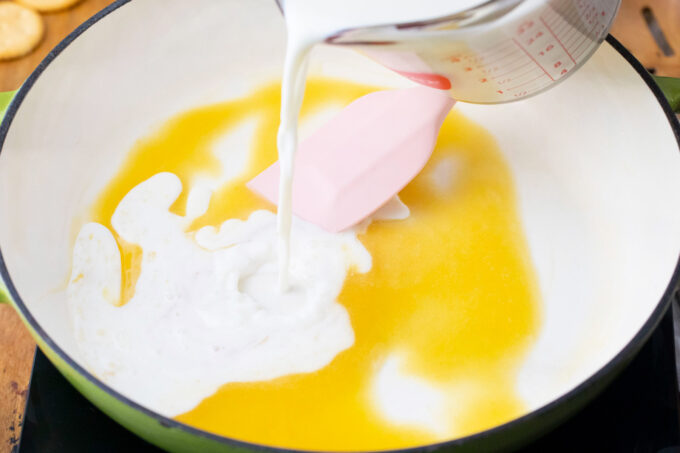
Add milk: While whisking constantly, I add the milk a little at a time until combined and smooth. I add the seasoning, bring it to a boil, and simmer for 2 minutes, stirring occasionally.
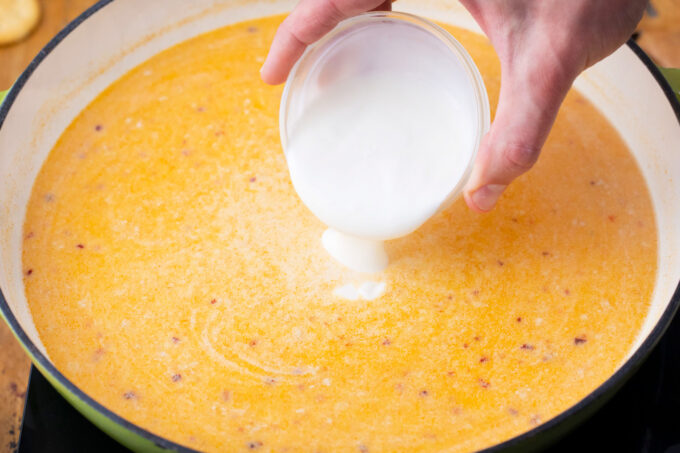
Add the cheese: Next, I remove the pot from the heat, stir in the sour cream, and season with salt and pepper to taste.
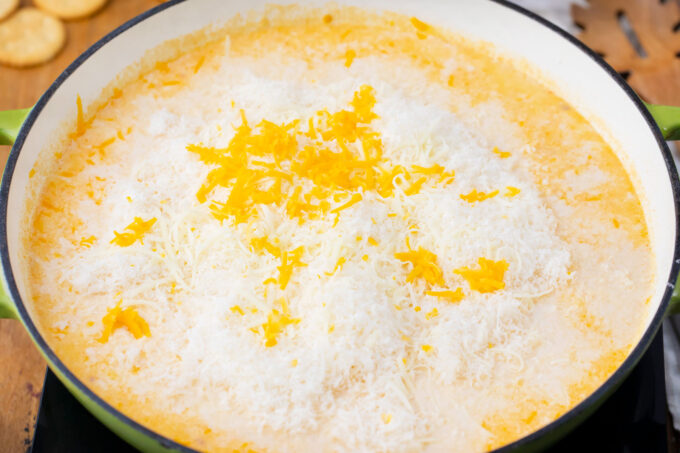
Add the cheese: Next, I stir in the three types of grated cheese until melted.
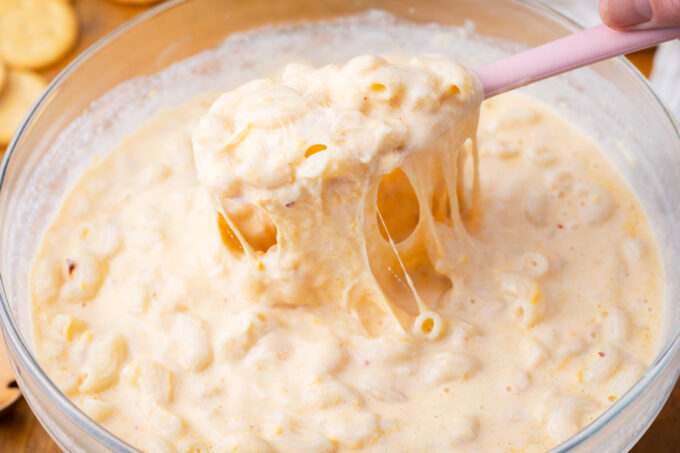
Combine: I combine the pasta with the cheese sauce.
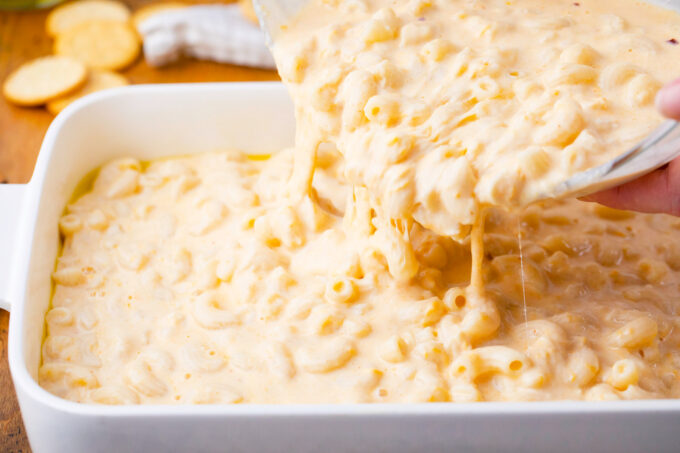
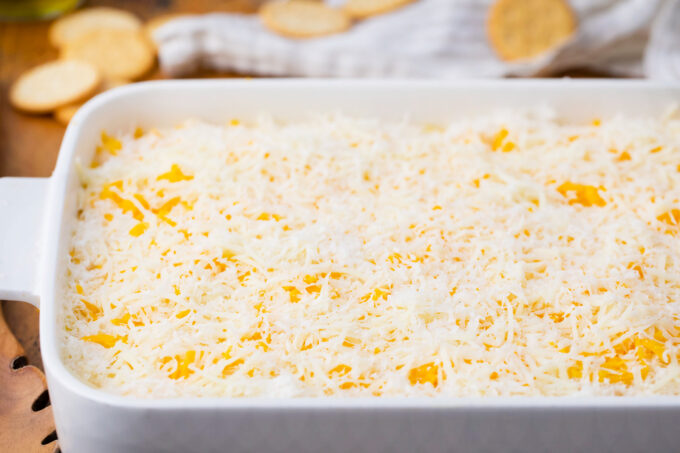
Transfer: Then, I pour the mixture into the prepared casserole dish and spread it evenly.
Add the toppings. If using extra cheese, sprinkle it on last. If using the buttery topping, I mix the cracker crumbs with melted butter and sprinkle them on top.
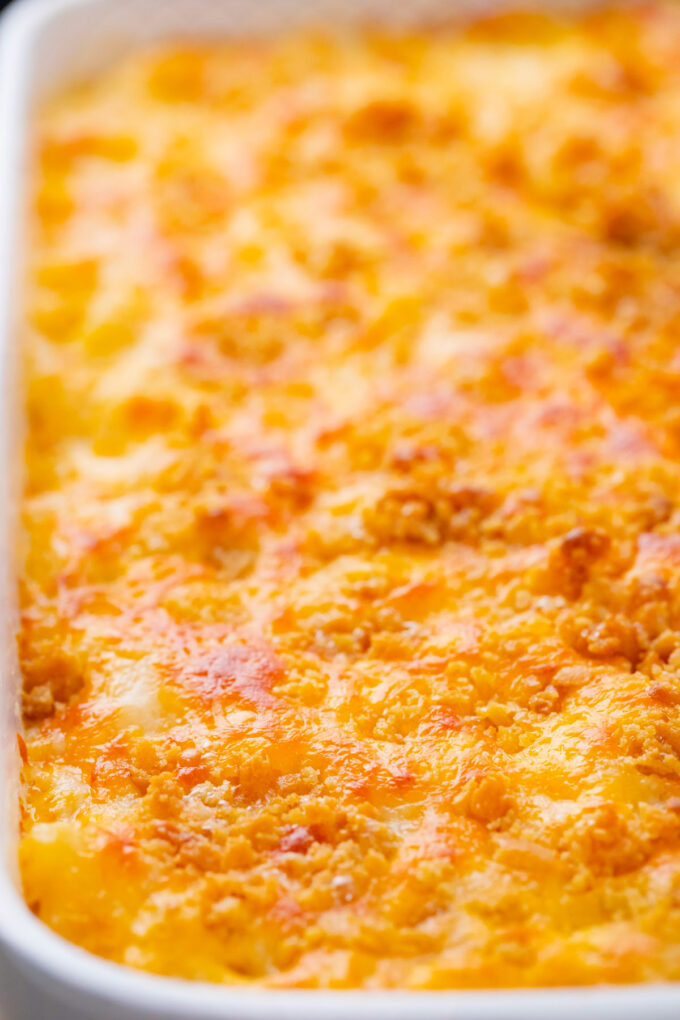
Bake the casserole: Finally, I bake the mac and cheese for 25 to 30 minutes until the top is bubbly and golden brown.
Rest and serve: Last, I let the casserole rest for 10 to 15 minutes before serving.
Expert tip
Don’t let the pasta get too soft
The first thing to remember is to boil it 2 minutes less than the package directions call for. I usually go for just under al dente. Stir frequently to prevent them from sticking. Then, I rinse the pasta under cold water right away to stop the cooking process. Also, be sure to use a high-quality brand name like Barilla, so the noodles hold up under pressure. Finally, let it rest for 10 minutes after removing it from the oven to set.
More tips to consider:
- Be sure to undercook the pasta. It will finish cooking in the oven. Otherwise, it will end up mushy.
- I always shred my own cheese. Pre-shredded cheese contains wood pulp, cellulose, or other ingredients to prevent clumping.
- Always salt the water before cooking the pasta; this will season the noodles.
- When cooking the pasta, place a wooden spoon over the pot to keep it from boiling over.
- Make sure the cream is off the heat before adding the cheese so the mixture does not separate.
- Gluten-free pasta absorbs more sauce than regular pasta, so it may need a little more milk than your normal mac and cheese recipe.
Recipe variations and add-ins:
- Different noodles: They don’t have to be elbow macaroni noodles. Sometimes, I use cavatappi (double elbows), farfalle, rotini, rigatoni, or shells.
- Add meat: Ground beef, ham, chicken, or turkey are all great choices. Or add bacon because everyone loves it.
- Toss in some veggies: To make this a more colorful, textural, and heartier dish, add some chopped bell peppers, carrots, mushrooms, and broccoli.
- More cheese: Other cheeses can also be added, such as mozzarella, gorgonzola, Gouda, ricotta, Romano, Gruyere, and provolone. Remember, some cheeses are better for melting, and others are better for flavor, such as sharp cheddar, pepper jack, Romano, bleu cheese, and asiago. I try to pick one of each for the best results.
- Spicy mac & cheese: For a spicier version, I sprinkle in red pepper flakes or a bit of my homemade Cajun seasoning.
- Taco mac & cheese: For a taco version, I cook some ground meat in taco seasoning and add it to the mix.
- Make it crunchy: Top this delicious casserole with buttered gluten-free crackers before baking for a crunchy finish.
Serving suggestions:
Macaroni and cheese is a classic side dish that pairs well with everything. I am all about the traditional combo of mac and cheese served with juicy steak and a side of roasted asparagus or crispy potatoes. This is also the side I always include when I host Thanksgiving or Christmas; it pairs just as well with roasted turkey breast as with fancy lamb chops or red wine pot roast.
For a fuss-free weeknight dinner that is cozy and comforting, I serve it with something hearty, such as oven-baked chicken, garlic pork loin, or this garlic-herb butter-roasted chicken. This is not your everyday chicken dinner. It’s crispy on the outside, juicy on the inside, full of herbs and spices, and preps in 20 minutes. Perfect for any weeknight. My kids are always happy when we have leftover mac and cheese, as I can turn them into mac and cheese balls, which they love to take to school for lunch.
How to store leftovers:
- Refrigerate: I store my leftovers in an airtight container in the refrigerator for 3 to 4 days.
- Freezing: To freeze, I put leftovers in smaller portions in freezer bags so I can take out what I need when I need it. They can be stored for up to 3 months.
- Defrost: I thaw my leftovers overnight in the refrigerator for the best flavor.
- Reheating: When reheating in the oven, I add a little milk and cook for 10 to 15 minutes at 350°F. It can also be reheated in a pot over medium-low heat for several minutes, adding a little milk.
Frequently asked questions
Besides not cooking it for too long to get the best pasta, another key is ensuring there is enough water in the pot to prevent excess starch from being absorbed. Although I highly recommend following the instructions on the box, my recipe calls for 1 pound of elbow macaroni and requires 4 quarts (1 gallon) of water.
I recommend using elbow macaroni for this dish, but many other pasta shapes work just as well, if not better. In fact, cavatappi is a double macaroni, so it is considered better than elbows for macaroni and cheese by some people. Others I like include rotini, rigatoni, and shells. My kids love bowtie pasta (farfalle).
This dish can be made a couple of days ahead of time, as long as the pasta is undercooked and refrigerated before baking. Prepare the whole thing up to the baking step. Then place a piece of plastic wrap around it, pressing it down against the surface of the sauce so it cannot form a skin. It can be refrigerated for up to 48 hours. To bake it, remove it and let it come to room temperature for 1 hour before baking it as directed.
Grainy mac and cheese often results from using pre-shredded cheese or overheating, which breaks emulsions. First, be sure to shred your own cheese. Pre-shredded cheese contains starches and other ingredients to prevent caking or clumping, which can cause it to separate or become grainy. This will also happen if the cheese was cooked over high heat. Remove the pot from the heat before adding the cheese.
More delicious pasta recipes:


Loved this recipe? I’d love to hear from you! 💛 Leave a 5-star rating ⭐️ in the recipe card below and share your thoughts in the comments – I read and appreciate every single one!
Let’s stay connected! Follow me on Facebook, Instagram, Pinterest, and YouTube for more delicious, sweet and savory recipes. Have a question? Ask in the comments, and I’ll be happy to help! 😊 with love Catalina!
Best Gluten Free Mac and Cheese
Ingredients
- 1 pound gluten-free elbows macaroni or cavatappi pasta – cooked per box directions, aim for al dente
- 1 tablespoon olive oil
Cheese Sauce:
- 4 tablespoons butter unsalted
- 1/4 cup gluten-free all-purpose flour
- 5 cups milk
- 1/4 teaspoon salt
- 1 teaspoon garlic powder
- 1 teaspoon onion powder
- 1 teaspoon paprika
- 1 teaspoon mustard powder
- 1/4 teaspoon red pepper flakes optional
- 1/2 cup sour cream optional – but recommended
- 2 cups sharp cheddar cheese freshly grated
- 1 cup white Colby cheese freshly grated – or use mozzarella
- 1 cup Parmesan cheese freshly grated
Buttery Cracker Topping (Optional):
- 1 1/2 cups gluten-free buttery crackers like Ritz, crushed into crumbs
- 6 tablespoons unsalted butter melted
Toppings:
- 1 cup white Colby cheese freshly grated – or use mozzarella
- 1/2 cup cheddar cheese freshly grated
- 1/2 cup parmesan cheese freshly grated
Instructions
- Preheat oven to 350 degrees F.
- Lightly grease a 9×13 baking dish with olive oil or with non-stick cooking spray. Set aside.
- Cook pasta per box directions, aiming for al dente. Drain and run it under hot water. Add to a large bowl, mix with olive oil, and set aside.
Cheese Sauce:
- Place a large saucepan or skillet over medium heat, and once it's hot, add the butter. Melt it.
- Add the flour and whisk until fully combined.
- While whisking, gradually add the milk and continue whisking until fully combined.
- Add onion powder, garlic powder, paprika, mustard powder, red pepper flakes, and salt.
- Over medium heat, bring the mixture to a boil and simmer for about 2 minutes.
- Stir in sour cream until fully combined. Taste and adjust for salt and pepper.
- Reduce the heat to low and add cheddar cheese, Colby, and Parmesan. Stir to combine until the cheese is fully melted.
- Add to the cooked pasta and stir to combine.
- Transfer the mixture to the prepared casserole dish.
Buttery Cracker Topping (Optional):
- In a medium bowl, combine the cracker crumbs with the melted butter and stir with a fork until fully combined.
Toppings:
- Sprinkle the remaining cheese (check the Toppings section) evenly over the top.
- Sprinkle the Buttery Cracker Topping (if using) evenly over the surface.
Bake:
- Bake the casserole uncovered in the preheated oven for 25-30 minutes. Until the top is golden brown and bubbly.
- Remove from oven and let it rest for 10-15 minutes before serving.
Video
Notes
Don’t let the pasta get too soft
The first thing to remember is to boil it 2 minutes less than the package directions call for. I usually go for just under al dente. Stir frequently to prevent them from sticking. Then, I rinse the pasta under cold water right away to stop the cooking process. Also, be sure to use a high-quality brand name like Barilla, so the noodles hold up under pressure. Finally, let it rest for 10 minutes after removing it from the oven to set.More tips to consider:
- Be sure to undercook the pasta. It will finish cooking in the oven. Otherwise, it will end up mushy.
- I always shred my own cheese. Pre-shredded cheese contains wood pulp, cellulose, or other ingredients to prevent clumping.
- Always salt the water before cooking the pasta; this will season the noodles.
- When cooking the pasta, place a wooden spoon over the pot to keep it from boiling over.
- Make sure the cream is off the heat before adding the cheese so the mixture does not separate.
- Gluten-free pasta absorbs more sauce than regular pasta, so it may need a little more milk than your normal mac and cheese recipe.
My perfect Mid week dinner right there!
All the fun with none of the guilt! I can’t wait to try this !!
This is a comfort food dinner for the win! The whole family will love this!
Looks so perfect! Definitely a must try!
This looks AMAZING! Love that butter cracker topping!
I can’t believe how much I am in love with this mac & cheese! I know that I am going to have to make this over and over again for my family and I.
Hello! Could I use cut up toasted gluten free bread in place of the gluten free cracker crumbs?
Yes, but it should be like croutons in texture.
Looks tasty. I love the addition of the garlic, onion, mustard powder. Sometimes it can get boring and I think this will help a ton
Yes! These add so much flavor!
I have been trying to make decent Mac n Cheese all my 62 years (my mom made dynamite Mac n Cheese). Mine was always dry, or tasteless and this recipe knocked it out of the park! Even my hubby, who has put up with all my disasters loved it! I put GF Veggie hotdogs in it too (cut up) – it was awesome and made SO much, that I’m able to give some to my kids too! Something so easy should be easy to make – NOT!! Thanks very much!!
Can this be frozen? I want to make this for a friend who just had a loved one pass away – I want to try to make something that doesn’t have to be eaten right away just in case they have been bombarded with other dishes. Would I freeze before or after baking if possible? Thanks!!
Yes, for best results please assemble it and freeze it, after that it can be simply baked.
This was ahhhmazing!!! My family (who’s not GF) loved it. This is a dish that can easily be taken to events/dinners and no one would know it’s gluten free. THANK YOU!!
I never comment on these things but this recipe is fantastic. I halved the amount of milk because I just like a thicker sauce but followed everything else to a T. Best mac and cheese I’ve ever made, — including when I used to make it with gluten ingredients
Thank you for your review Danielle! Glad you liked this recipe!
Could you make this ahead and cook the next day?
Yes.
What a wonderful recipe! Love it, I added meat…😁
The option to double the recipe isn’t working. 🙁
sorry, it has been fixed
Any tips for assembling then cooking a few hours later?
It will work great, just bring it to room temp for 20 minutes before cooking it.