
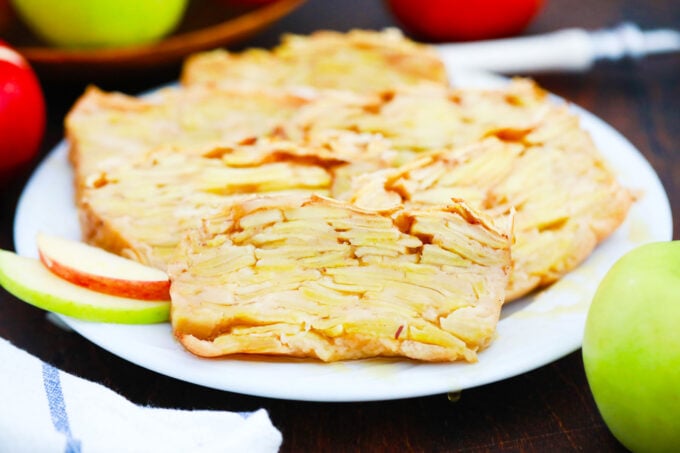
Invisible Apple Cake Recipe
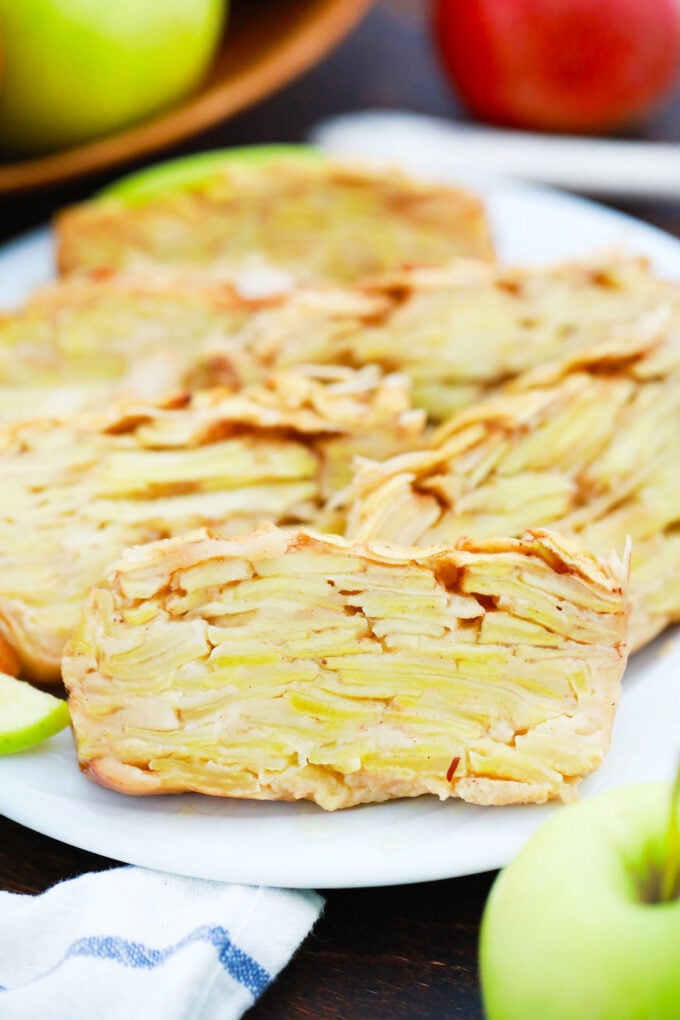
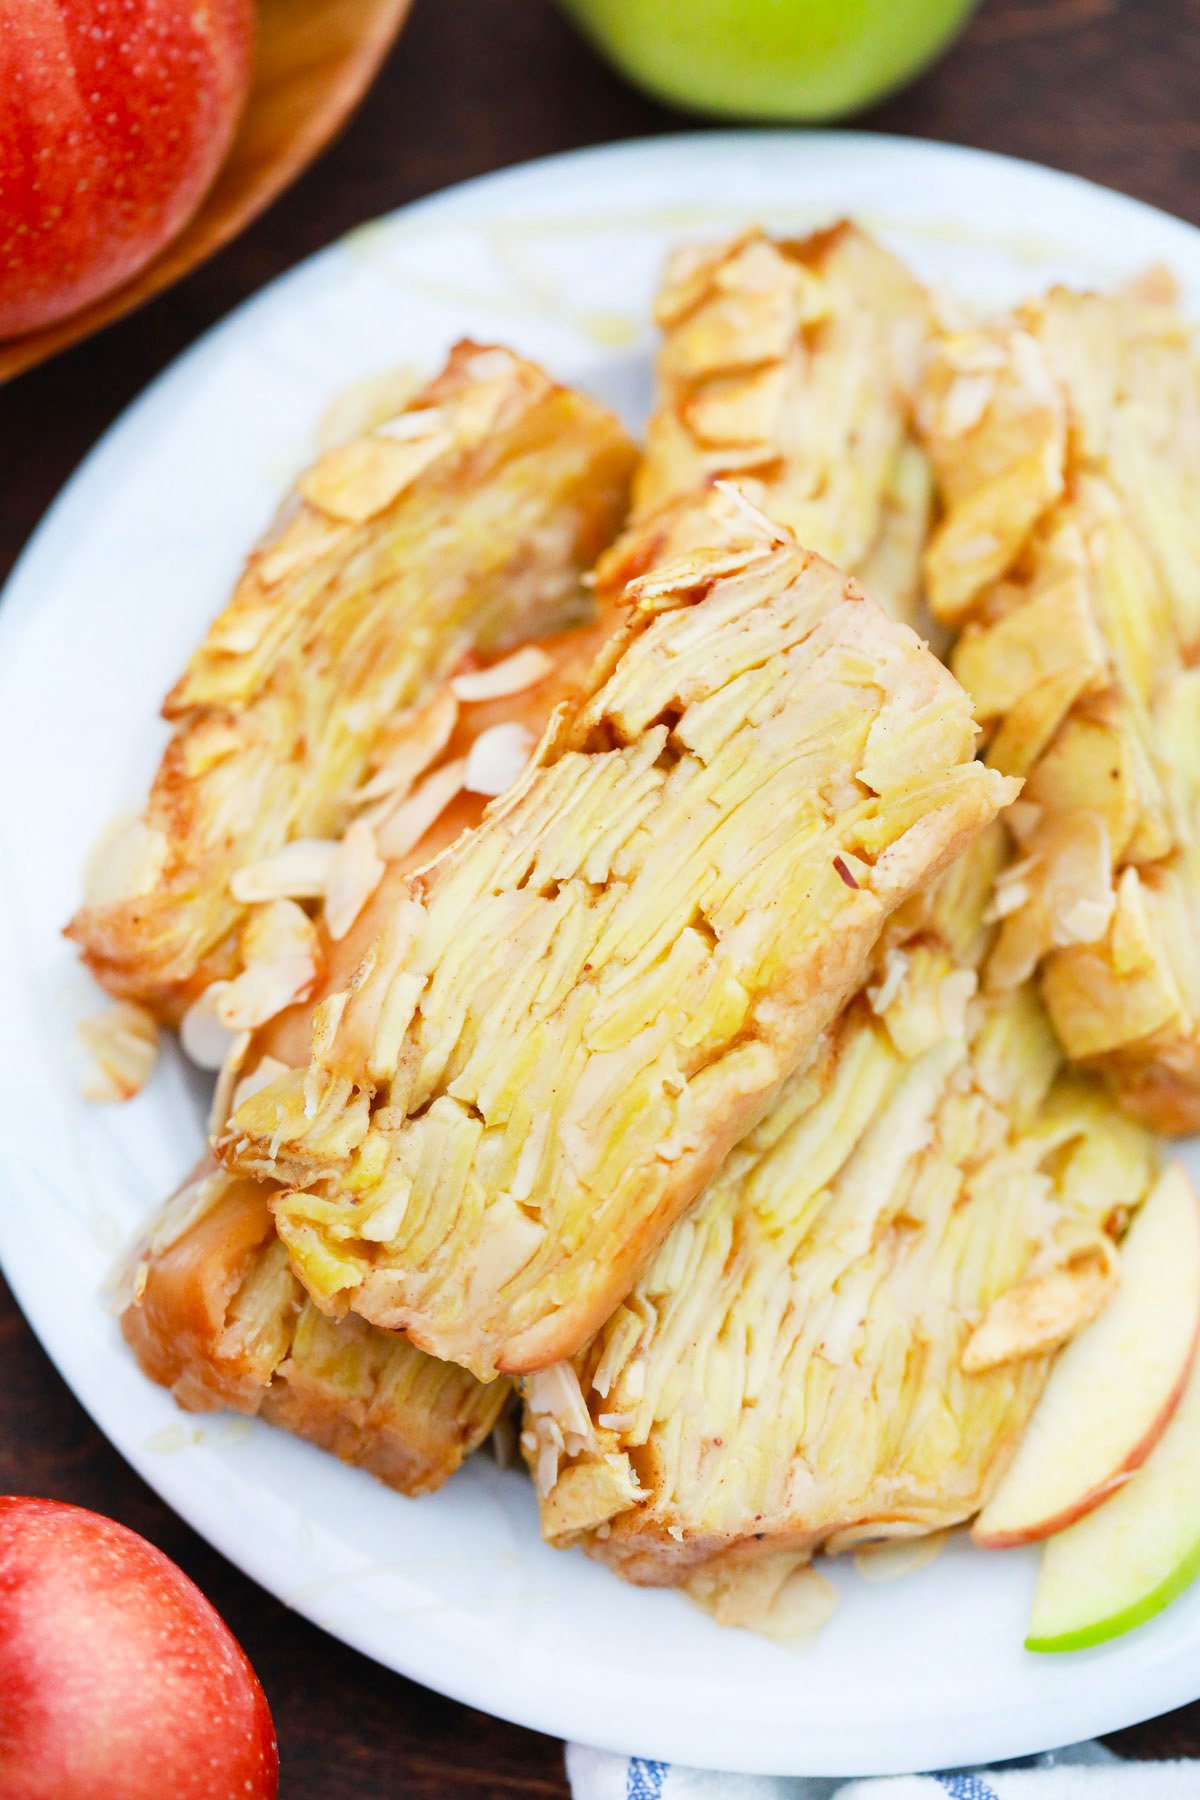
This Invisible Apple Cake is a delicious dessert layered with thinly sliced apples, maple, and warm spices baked in a custardy batter. I topped with crunchy almonds and it tastes like a lighter version of apple pie that is delicate, flavorful, and so easy to love. I am sure this will be a family favorite at your table too.

Since it is apple season right now, I have been making all kinds of apple recipes. My recent Instant Pot Apple Crisp has been a big winner because it is ready in only 30 minutes, and yes moms, that really is all it takes! I also have to recommend making my Instant Pot Cinnamon Apples if you have a few apples on hand. In my house, my kids call it a popular little snack, and they always ask for it.
Table of contents
For this Invisible Apple Cake recipe, I like to keep things simple with Honeycrisp apples, butter, eggs, milk, flour, and a few baking essentials. It takes me about 30 minutes to prep, and then I let it bake for an hour while I tidy up the house or just spend time with my kids. Once it cools and I slice it, it looks so beautiful on the plate, and I love enjoying a piece with a cup of coffee, my favorite. It also makes a wonderful dessert after dinner, especially with my sweet and savory apple cinnamon pork chops. And if you still have apples to use but do not want cake, my apple snickers salad made with Snickers candy bars, cream cheese, and powdered sugar is always a favorite too.
Why you will love this recipe
- Layers of apples and spices: I love how this cake is packed with thinly sliced apples, warm spices, and a custardy batter that bakes into a soft and flavorful dessert.
- Simple family dessert: This recipe is perfect when I want to bake something sweet for my family using just apples, butter, flour, milk, and a few basics. It is easy enough for a weekday treat but also beautiful for holidays.
- Perfect texture and taste: The custardy layers with maple and spices taste so comforting, while the crunchy almond topping adds a great amount of sweetness and crunch. My kids love it as an after-dinner dessert, and I love it with my coffee.
- Seasonal and versatile: Since apple season always brings so many fresh apples, this recipe is a wonderful way to use them up. Whether you are serving it for a Sunday dinner, a holiday meal, or just any afternoon, this cake is always amazing.
What you will need

- Apples and nuts: I like to use Honeycrisp apples peeled and sliced thin, along with sliced almonds for a crunchy topping.
- Wet ingredients: Melted unsalted butter, large eggs, whole milk, vanilla extract, and maple extract all help create a rich custardy batter.
- Dry ingredients: All-purpose flour, baking powder, kosher salt, cinnamon, and nutmeg come together to give the cake structure and the fall flavor I am obsessed with.
- Sweeteners: Maple sugar or white sugar is mixed into the batter, and maple syrup is my favorite garnish for serving.
How to make
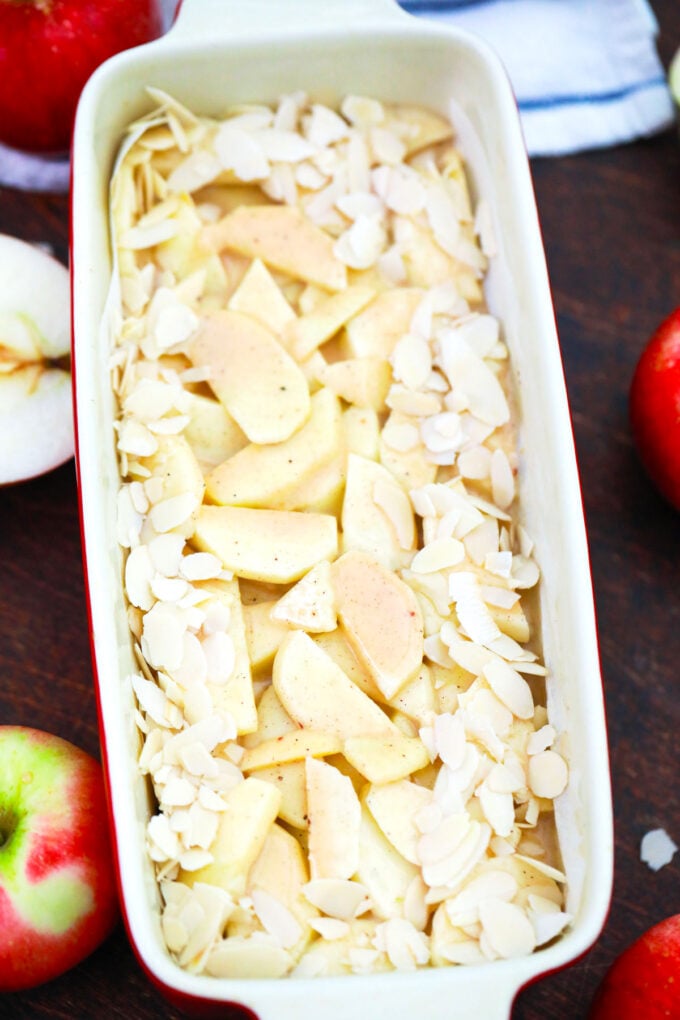
Preheat and prep the pan: First, I set my oven to 350 degrees F. While it warms up, I spray a loaf pan with nonstick cooking spray, dust it lightly with flour, and line it with parchment paper, letting the paper hang over the long sides so it is easier to lift the cake out later.
Mix the ingredients: While the oven finishes preheating, I whisk together the salt, maple extract, vanilla, baking powder, eggs, milk, and melted butter in a medium bowl. I use a rubber spatula to scrape down the sides, and the batter should look thin like crepe batter.

Stir in the rest: Next, I add the flour, cinnamon, and nutmeg to the bowl and mix until the batter is smooth and well blended.

Fold: Then, I gently fold in the apple slices, making sure each one is coated evenly with the batter.

Fill the pan: After that, I stack the apple slices in neat columns along the bottom of the loaf pan. I press them down gently, turn the pan, and keep layering until the pan is completely filled.
Add the batter: Next, I pour the cake batter over the apple slices and let it rest for about two minutes so it can settle into the layers. Then I sprinkle almond flakes around the edges for a crunchy finish.
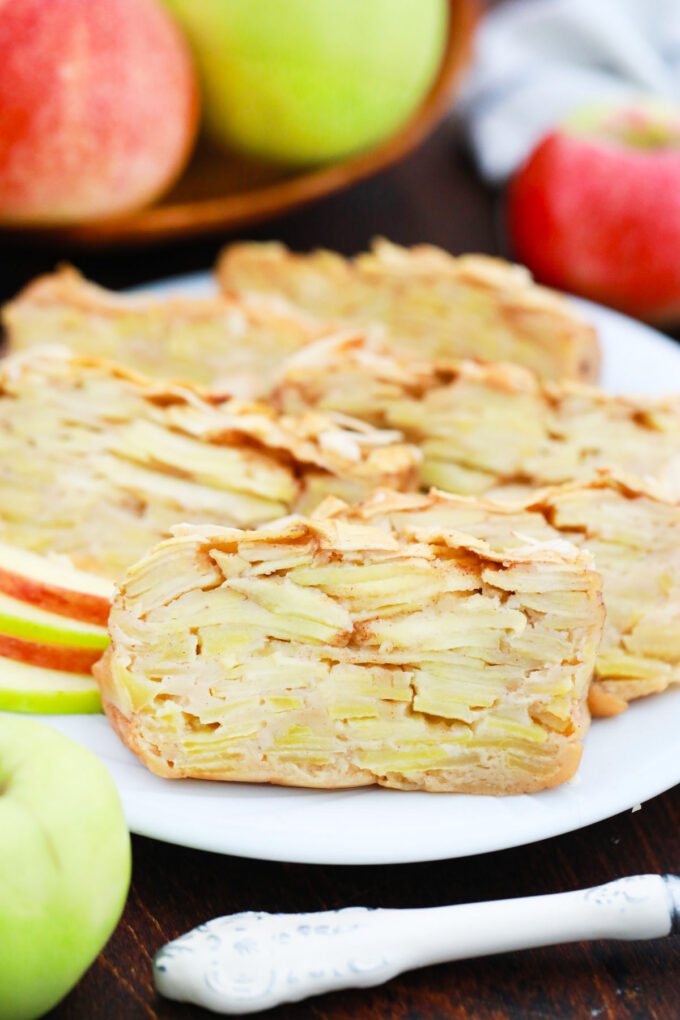
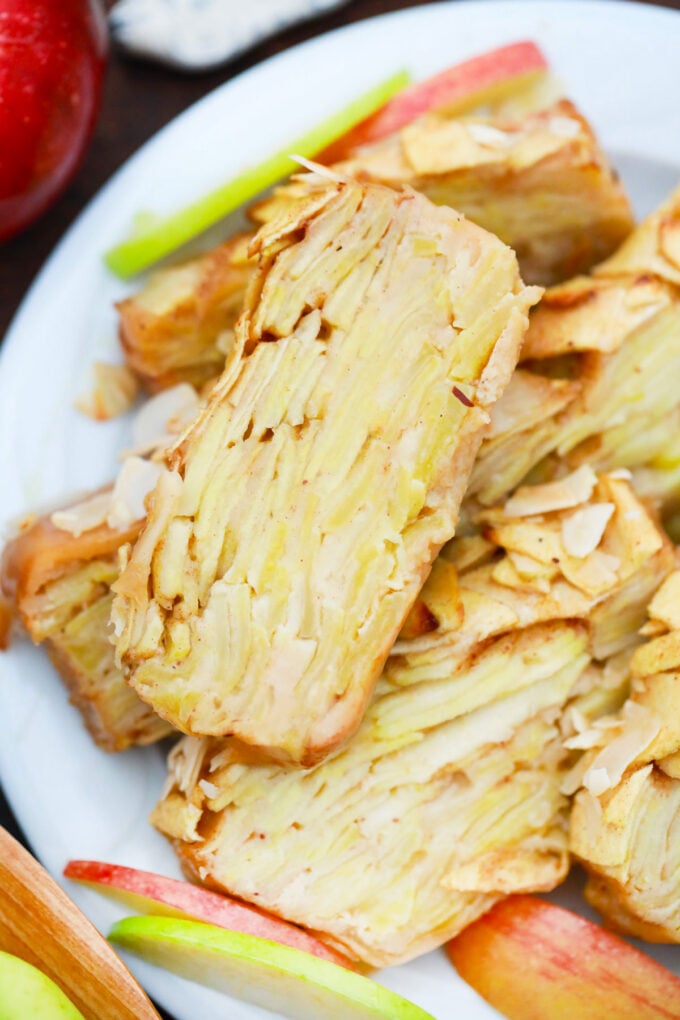
Bake the apple cake: I bake the cake for about 40 minutes until the almond flakes look golden brown. Then I cover it with foil and continue baking for another 25 to 30 minutes, checking with an instant-read thermometer to make sure it reaches 200 degrees F in the center. After baking, I let the cake cool for 25 to 30 minutes before slicing.
Let the cake cool: Lastly, I lift the cake out of the pan using the parchment paper and place it on a wire rack. I let it cool completely before slicing and serving.

Expert tip
Slice the apples thin even
I always say the secret to making the best Invisible Apple Cake is to slice the apples as thin and even as you can, about 1/8 inch thick. I like to use a mandoline because it makes the job quicker, and the slices bake up beautifully layered, soft, and delicate, giving the cake a light texture my family love.
More tips to consider:
- If you do not have a mandoline, you can use a very sharp knife, but it will be challenging to get the apple slices thin enough.
- When it is time to mix the batter, I use my electric mixer with a big bowl to make it easier on myself. It keeps the batter smooth and saves me a lot of stirring.
- To get that pretty marble look in the cake, I always turn the pan after each layer of apples. It helps the slices stack in a neat pattern that looks so nice when sliced.
- Since the batter is thin, I avoid using a springform pan because it can leak. If I have to, I wrap the outside with foil to be safe.
- On busy days, I skip the layering and just pour the batter over the apples. The look may not be fancy, but it still bakes into a tasty cake that my family loves.
- When I want a taller cake, I use about two pounds of apples but never more. Any more and the cake does not set the way it should.
- To keep my apple slices from browning, I drop them straight into the batter as I slice. That way they stay fresh and keep their nice color.
Recipe variations and add-ins:
- Sweet pear flavor: I swap apples for 2 pounds of thinly sliced pears. The cake comes out soft and lightly sweet with a fruity flavor my kids enjoy.
- Cranberry apple pop: I mix in 1 cup of fresh cranberries with the apples. The little bursts of tartness balance the sweetness so well.
- Nutty crunch mix: I add 1/2 cup of chopped walnuts or pecans to the batter. The crunch makes the cake richer and more filling.
- Caramel drizzle: I pour 1/4 cup of caramel sauce on top once it is baked. It makes the cake extra rich and perfect for holidays.
- Spiced up bake: I add 1 teaspoon of cardamom with the cinnamon and nutmeg. The warm spices make the cake smell wonderful and taste deeper.
Serving suggestions:
When I make this invisible apple cake for the holidays, I like to serve it with a big spoonful of my apple pie filling on top. The warm apple layers remind me of baking with my mom, and the orange marmalade is another topping that brightens up the table when my family gathers for Thanksgiving dessert.
For dinner plans, I remember last Wednesday we had my easy cabbage soup together and this cake was the sweet ending everyone enjoyed at the table. On chilly weekends, my kids ask for Instant Pot pumpkin soup, and finishing the meal with this apple cake always makes us happy.
How to store leftovers:
- Store: Once my apple cake has cooled, I put the leftovers in an airtight container and keep them in the fridge. It stays fresh for up to three days.
- Freeze: If we are not going to eat it soon, I wrap it up well and freeze it. It keeps in the freezer for about three months.
- Thaw: When I want to serve it again, I let it thaw overnight in the fridge so the texture stays soft and the flavors stay rich.

Frequently asked questions
I usually use Honeycrisp apples for this recipe, but Pink Lady, Fuji, or Ambrosia also work really well. If I want a tangier flavor, I go for Granny Smith instead. Really, any firm apple will work as long as it slices nicely. I like choosing apples that balance sweetness and tang so the cake tastes rich but not overly sweet.
It is not easy to count the layers since the apples are stacked like shingles, but I usually plan for a good amount. For the top, I use about 40 to 50 slices, picking the thickest and nicest ones so the cake looks beautiful once baked.
The batter looks more like crepe batter than regular cake batter, and that is exactly how it should be. It wraps around each apple slice and bakes into a custard-like texture that makes the cake so soft and light. My husband always says it tastes like apple pie met custard, and that is what makes it so unique.
More recipes with apples:


Loved this recipe? I’d love to hear from you! 💛 Leave a 5-star rating ⭐️ in the recipe card below and share your thoughts in the comments – I read and appreciate every single one!
Let’s stay connected! Follow me on Facebook, Instagram, Pinterest, and YouTube for more delicious, sweet and savory recipes. Have a question? Ask in the comments, and I’ll be happy to help! 😊 with love Catalina!
Invisible Apple Cake Recipe
Ingredients
- 1/2 cup white granulated sugar or use maple sugar for extra flavor
- 1/2 cup whole milk room temperature
- 2 large eggs room temperature
- 2 tablespoons unsalted butter melted
- 1 teaspoon baking powder
- 1 teaspoon maple extract
- 1 teaspoon vanilla extract
- 1/2 teaspoon kosher salt
- 1 teaspoon ground cinnamon
- 1/4 teaspoon ground nutmeg
- 3/4 cup all-purpose flour sifted
- 5 cups peeled and sliced apples use Granny smith or Honeycrisp and slice them in 1/8-inch thick slices
- 1/4 cup slivered almonds
Instructions
- Preheat oven to 350°F.
- Spray an 8½ x 4½-inch loaf pan with baking spray.
- Line the pan with parchment paper, letting some hang over the sides of the pan.
- In a medium bowl, whisk together sugar, milk, eggs, melted butter, baking powder, maple extract, vanilla extract, and salt until well combined.
- Using a spatula, whisk in the flour, cinnamon, and nutmeg, and stir just until combined and smooth.
- Using a rubber spatula, gently fold in the apple slices, until evenly coated.
- Starting on one long side of the prepared loaf pan, shingle about 5 apple slices in columns until the bottom of the pan is filled.
- Lightly press to level the layer, turn the pan 180 degrees, and repeat the layering and pressing process until the pan is filled.
- Pour the remaining batter on top and distribute it evenly.
- Sprinkle the almonds around the edges.
- Bake until golden brown, about 40-45 minutes. After that, cover with foil, and bake until set, about 20 minutes more.
- Remove from the oven and place the pan on a wire rack, cool the cake in the pan for 25 to 30 minutes.
- Using the excess parchment as handles, remove the cake from the pan, and let cool completely on a wire rack.
- Serve at room temperature, or chilled.
Video
Notes
Slice the apples thin even
I always say the secret to making the best Invisible Apple Cake is to slice the apples as thin and even as you can, about 1/8 inch thick. I like to use a mandoline because it makes the job quicker, and the slices bake up beautifully layered, soft, and delicate, giving the cake a light texture my family love.More tips to consider:
- If you do not have a mandoline, you can use a very sharp knife, but it will be challenging to get the apple slices thin enough.
- When it is time to mix the batter, I use my electric mixer with a big bowl to make it easier on myself. It keeps the batter smooth and saves me a lot of stirring.
- To get that pretty marble look in the cake, I always turn the pan after each layer of apples. It helps the slices stack in a neat pattern that looks so nice when sliced.
- Since the batter is thin, I avoid using a springform pan because it can leak. If I have to, I wrap the outside with foil to be safe.
- On busy days, I skip the layering and just pour the batter over the apples. The look may not be fancy, but it still bakes into a tasty cake that my family loves.
- When I want a taller cake, I use about two pounds of apples but never more. Any more and the cake does not set the way it should.
- To keep my apple slices from browning, I drop them straight into the batter as I slice. That way they stay fresh and keep their nice color.
This looks absolutely delicious! I love all those layered apple slices.
This looks like a fantastic cake. Love all the layers and flavors!
WOW! Those amazing layers! I would love to try this cake!
I would love a BIG slice of this fabulous cake!! YUM!
This is such a fun dessert! Always love a good apple recipe.
This is such a perfect fall dessert! So good with coffee!
This looks the best of many similar recipes I’ve read. What size loaf pan do you use?
Apologies! Just saw that the loaf pan size in is the actual recipe. Excited to try this!
made it and it is really delicious, so easy just first I prepared the oven, the pan with parchment paper, sliced the apples, mixed and beat all ingredients, then, I added to the apples in the pan. baked 45 minutes and voila, although I cheated with my kitchen aid batters and slicer tools
thanks for the feedback, glad you liked it!