
Dream Extreme Oreo Cheesecake
When I think of a sinful and indulgent dessert, this Dream Extreme Oreo Cheecake comes to mind. It’s a blissful combination of flavors and textures, and it’s the ultimate dream come true for chocolate and Oreo lovers. Rich, fudgy, with a pillowy layer of Oreo mousse, this majestic cake is manageable to make at home and is guaranteed to be a showstopper.

Cheesecakes are my passion. Over the years, I have published many unique and delicious homemade concoctions. Once you try your hand at making them at home, you quickly realize how rewarding and surprisingly simple they are. From the buttery top to the creamy filling and endless toppings, every layer is an opportunity to create something delicious. Some of my most popular ones are the Original Cheesecake, Pecan Pie Cheesecake, and Instant Pot Oreo Cheesecake.
Table of contents
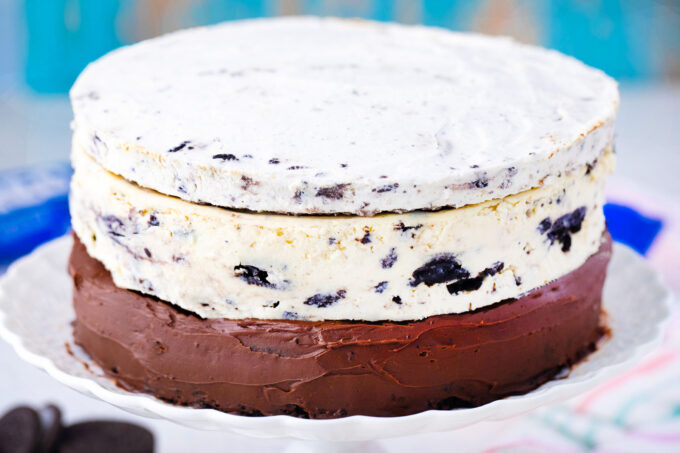
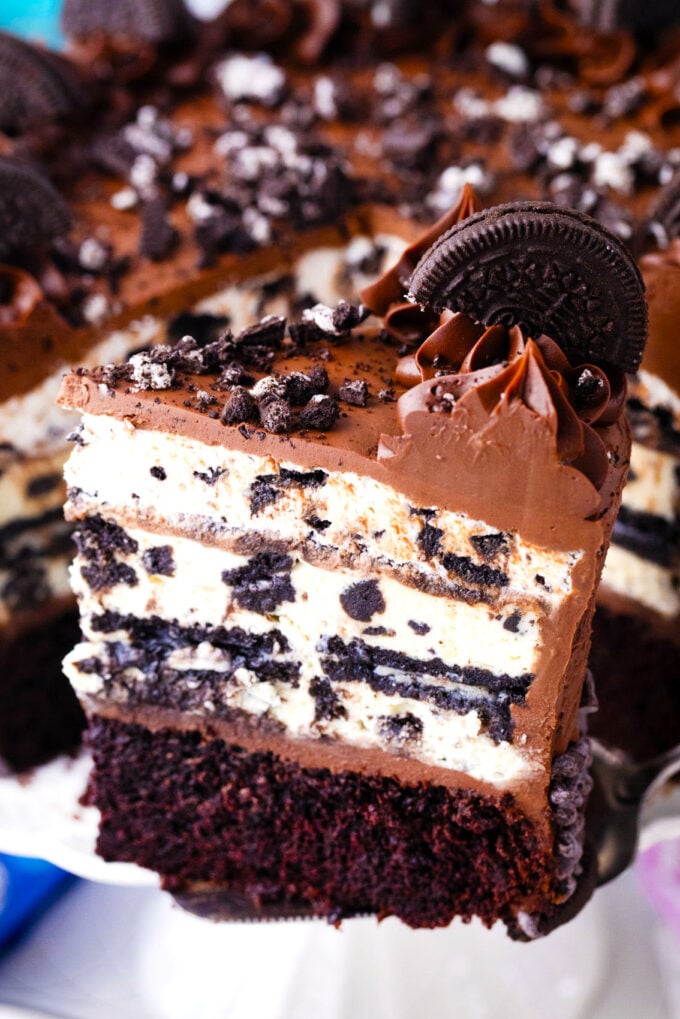
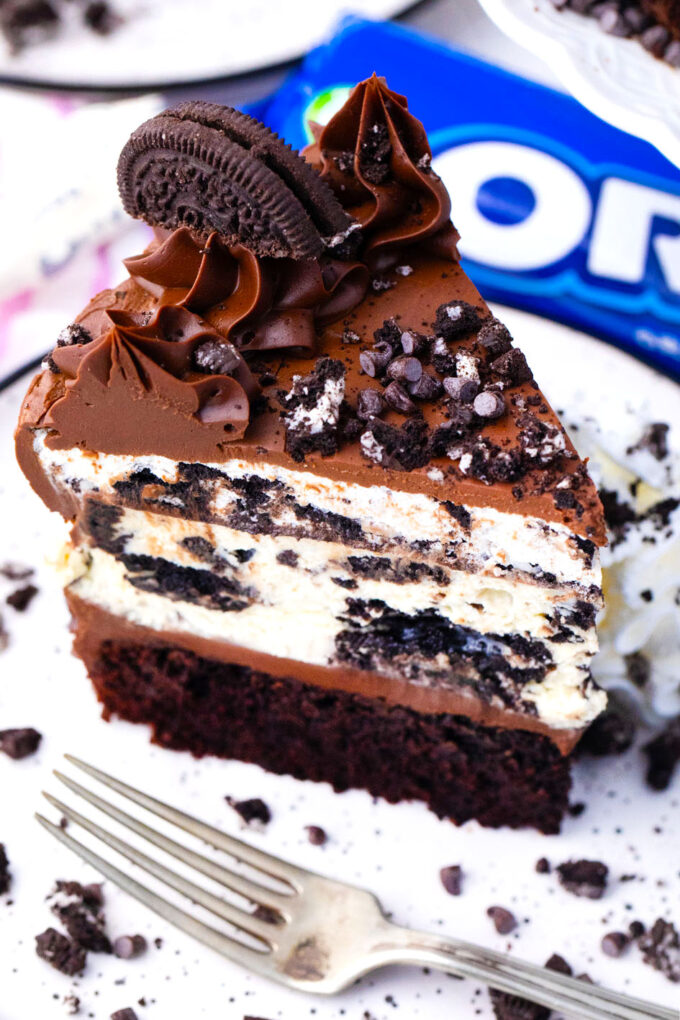
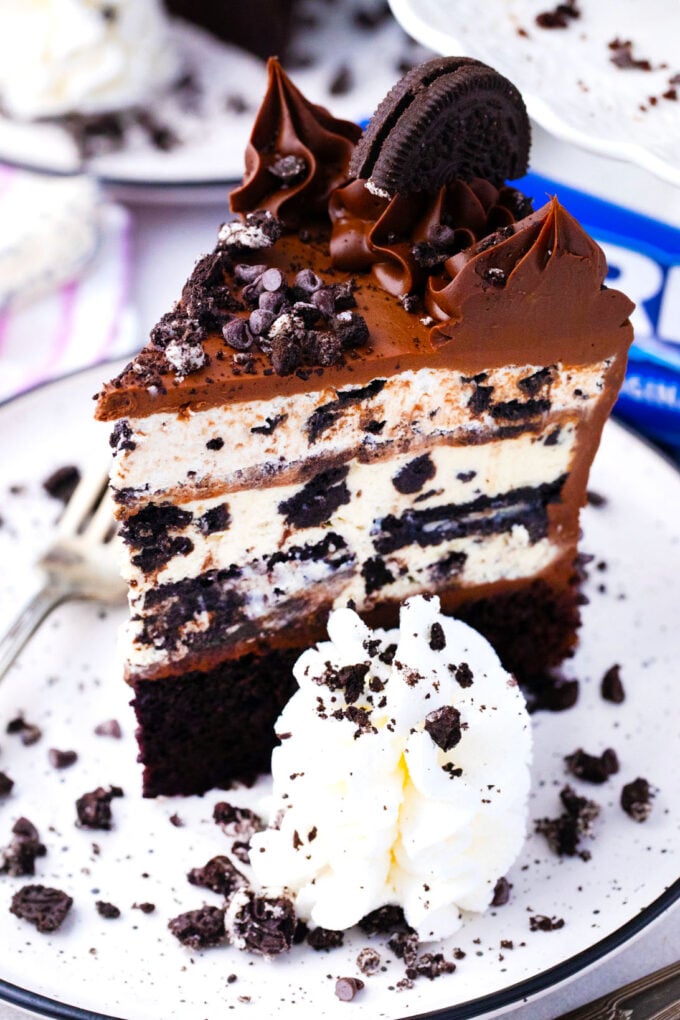
Dream Extreme Oreo Cheesecake was first discovered by my husband a few years back when he dined at the Cheesecake Factory restaurant. He was so impressed and amazed by the taste and richness of the cake that we have been making this cake ever since. Indeed, this is a fantastic and impressive cheesecake that consists of five layers. Making it at home is a true adventure, and you’ll love every single step of it. Trust me, it is well worth it!
Most of the time is spent waiting for specific layers to set, so you have to work in steps, starting one day before you plan to serve it. This makes it the ideal dessert to prepare in advance. The first layer is a fudgy cake followed by chocolate frosting. Then, it is layered with an Oreo cheesecake and topped with Oreo mousse. Finally, it is then topped with a chocolate ganache, which complements the cake nicely.
After exploring and searching for the best cheesecake in my arsenal, I concluded that this Dream Extreme Oreo Cheesecake is our family’s favorite. The cake looks stunning, it is filled with Oreos, and rich in chocolate flavor. It is the ultimate and most perfect dessert, seeming extravagant but, in reality, quite approachable.

Why you will love this recipe
- You don’t have to worry about cracks: Cover them with Oreo mouse and chocolate ganache, so there is no pressure or stress to make the smoothest cheesecake.
- A chocolate lover’s dream: Fudgy chocolate cake, frosting, and filling, a delicious chocolate ganache, and lots of Oreo cookies!
- Easier than it looks: Although time-consuming, the steps can be completed in advance, making it relatively easy. Make the cheesecake layer and the chocolate cake. The next day, prepare the mousse and ganache, and then assemble the cake.
- No need to go to the restaurant: Save money and stay home. While this is not a cheap cake to make, it’s still more affordable than buying one at a restaurant.
What you will need
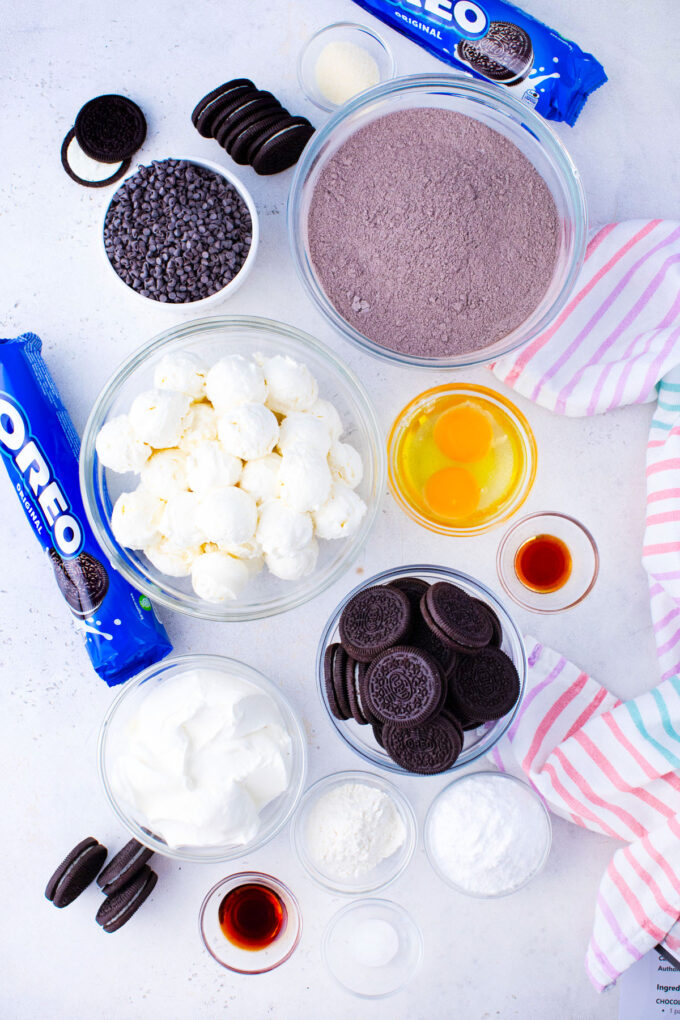
- Chocolate cake layer: For this layer, I took a shortcut and used a chocolate fudge cake mix, along with the ingredients listed on the package.
- Oreo cheesecake layer: This layer is decadent and rich, made with cream cheese, sour cream, eggs, vanilla extract, sugar, and flour, with a twist: I mix in crushed Oreos.
- Oreo mousse layer: This layer is made with a mixture of milk and heavy cream, gelatin, powdered sugar, vanilla extract, and, of course, lots of crushed Oreos.
- Chocolate ganache: I use heavy cream, sugar, and high–quality chocolate, such as Belgian chocolate.
How to make
Preheat the oven: First, I preheat the oven to 350 degrees. Then, I spray a cake pan with baking spray and place a parchment circle at the bottom of it. To be safe, I also grease the sides and top of the parchment paper.
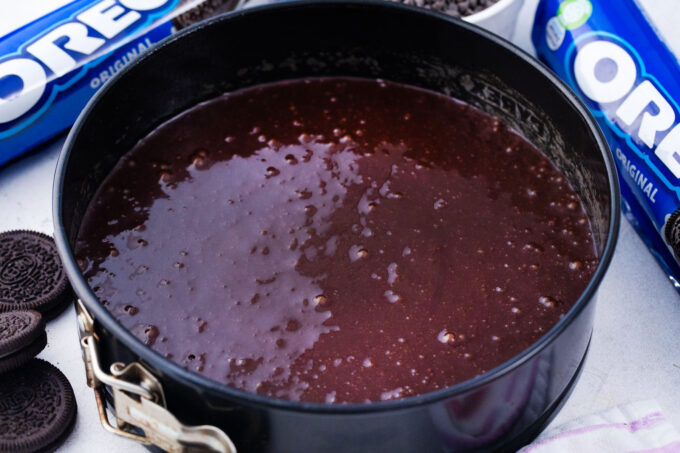
Make the cake: Now, I follow the instructions on the cake mix box to prepare the batter and bake it. Once it is done, I place it on a cooling rack until it is cool enough to move. Then, I remove it from the pan and let it fully cool on the rack. I wrap it in plastic wrap and refrigerate it until it’s time to assemble the cheesecake.
Turn the oven down: Next, I reduce the oven temperature to 325°F and prepare a 10-inch springform pan in the same manner as the cake pan.
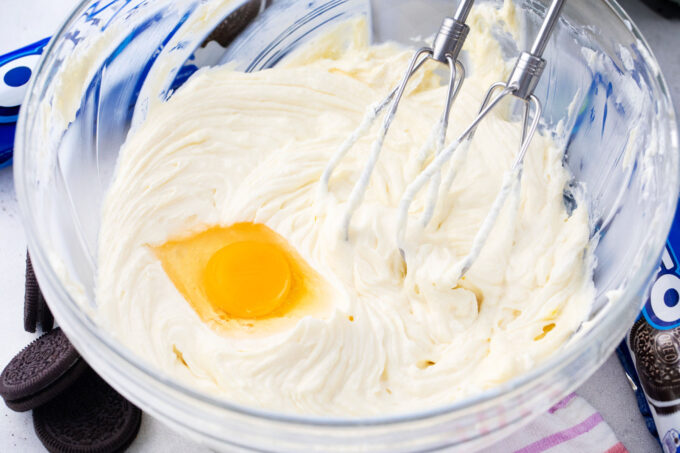
Start the cheesecake: In a large bowl, I beat the cream cheese for one minute before adding the flour and sugar. Keeping the mixer on low, I add the eggs one at a time, beating just until they are fully incorporated.
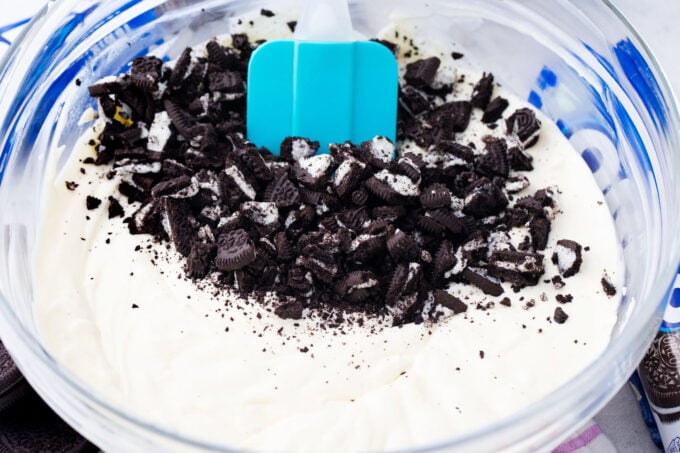
Mix it up: Now, I add the salt, vanilla, and sour cream, mixing the same way. Finally, I gently fold in the crushed Oreos.
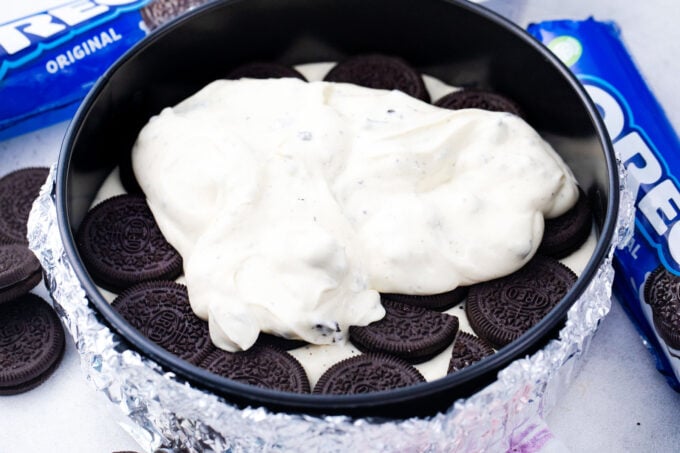
Transfer: Then, I pour half of the batter into the pan and place the whole Oreo cookies flat on top. Top with the remaining batter and level the top with a spatula.
Bake your cheesecake: I place the cheesecake in the oven and bake it for 60 minutes. If you are using a water bath, put it in a roasting pan and fill it halfway with hot water. Be sure to wrap your cheesecake pan in foil to prevent leaks. When it’s done, it will be just slightly wobbly in the center, not wavy throughout the cake.
Let it cool: I turn off the oven and open the door just a crack to let it cool for one hour. Then, I transfer the cheesecake to cool for 30 minutes on a cooling rack before chilling it in the fridge for six hours. After that, I run a butter knife around the edges to release the cake, and then store it in the refrigerator until it’s ready to assemble.
Prep the pan again: I again prepare the springform pan in the same way as before, set it aside, and place a large bowl in the freezer.
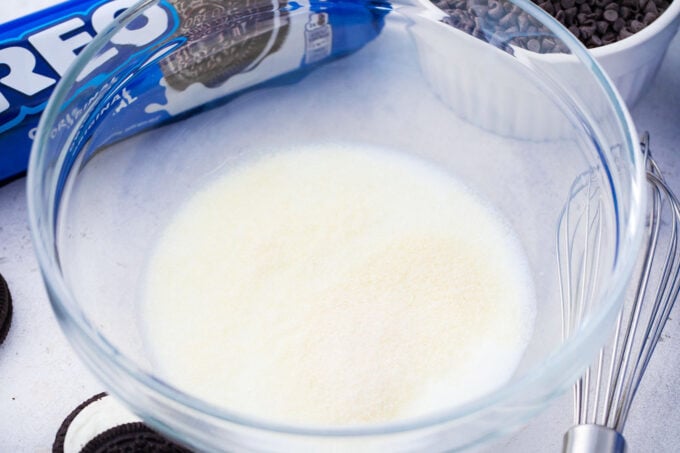
Make the gelatin: Then, I add half of the milk to a bowl and sprinkle the gelatin on top, and let it bloom for five minutes. After it blooms, I microwave it for 15 seconds, then stir. I microwave it again to melt the gelatin, add the remaining milk, and stir to combine.
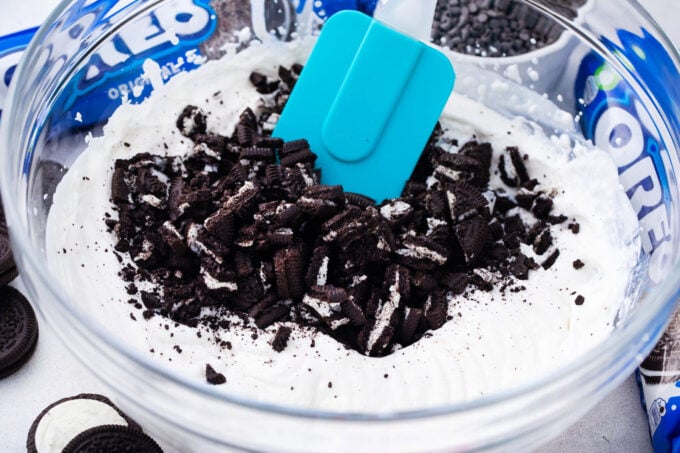
Whip the cream: I take the bowl from the freezer and pour the heavy cream into it. I add powdered sugar and whip the mixture until it reaches medium peaks. Next, I add the gelatin mixture and vanilla, then whisk again until it reaches firm peaks. I then fold in the crushed Oreos. Then, I pour the mousse into the prepared pan and refrigerate it for 2 hours.
Make the ganache: First, I bring the heavy cream to a boil in the microwave or on the stove. Then, I pour the chocolate chips into a large bowl and add the heavy cream on top. I stir until the chocolate is melted and smooth, then stir in the sugar until it is combined. Let it cool before placing it in the fridge, then use it when you are ready.
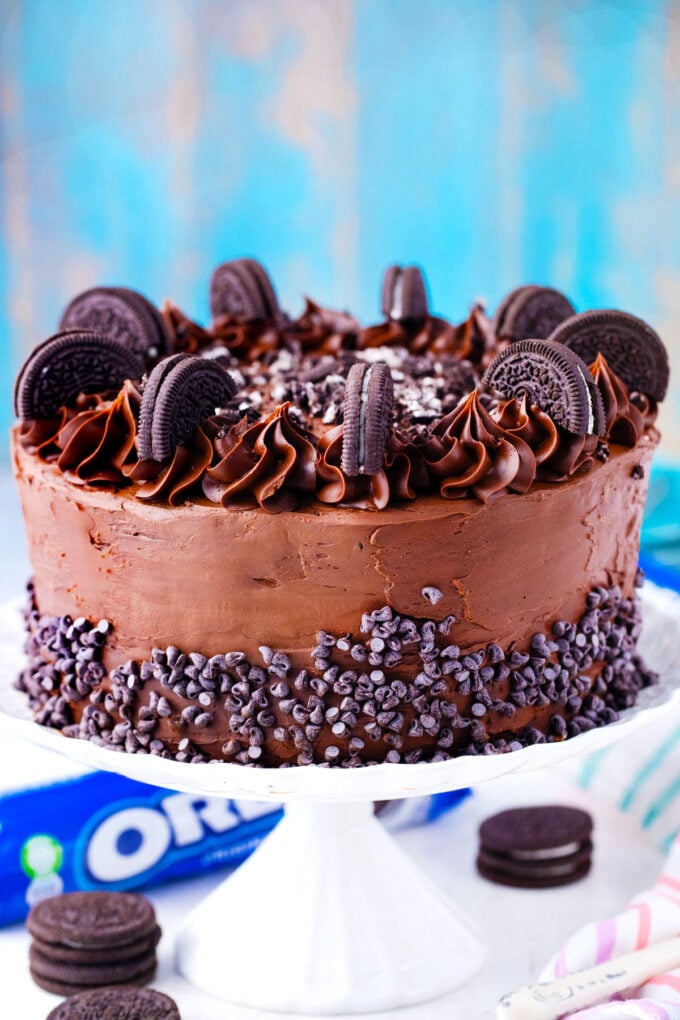
Assemble the cake: To assemble, it is best to use a cake stand with a cardboard round cake paper on top. I whip the ganache frosting for about 2 to 3 minutes before starting, until it is spreadable and smooth. Then, I spread some ganache on the paper to hold the cake in place. Level the cake and place it on the stand. Spread 1/3 of the ganache evenly on top.
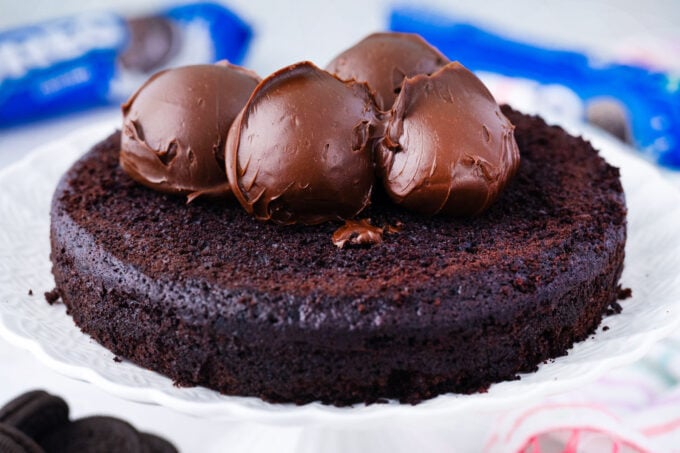
Decorating: Carefully, I place the Oreo cheesecake on top and then add the Oreo Mousse layer, using half of the remaining ganache to cover the rest of the cake. I put the remaining frosting into a piping bag with a star tip and pipe it on top as desired. You can also add the cookies as shown or as you like. I even added some extra chocolate chips around the outside of the cake.
Chill and serve: I chill the cake for at least 2 to 3 hours before slicing and serving.
Expert tip
Using a springform pan
Some say they dislike using springform pans when making cheesecakes because they leak, which can be a big problem when using a water bath. However, using aluminum foil works just fine to solve that issue. Another way to prevent the problem is to put your springform pan in a round cake pan that is just a tiny bit larger than the springform. This way, any water or moisture that leaks in will evaporate and will not affect your cheesecake at all.
How to remove a cheesecake from the springform pan:
- First, ensure the cake has thoroughly cooled and is stored in the refrigerator.
- Carefully run a small knife around the edge of the pan, starting at the top and working your way down. Gently loosen the bits that stuck to the pan.
- Next, unbuckle the springform pan and remove the circular band only after the cheesecake has been properly chilled and has become cold.
- Similarly, to transfer it to a serving dish, run a long, thin spatula between the crust and the pan bottom, and gently slide the cheesecake onto the serving dish.
- We also like adding parchment paper to the bottom of the pan, which helps the cake slide out easily.
More tips to consider:
- Read all the directions and plan accordingly. This is a complex cake with many steps and different chilling times.
- Use a springform pan. Once you do, you will never go back to using a regular pan for cheesecakes.
- Be sure to line the bottom of the pan with parchment paper. This is the simple way to remove all the cakes from the pan.
- ALWAYS use room temperature ingredients. This is essential to a creamy cheesecake with no lumps.
- If you didn’t remember to bring your ingredients to room temperature, warm the eggs in a bowl of water and the cream cheese in the microwave.
- After adding the eggs, do not overmix, as this can cause air bubbles in the cheesecake, which can lead to cracking and deflation.
- You do not always need a water bath. Especially if your cheesecake is covered like this recipe, but it is always good for keeping your cheesecake moist.
- Another key element is to cool your cake very slowly, cracking the oven door for an hour before removing it.

Recipe variations and add-ins:
- Different cake: Change it up. Use a distinct flavor of cake for the bottom layer. I have used strawberry for my daughter, who likes strawberries, and she loved it.
- Other cookies: Oreos come in so many flavors that you don’t have to stick to just one. Try golden, mint, peanut butter, dark chocolate, and birthday cake.
- Sparkles: Your kids will love this cake with sparkles. Top it with some edible sparkle decorations for a festive look.
- Rainbows: Just because it is chocolate doesn’t mean it has to be all brown. Add some color to it with rainbows. You can use candy, rainbows, gummies, or Skittles to make your own.
- White chocolate: Speaking of different colors, white chocolate would also be a suitable option for this. Change the ganache, Oreos, and cake mix to white chocolate.
Serving suggestions:
Dream Extreme Oreo cheesecake is the perfect dessert to impress your guests and make a lasting impression as the centerpiece of any dessert table. This cake is so elegant and tastes so good that it would be ideal for special occasions, such as Valentine’s Day dinner dates, anniversaries, or birthday parties. I like to serve each slice with a dollop of whipped cream and this easy-to-make 3-ingredient Oreo ice cream. They’re perfect together!
Another easy Oreo dessert to serve with this cheesecake is no-bake Oreo fluff. Talk about a match made in heaven. And it only has five ingredients. Switch the classic whipped on the side for the creative Orel fluff! With so much chocolate around, you may need to serve a bowl of fruit or a fresh fruit salad as well. Just to even things out a bit. One of the best drinks to serve with this delicious dessert is my Baileys S’mores milkshake. For the kids, try this hot white chocolate.
How to slice the cake
- Run a long, sharp, thin-bladed slicing knife under hot tap water or dip it into a glass of hot water before slicing this tall and complex cake.
- Then, wipe the knife clean and run it under hot water before making another cut.
- An easy, mess-free way to cut even slices is to use a cheese wire or unflavored dental floss. Clean the bits that have stuck to the wire or floss before every cut.

How to store:
- Refrigerate: Seal your leftovers in an airtight container and put them in the fridge for up to three days.
- Freezing: To freeze, pack in a freezer-safe container for up to three months.
- Defrost: For optimal results, thaw the frozen item in the refrigerator for several hours before serving.
Freezing the cake tips:
- Preferably, freeze the cake before topping it with the cookies, or remove them and set them aside.
- First, ensure the cake has thoroughly cooled and been refrigerated for at least 6 hours.
- The cake can be frozen BEFORE or AFTER it is assembled.
- If freezing the layers before assembling, wrap each layer tightly with aluminum foil, and then with plastic freezer wrap, or place it in a heavy-duty freezer bag.
- You can also wrap and freeze individual slices the same way.
- Properly stored, it will maintain the best quality for about 2 to 3 months.
- Thaw overnight in the fridge one day before serving.
Frequently asked questions
It happens, we all forget to take the ingredients out ahead of time. But you can put the eggs in a bowl of warm water for five to seven minutes. Cream cheese can also be softened in warm water. Just leave it inside the foil and put it in a sealed baggie. Let it soak for 10 minutes, and it will be soft. Or remove it from the foil and microwave it for 30 seconds.
First, ensure that all the ingredients are at room temperature and well-mixed. On the other hand, ensure that you do not overmix the batter. Once you add the eggs, mix them enough to combine. Also, do not open the oven while baking the cheesecake. A water bath can also be helpful. Cooling it in the oven with the door slightly ajar is also very important, as a sudden change in temperature may cause the cheesecake to drop in the center or crack.
This is usually due to a measurement problem. It’s possible that you didn’t have enough chocolate chips or had too much cream. Or maybe you used light cream instead of heavy cream. Light cream contains only about 20% fat, while heavy cream contains 36 to 40%. This will also change the thickness of the ganache. Also, ensure you use high-quality chocolate, as the generic kind often contains fillers that can cause it to be runny. The last thing is to avoid whipping it too much. If it is too watery, return it to the fridge for a while.
More Cheesecake Factory cheesecake recipes to try:


Loved this recipe? I’d love to hear from you! 💛 Leave a 5-star rating ⭐️ in the recipe card below and share your thoughts in the comments – I read and appreciate every single one!
Let’s stay connected! Follow me on Facebook, Instagram, Pinterest, and YouTube for more delicious, sweet and savory recipes. Have a question? Ask in the comments, and I’ll be happy to help! 😊 with love Catalina!
Dream Extreme Oreo Cheesecake
Ingredients
CHOCOLATE CAKE LAYER:
- 1 package Chocolate Cake Mix plus the ingredients on the back of the box
OREO CHEESECAKE LAYER:
- 24 ounces cream cheese softened to room temperature
- 1 cup granulated sugar
- 2 large eggs room temperature
- 1/2 tablespoon vanilla extract
- 1 cup sour cream room temperature
- 2 tablespoons all-purpose flour
- 1/2 teaspoons salt
- 10 Oreo cookies crushed
- 16 Oreo cookies whole
OREO COOKIE MOUSSE LAYER:
- 1 envelope powdered gelatin 2 1/4 teaspoons
- 10 tablespoons milk divided equally into 2 small bowls
- 1 cup heavy cream cold
- 1/2 cup powdered sugar Sifted
- 1 teaspoon vanilla extract
- 10 Oreo cookies crushed
CHOCOLATE GANACHE LAYER AND FROSTING:
- 3 cups heavy cream
- 24 ounces semi-sweet chocolate chips
- 2-3 cups powdered sugar
Instructions
- Preheat oven to 350 degrees F.
- Prepare a 10-inch cake pan with non-stick baking spray and place a parchment circle on the bottom. Grease the sides and top of the parchment paper. Set aside.
CHOCOLATE CAKE LAYER:
- Prepare the cake batter as directed on the Cake Mix box.
- Transfer the cake batter to the prepared cake pan and bake for the time specified on the box. A toothpick inserted in the center of the cake should come out clean or with a few cake crumbs, not raw batter.
- Remove the cake from the oven and place the cake pan on a cooling rack until the cake has cooled off.
- Remove the cake from the pan and let it fully cool. Wrap the cake in plastic wrap and refrigerate until ready to assemble.
OREO CHEESECAKE LAYER:
- For this layer, preheat the oven to 325°F.
- Prepare a 10-inch leak-proof springform pan, spraying it with non-stick baking spray and placing a parchment circle on the bottom. Grease the sides and top of the parchment paper. Set aside.
- In a large bowl, beat cream cheese for 1 minute. Add sugar and flour, and mix until thoroughly combined, with no lumps remaining. Scrape down the sides of the bowl with a spatula.
- With the mixer on low, add the eggs to the mixture one at a time and beat until just incorporated, being careful not to overbeat. Scrape down the sides of the bowl with a spatula.
- Add salt, vanilla extract, and sour cream and beat until combined, stopping to scrape the sides and bottom of the bowl with a spatula.
- Stir in the crushed Oreo cookies.
- Pour half of the cake batter into the prepared pan. Arrange the whole Oreo cookies on top of the cheesecake layer and top with the remaining batter. Level the top with a spatula.
- Transfer the cheesecake to the preheated oven and bake it for 60 minutes. It should be just slightly wobbly in the center but puffy and settled on the sides.
- Turn off the oven and crack open the door. Cool the cheesecake completely in the oven.
- Once completely cooled, remove the cake from the oven and refrigerate for at least 5-6 hours. Run a butter knife around the edges to release the cake from the pan. Store in the fridge until ready to assemble.
OREO MOUSSE:
- Prepare a 10-inch leak-proof springform pan, spraying it with non-stick baking spray and placing a parchment circle on the bottom. Grease the sides and top of the parchment paper. Set aside.
- Add half of the milk to a small to medium bowl and sprinkle the gelatin over it. Let the gelatin bloom for about 5 minutes.
- Once bloomed, place the bowl in the microwave for 15 seconds, stir to combine, and repeat to melt the gelatin.
- Add the remaining milk to the gelatin mixture and stir until well combined.
- Add the cold heavy cream to a large chilled bowl. Add powdered sugar and whip until it reaches medium-firm peaks.
- Add the vanilla extract and gelatin mixture to the whipped cream and whisk until firm peaks form. Fold in the crushed Oreo cookies.
- Pour mousse into the prepared pan. Place the pan into the fridge and set it for about 1-2 hours.
CHOCOLATE GANACHE LAYER AND FROSTING:
- Add the chocolate chips to a large bowl.
- Add the heavy cream to a medium saucepan over medium heat and stir for 2-3 minutes until it reaches a boil.
- Pour the hot, heavy cream over the chocolate chips and allow 2-3 minutes for the chocolate to melt. Stir the ganache until all the chocolate chips are completely melted and the mixture is smooth and shiny.
- While the ganache is still hot, add the powdered sugar and stir until it is fully dissolved.
- Allow chocolate ganache to cool, then transfer to the fridge. When ready to use, beat the chocolate frosting for 2–3 minutes until it becomes fluffy and spreadable.
ASSEMBLE THE CAKE:
- Start with a cake stand and place a cardboard round cake paper on top. Add 1/3 cup of chocolate frosting and spread it.
- Level the chocolate cake using a cake leveler or a sharp, serrated knife. Place the chocolate cake layer on the cake stand.
- Add 1/3 of the chocolate frosting and spread it in an even layer.
- Level the edges of the cake layer using a sharp, serrated knife. Place the Oreo Cheesecake layer on top of the frosting layer.
- Top with the Oreo Mousse layer.
- Half of the remaining frosting should cover the cake entirely. Add the remaining frosting to a piping bag fitted with a star tip and pipe frosting onto the top edge of the cake.
- If desired, top with Oreo cookies and crushed Oreo cookies.
- Chill the cake for at least two hours before serving, so the frosting sets, but it's even better after 4-8 hours.
- Serve with a side of whipped cream and more crushed Oreo cookies.
Video
Notes
Using a springform pan
Some say they dislike using springform pans when making cheesecakes because they leak, which can be a big problem when using a water bath. However, using aluminum foil works just fine to solve that issue. Another way to prevent the problem is to put your springform pan in a round cake pan that is just a tiny bit larger than the springform. This way, any water or moisture that leaks in will evaporate and will not affect your cheesecake at all.How to remove a cheesecake from the springform pan:
- First, ensure the cake has thoroughly cooled and is stored in the refrigerator.
- Carefully run a small knife around the edge of the pan, starting at the top and working your way down. Gently loosen the bits that stuck to the pan.
- Next, unbuckle the springform pan and remove the circular band only after the cheesecake has been properly chilled and has become cold.
- Similarly, to transfer it to a serving dish, run a long, thin spatula between the crust and the pan bottom, and gently slide the cheesecake onto the serving dish.
- We also like adding parchment paper to the bottom of the pan, which helps the cake slide out easily.
This cheesecake sounds really good. We all love cheesecake around here, so I will have to try this.
My daughter makes something very similar to this cake and take about over the top rich with chocolate. She usually doesn’t decorate it so fancy just because well her family doesn’t care about the decorating.
This is my kind of cheesecake. It looks incredible! I would love if someone made this for me. I am all about Oreos too.
I can’t wait to surprise my family with this new dessert at our next party or on Family Game Night because I know everyone would enjoy this.
Oh my gosh my husband would eat this in one sitting LOL. It looks absolutely delicious and I love how much chocolate there is on it.
I am on a diet right now, so this definitely looks great. It looks like a tasty dessert or treat! I will have to make it once I’m off my diet.
Cheesecake is one of my favorite desserts. This cheesecake looks divine. Love the flavor combination.
OMG, this is #BakingGoals for me! This looks so decadent and I wish I had a slice right now. This is gorgeous!
This is a delicious looking cheesecake. I love cheesecake so much, it’s delicious! I would totally make this and enjoy every bite.
Cheesecake is my favorite. I can’t wait to try this. I am hoping that I can replicate it.
This looks delicious. I love a good cheesecake and this one has all my favorite things in it.
This looks delicious! I am glad to know that it can be made and frozen ahead of time. It would be perfect for when all my kids come home, but I never feel like making a fancy dessert when I could be visiting with them instead.
Yes, yes yes! I need this in my life. With that many oreos, it can’t be bad.
It is 7 o’clock in the morning and this dessert is making me crave for something sweet already. That looks delicious.
I love Oreo cookies and my husband loves cheesecake. I bet this is a dessert we’d both like! It looks delicious!
Whoa! What a great recipe. I would love to make this in individual pots for Valentines day for my family. Yum.
Now, THIS dessert has my name written all over it! My mom swears I only ate Oreo cookies when I was 2…I still love them!
I am in love this delicious cheese cake, who can resist, Oreo cheese yum. Love it. This is going to be one of best dessert.
Wow this is a super yummy cheesecake. We love oreo, though this type of cakes take some patience to make, it is well worth it. This recipe is amazing and we really loved it! One of the best we have ever made! Thank you!
Happy that you enjoyed it!
This is a great recipe, my only frustration was how do you get 3 cups of granulated sugar to dissolve in the ganache. I whipped it for over 30 minutes in my kitchen aid and even tried reheating it in the microwave, yet it’s still so grainy…now I’m wondering if it was supposed to be powdered sugar. 😭
I was wondering if guwr gum can be used in place of the gelatin? And if so, would it require the same steps?
I had a problem getting the mousse to set hard enough to actually apply icing. I finall set it in the freezer for a few hours. is this normal?
Maybe you didn’t use enough gelatin?
Hi, this is my favourite cheesecake factory cake! I’m planning to make it for Thanksgiving this week (Canada) but wondering about the sugar in the ganache. Did you add the sugar to balance the cake since the rest of the layers don’t have a lot of sugar or was there another reason? I’m just wondering because I’m not used to seeing sugar in ganache and I’m worried that 3 cups might make it really sweet. If I were to leave the sugar out should I increase the sugar in the other layers to balance it? Would appreciate some extra info on this before I go ahead with the recipe. Thanks!
The sugar was added for the texture, if you leave it out, it will be a more runny ganache.
10/10 would recommend!!! Made this recipe for a NYE party and it was awesome. I made it slowly 2 days in advance so each layer had sufficient time to chill in the fridge. The only notes I have are as follows:
-chocolate ganache when adding the granulated sugar never fully dissolved on its own. Solution I had to do was use a double broiler over the stove to continue to melt down the ganache until the sugar completely dissolved. Not sure how else to get around that, if I hadn’t done that extra step the ganache would have been super grainy.
Im making this for my husbands birthday. When assembling, do you put 1/3 cup frosting BEFORE cake layer? I’m super confused as the instructions say the frosting is the first to go on the cake stand.
Yes, frosting goes on the cake stand, to keep the cake steady.
Looks amazing and I just completed for my husband’s birthday!! BUT, I think the recipe is wrong – should use POWDERED SUGAR instead of granulated sugar for frosting – could not get the sugar to dissolve!! I am sure will still taste lovely and there is so much texture in the cake people will not notice – but never have I made frosting with granulated sugar and now I know why!!!
Can i use my instant pot to make the cheesecake layer? I have little kids and I dont like having the oven door open.
yes, sure, as long as its the right size
I only have 7.5 inch springform pans. Do you think this recipe would still work or should I decrease the ingredient amount?
Hi Ashley, sorry but it may flop if you do that.