
White Chocolate Fudge Recipe
White chocolate fudge is my go-to recipe for a quick, festive, and delicious treat. It’s always a hit with everyone, it’s easy to make, and it only takes four ingredients. Ideal for a quick treat, something to make with the kids, and I always include it on my Christmas sweets list.

If you want to see some other confectionery classics, take a quick look at these No-Bake Oreo Balls or Chocolate Hershey Kiss Cookies – they never get old. As much as I love testing and getting creative in the kitchen, I can never say no to an old classic that is not only filled with flavor, but also with memories.
Table of contents
Children obviously love it, but even my adult friends can’t seem to help themselves. This irresistible goodness is just so satisfying that one bite is not enough. The best part is that it’s so easy to make, no candy thermometers involved, no boiling, making it the perfect no-bake treat. When those sweet cravings hit, it is so convenient to have it in my fridge for a quick bite.
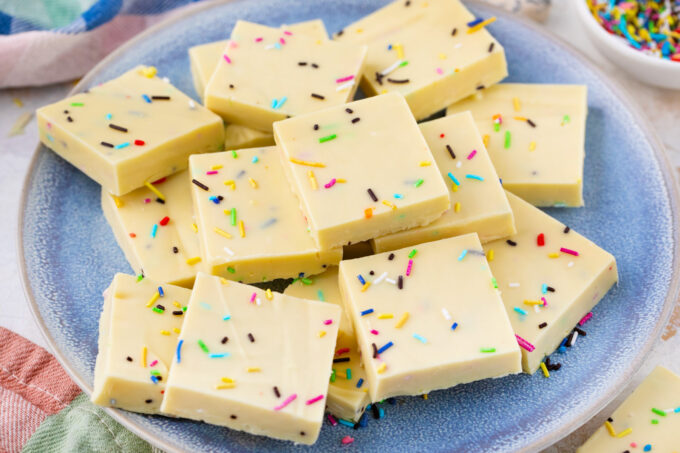
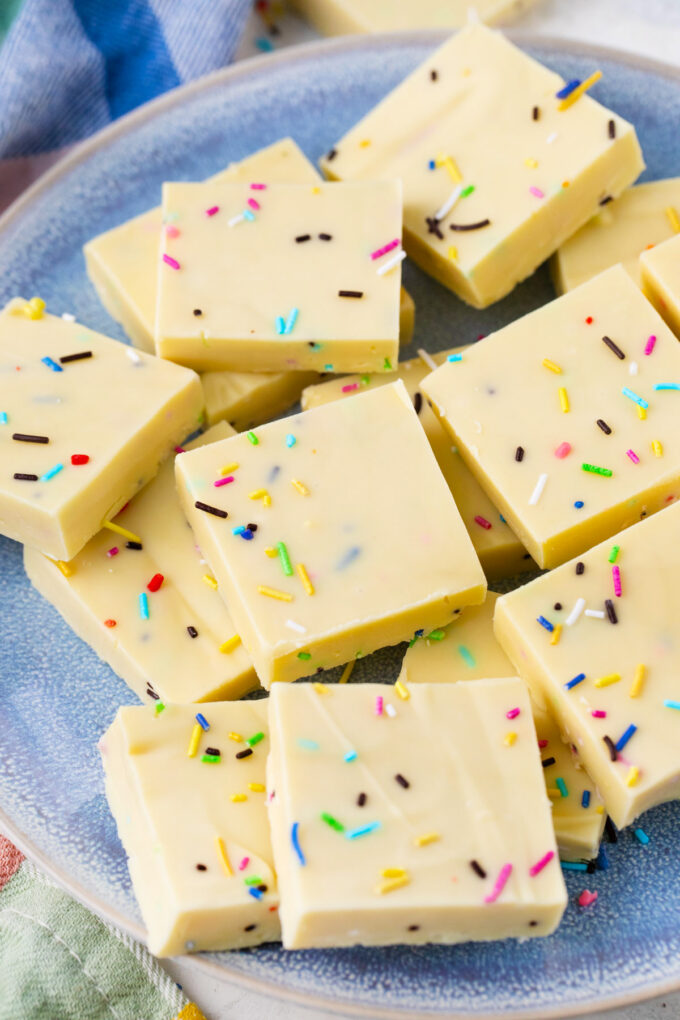
This treat is also great for parties, as it comes in bite-sized shapes that are fun to eat. I also love adding sprinkles to it, based on the occasion, red and green for Christmas, pink for Valentine’s Day. The fudge is versatile and easily adapted for the party or holiday you make it for. Holidays, especially, are the perfect time to make this dessert at home. I also include it in my hostess gift basket.
Why you will love this recipe
- It is so simple: Melt the chocolate, stir in the vanilla, and let it chill. That’s all there is to it!
- Just a few ingredients: What makes it even easier is that I only need a few ingredients to make this yummy fudge.
- No baking: There is no need to use the oven for this dessert, so I can save that for making bigger things like a turkey or ham.
- Perfect for gift-giving: This fudge is shelf-stable, so I like to wrap it in plastic and give it as a holiday gift.
What you will need
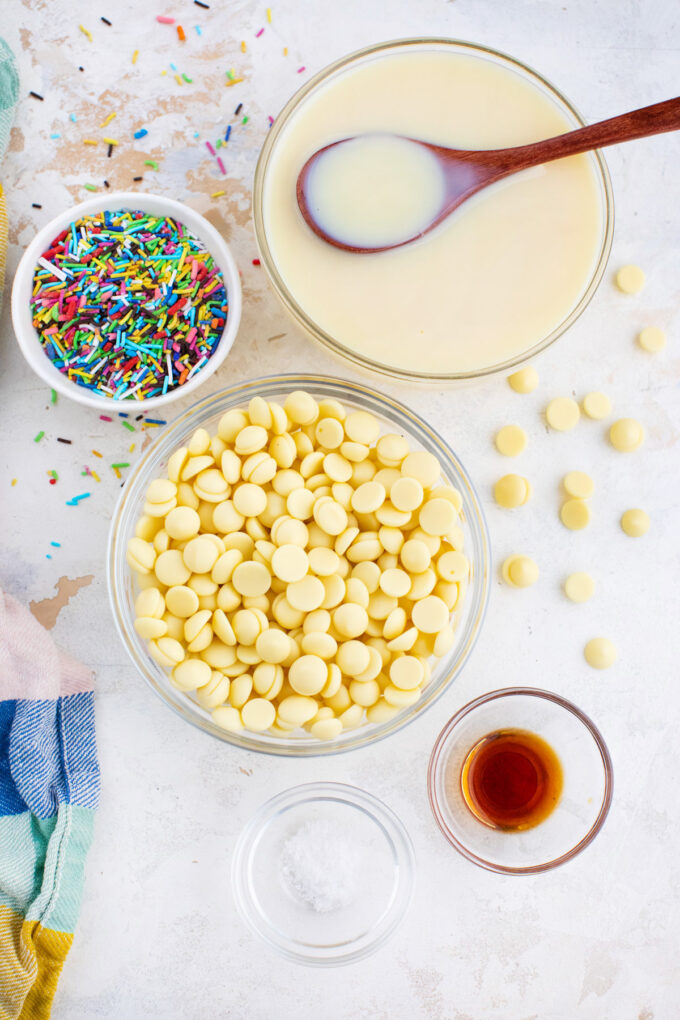
- Chocolate: I use chopped chocolate instead of chips because they melt better. Chips have added ingredients to help them keep their shape. Always use a high-quality brand. My favorite is Ghirardelli.
- Condensed milk: I use sweetened condensed milk as both a sweetener and a creamy binder rather than using sugar and milk. It is easier and comes out perfectly every time.
- Seasonings: Pure vanilla extract adds a richer, more complex flavor to the fudge, enhancing its overall sweetness. Salt is a flavor enhancer that balances the sweetness.
- Sprinkles (optional): I sometimes add rainbow sprinkles to mine to make them look prettier.
How to make
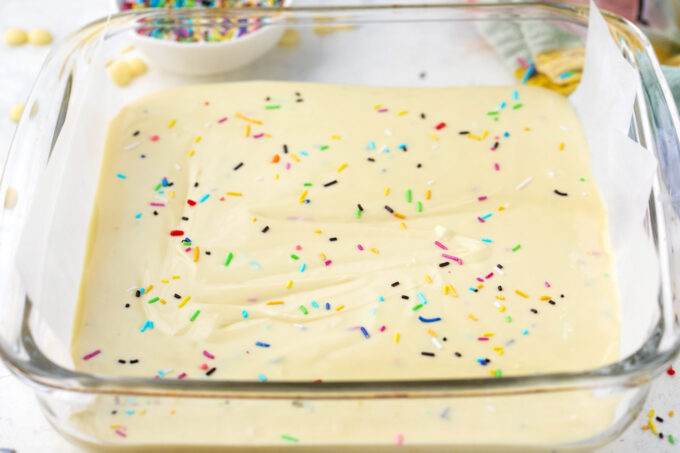
Prepare the pan: First, I grease a square pan and line it with parchment paper, leaving it to hang over two sides for easy removal.
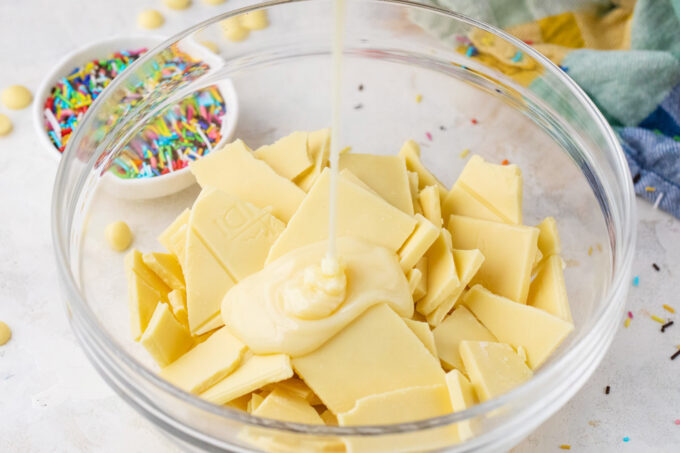
Melt the chocolate: Now, I pour the sweetened condensed milk into a bowl with the chopped chocolate, then microwave it for one minute. I remove it and let it sit for 1 minute before stirring. If it is not melted, I heat it for 30 more seconds, in 10-second intervals, stirring in between.
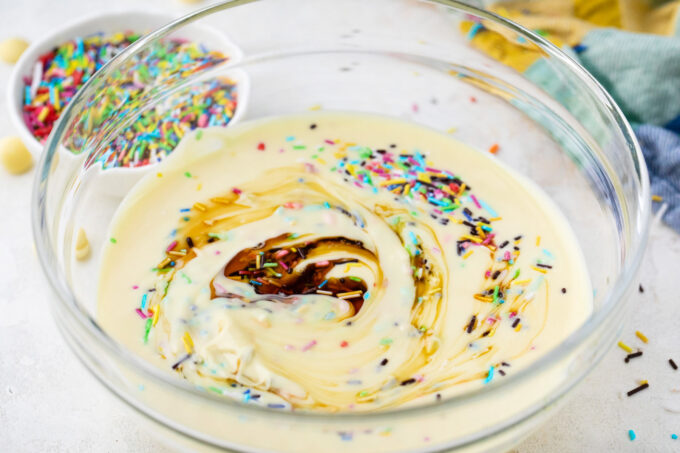
Chill the fudge: Next, I stir in the salt, vanilla, and sprinkles, then pour the fudge into the prepared pan. Then I add more sprinkles on top and put it in the fridge to cool for about an hour.
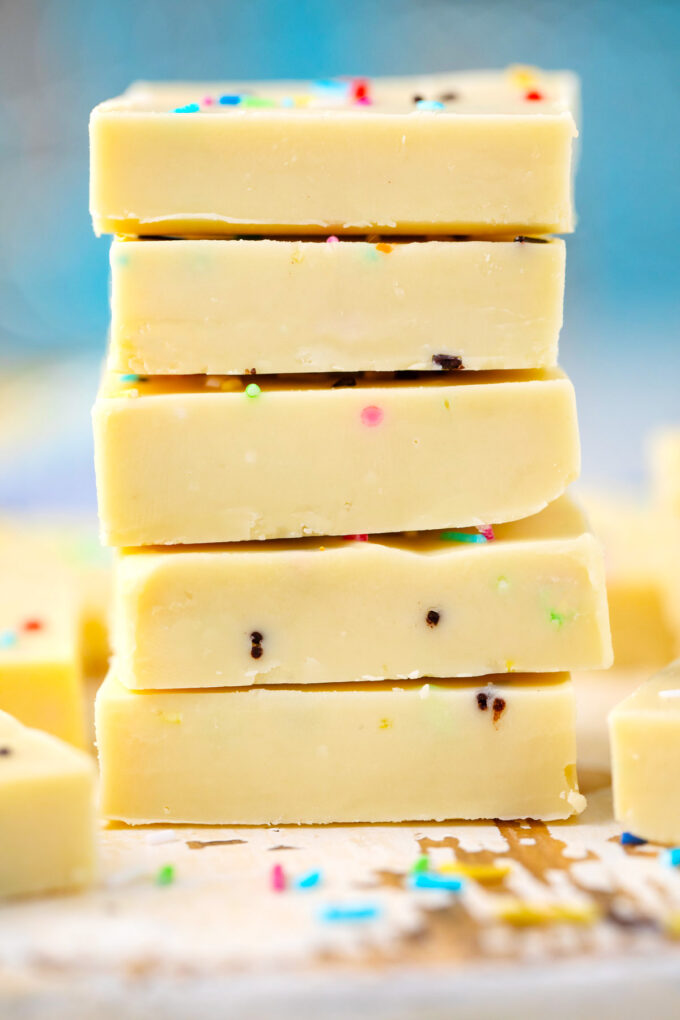
Slice and serve: Once it is hard enough, I slice mine with a pizza cutter, which makes it super easy to get straight slices fast.
Expert tip
Keeping the fudge from crumbling
This typically happens if the fudge is overcooked. Using the microwave to melt the chocolate can cause this because white chocolate is so easy to burn. After microwaving for 1 minute, do not stir. Just take the bowl out of the microwave and let it sit for one full minute. Then stir it until entirely melted. If there are still a few pieces of chocolate, I would microwave the mixture again for only 30 seconds, stirring well until melted from the residual heat.
More tips to consider:
- Watch the chocolate carefully as it melts so it does not scorch.
- Make sure the fudge is 110 to 115 degrees F before pouring it into the pan. It needs to be cooked to 234 degrees F and then cooled before pouring it into the pan. To check it, use a candy thermometer after removing it from the microwave.
- Another way to check the fudge is to drop a small amount into a glass of ice water. Then, if it forms a ball, it is ready; if it is too thin, let it continue cooking.
- The fudge doesn’t have to be refrigerated, but it is easier to cut that way.
- Don’t skip the salt. It really makes a difference.
Recipe variations and add-ins:
- Go nuts: Any kind of nuts would be delicious on top or mixed in. I like mine with chopped pecans.
- Chocolate chips: There is no rule saying I cannot add them to my white chocolate fudge. After all, you can never have too much chocolate!
- Fruity fun: Dried fruit like cranberries, cherries, raisins, or dates would also be yummy.
- Caramel sauce: To make this fudge even more luscious, drizzle on some of my caramel sauce. It is easy to make and only needs three ingredients.
- Add candy: For a minty flavor and holiday theme, crush some candy canes and sprinkle them on top before the fudge dries.
- Peanut butter: Mix ½ cup into your fudge for a peanut butter flavor.
- Extracts: Talk about flavor! With extracts, you can give this fudge any flavor from amaretto to eggnog.
Serving suggestions:
White chocolate fudge goes with anything, but I like to serve it with a cup of my white hot chocolate or red velvet hot chocolate during the holidays. This thick, rich drink requires only a few ingredients and pairs perfectly with a few pieces of fudge. If I am trying to be fancy, I can serve it with my white chocolate crème brûlée. This rich and creamy dessert with a crunchy top is always a hit.
For a party, I like to make this fudge and serve it along with my unicorn cake, which is full of incredible rainbow colors to match the rainbow sprinkles on the fudge. Of course, I also have some unicorn cupcakes that go with these two decadent desserts. Why not? It’s a party!
How to store leftovers:
- Refrigerate: This fudge can be safely kept at room temperature for up to 10 days or refrigerated for up to 2 weeks in a sealed container.
- Freezing: To freeze, I wrap the fudge in plastic wrap and place it in freezer bags, where it can stay frozen for up to 6 months.
- Defrost: I thaw it overnight in the refrigerator for the best flavor.

Frequently asked questions
This usually happens because the sugar crystallizes during cooking or cooling. It can occur if it is stirred too much or at the wrong time. If it is not stirred enough before the sugar dissolves, or for too long after the sugar dissolves, it can cause the chocolate to seize. Overcooking or adding water to the bowl during mixing can also cause this problem.
Yes, the best way to do this is to put the fudge back into a saucepan with about 1½ cups of water, heating it on low until it turns smooth again. Then, let it come to a boil while wiping down the sides of the pan with a wet pastry brush the whole time. This will prevent crystals from forming. Don’t stir the fudge until after it starts boiling. Then remove it from the heat and let it cool to 110 degrees F without stirring, then pour it back into the pan.
It was either not cooked long enough or the wrong ingredients were used. The fudge has to reach 234 degrees F for it to form a stable fudge. Also, be sure to get sweetened condensed milk and not evaporated milk. Using the wrong milk will make the fudge too watery. Finally, be sure to let it sit long enough. If everything else is done right, just let it chill for a few hours and see if that works. If not, try reheating it and letting it set again.
For short-term storage (a few days), I keep my leftover fudge in a sealed container, like a Rubbermaid container. If I am going to keep it for a week or longer, I wrap it in plastic first. To keep it up to two weeks, I wrap it in plastic and put it in a sealed container in the fridge. For anything longer than that, I would wrap it in plastic and put it in freezer bags to freeze.

More fudge recipes:


Loved this recipe? I’d love to hear from you! 💛 Leave a 5-star rating ⭐️ in the recipe card below and share your thoughts in the comments – I read and appreciate every single one!
Let’s stay connected! Follow me on Facebook, Instagram, Pinterest, and YouTube for more delicious, sweet and savory recipes. Have a question? Ask in the comments, and I’ll be happy to help! 😊 with love Catalina!
White Chocolate Fudge
Ingredients
- 14 ounces sweetened condensed milk
- 12 ounces white chocolate chopped
- 1 teaspoon vanilla extract
- 1/4 teaspoon Sea salt
- 1/4 cup rainbow sprinkles optional
Instructions
- Grease a square pan and line it with parchment paper, allowing it to hang over two sides for easy removal. Set aside.
- In a microwave-safe bowl, combine the chopped chocolate and sweetened condensed milk. Microwave on high for 1 minute. After removing the bowl from the microwave, let it sit for 1 minute before stirring the mixture. If the chocolate hasn’t completely melted, heat it for an additional 30 seconds. Stir until the chocolate is fully melted and the mixture is smooth.
- Mix in the vanilla extract and sea salt. If using, stir in sprinkles. Pour the fudge into the prepared pan and sprinkle additional sprinkles on top.
- Allow the fudge to cool completely before cutting it into 1-inch squares. To speed up the process, refrigerate it for 1 hour.
- Store in an airtight container.
Video

Notes
Keeping the fudge from crumbling
This typically happens if the fudge is overcooked. Using the microwave to melt the chocolate can cause this because white chocolate is so easy to burn. After microwaving for 1 minute, do not stir. Just take the bowl out of the microwave and let it sit for one full minute. Then stir it until entirely melted. If there are still a few pieces of chocolate, I would microwave the mixture again for only 30 seconds, stirring well until melted from the residual heat.More tips to consider:
- Watch the chocolate carefully as it melts so it does not scorch.
- Make sure the fudge is 110 to 115 degrees F before pouring it into the pan. It needs to be cooked to 234 degrees F and then cooled before pouring it into the pan. To check it, use a candy thermometer after removing it from the microwave.
- Another way to check the fudge is to drop a small amount into a glass of ice water. Then, if it forms a ball, it is ready; if it is too thin, let it continue cooking.
- The fudge doesn’t have to be refrigerated, but it is easier to cut that way.
- Don’t skip the salt. It really makes a difference.
My boys would like this for dessert. It looks so fun to make.
Mmm, fudge! This stuff is so addicting! I have only made fudge once for the holidays. Your recipe looks so much easier.
We love to make fudge! My oldest is most fond of the white chocolate fudge. She would love this!
I love white chocolate fudge. I haven’t made homemade fudge in years. I definitely need to try this recipe.
This is really addictive! My kids won’t be able to stop eating these!!
I love white chocolate fudge! I used to make white chocolate oreo fudge all the time, but haven’t made it in a while! Thanks for the reminder! I’ll be making some soon!
May I substitute the white chocolate for dark chocolate or normal milk chocolate?
yes, you can!
I made this last year and added dried apricots and walnuts .
yum
Good fudge, easy to make!
I’m not a huge fan of white chocolate but I will definitely make this with dark chocolate for a yummy treat for my nephews.
My neighbor makes fudge for my family every year for Christmas. I need to make this recipe to see how it compares to his.
This looks really good. I’ll have to try this out. I need different recipes for the holidays, so this would be perfect.
We love fudge. I need to make this for the holidays to pass out as gifts.
I have never seen such a nice dessert in my life! I will save this recipe and try it!
Your tips on preventing a gritty texture are a game-changer, and I love the idea of using a candy thermometer for precision.
I’ve never made white chocolate fudge so I’m intrigued to try this recipe. Love the addition of the colorful sprinkles.
This white chocolate fudge recipe looks easy to follow and I bet it would be a hit at a holiday party!
Absolutely loved your video! The step-by-step instructions were super easy to follow, and the visuals were mouthwatering. Even though I’m not much into cooking, your enthusiasm made me consider giving it a shot. Great job!
the fudge looks so very tempting.. and i love white chocolate (happen to have enough to attempt this recipe in fact)..
I love white chocolate fudge for its creamy, melt-in-your-mouth texture and the way it balances the sweetness of white chocolate with a hint of vanilla, creating a delightful treat that’s hard to resist.
I love white chocolate and this fudge looks amazing! Thanks so much!
I don’t think I’ve ever had white chocolate fudge before. I need to try making it!
This is a perfect treat to make for my kids today. It is so easy and delicious!
Yum. My grandma used to make fudge every year at Christmas. I’ll have to make some in honor of her. But I’ll add festive holiday sprinkles instead of rainbow ones.