
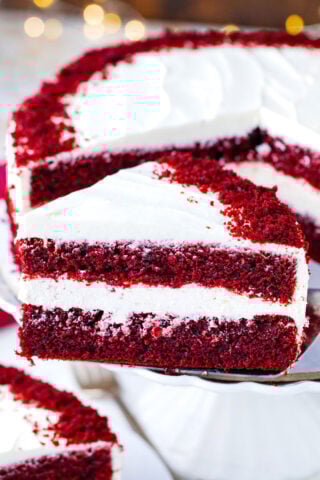
Red Velvet Creme Brulee
I make red velvet crème brûlée every year for Valentine’s Day; it’s definitely one of my signature desserts. This is one of the easiest and most impressive desserts, with a beautiful, deep, rich red color that is festive and absolutely gorgeous. It takes just 15 minutes to prep and another 45 to bake, which is so impressive for such a stunning and sophisticated treat!

I sure love my crème brûlée, and on the blog, I have many versions for different occasions. You can start with the French classic creme-brulee, or make a chocolate version. The seasonal take on this crowd-pleaser dessert is this Pumpkin Creme Brulee. No matter which one you choose, the delicate texture and unforgettable taste of this dessert will win you over.
Table of contents
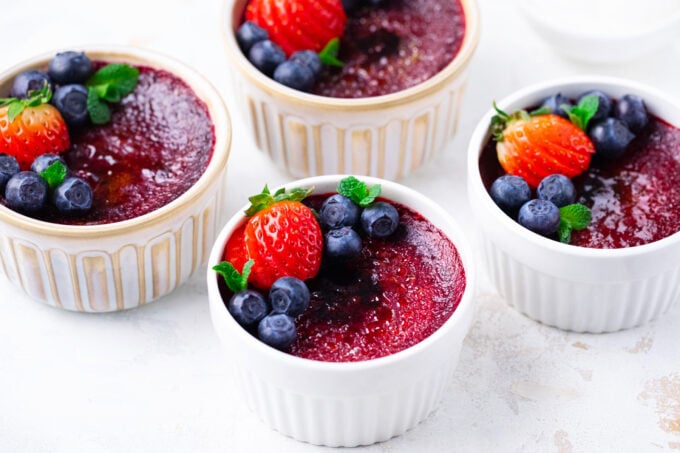
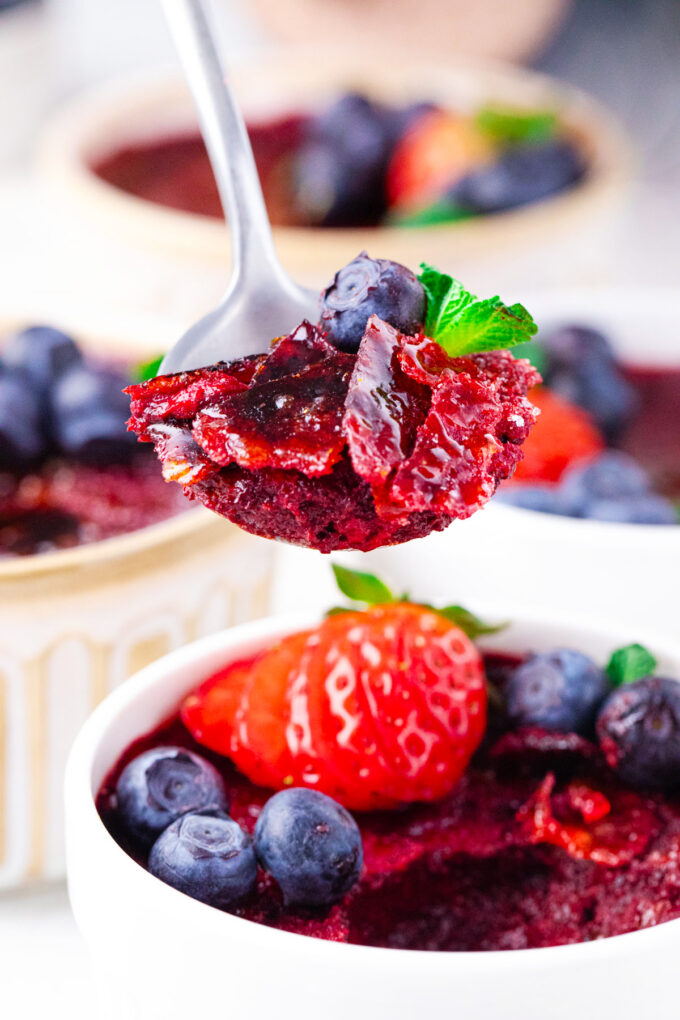
Red Velvet Creme Brulee is a sweet, tender custard with just the slightest hint of chocolate, characteristic of red velvet desserts. I enjoy serving it with fresh berries, which are just tart enough to balance the sweetness. Definitely serve it cold, to fully enjoy its gloriousness. The crispy sugar shell and the silky baked custard are the perfect match, which makes this restaurant’s worthy dessert a showstopper.
This homemade recipe is certainly fancy enough to serve at a dinner party or celebration, but easy enough to make anytime a craving hits. I use a few simple ingredients followed by a handful of easy steps. The so-called French custard can be made ahead of time and served when ready. Everyone loves breaking through the crunchy top to get a harmonious combination of textures.
Why you will love this recipe
- Fancy enough for a party: With festive colors and a fancy topping, these crème brûlée treats make the perfect party desserts. Especially since they come in their own serving dishes.
- They are so easy to make: with just a few ingredients and steps, the custard takes 15 minutes to make; after that, you just have to patiently wait while it bakes.
- Make it in advance: I usually make mine the night before and let them set perfectly before serving. Remember to add the sugar topping right before serving, to experience the full spectrum of hot, cold, creamy, and crunchy in one bite.
- Valentine’s Day treat: These are perfect for a Valentine’s Day treat, too! There will be leftovers for the kids or for later, but that’s okay, too, because they can be kept in the fridge for up to five days.
What you will need:

- Egg yolks – I only use egg yolks, without the whites, for the richest and smoothest custard.
- Sugar – Granulated sugar is best for cutting into the cream to create pockets of air, making the crème brûlée lighter and fluffier. For the topping, it must be fine sugar or turbinado sugar, rather than granulated will not melt evenly
- Heavy cream – I use it in the custard to make it extra thick and rich. Milk or half-and-half just does not give it the same consistency.
- Add-ins – Pure vanilla extract is the only thing that will give it the most natural vanilla flavor without the bitter aftertaste of artificial flavoring. I also add red food gel coloring for a vivid, rich color.
- Cocoa powder – I highly recommend Dutch-processed cocoa powder for the smoothest, richest chocolate flavor.
- Salt
How to prepare
Preheat the oven: First, I preheat the oven to 325 degrees F and put six 7-ounce ramekins into a roasting pan.
Whisk the eggs and sugar: Then, I whisk the egg yolks, salt, and 1/2 cup of sugar in a large bowl until well combined, scraping the sides and bottom of the bowl as needed.
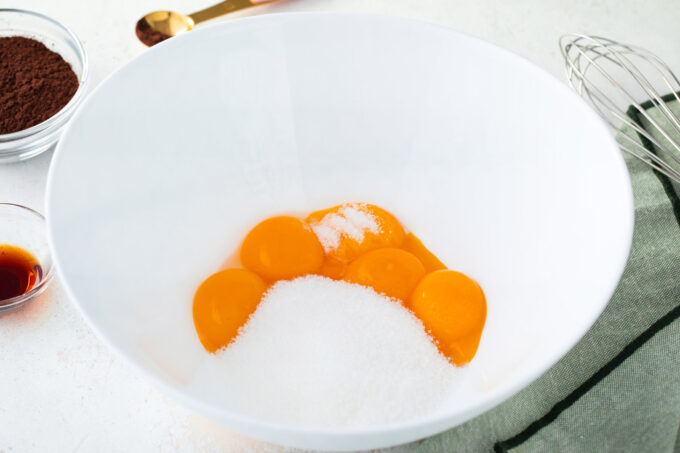
Color and cocoa: I add the cocoa powder and red food coloring, whisking until combined, scraping the sides and bottom again.

Heat the cream: In a medium pot, I heat the heavy cream until it simmers, stirring constantly to prevent boiling. Then I add the cream a little at a time so it does not cook the egg.

Flavor: After mixing in the cream, I add the vanilla extract and more gel food coloring if needed. Once that is done, I use a spoon to remove all the foam from the top of the custard.

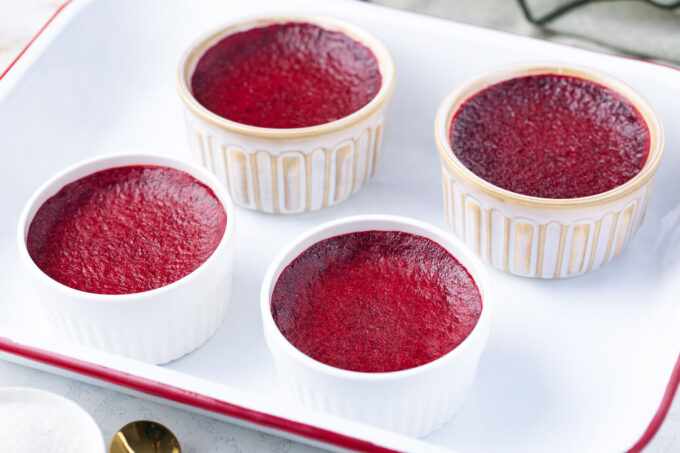
Bake the custard: After that, I fill the roasting pan with hot water halfway up the sides of the ramekins, then bake them for 45 to 50 minutes. It is done when it looks set but is still slightly jiggly in the center.

Cool the brûlée: After that, I take the pan out of the oven and let the ramekins cool completely. Then I remove them from the water bath and cover each one with plastic wrap before chilling for at least 4 hours. I usually make mine the night before and let them chill overnight.
Torch: When they are chilled, I remove them 30 minutes before serving. I sprinkle a layer of superfine sugar on top and use a torch or a lighter to melt it.

Serve: Then, I let it sit for 10 minutes before serving.

Expert tip
They must be cooked in a bain-marie
The water bath, or bain-marie, is used to surround the ramekins with hot water and maintain a uniform, regulated temperature for even cooking. It also creates a perfectly moist environment that keeps the custard soft as it cooks, preventing a grainy texture and cracks. This gives the whole dessert a silky-smooth feel. By cooking it this way, the water bath prevents the eggs from separating and overcooking or cracking. Just as in baking a cheesecake, using a water bath gently cooks the custard, making it soft and velvety. There are no hot spots and uneven cooking to worry about.
More tips to consider:
- Using milk instead of cream can also make it grainy.
- Be sure the sugar is very fine and do not add too much. It has to be a very light topping.
- Use high-quality cocoa for this dessert, as it is one of its main ingredients.
- No torch? No worries. Just use the broiler, but keep a close eye on them.
- The custard must be fully cooked before chilling to set. The middle should be the only area that moves.
- Add the cream a little at a time, especially at the beginning, otherwise it may cook some parts of the egg mixture.
- The custard needs to be chilled for at least four hours, but I usually make mine the night before and let it chill overnight.
Recipe variations and add-ins:
- Go nuts: Sometimes I like to add some chopped walnuts or pecans on top for extra crunchiness.
- Add fruit: To offset the sweetness of the sugar topping, I also like to add some sour berries, like raspberries or blackberries.
- Chocolate chips: The kids love it when I add a few to the custard for little dots of extra chocolate flavor.
- Layers: Color half of the batter, then add it in layers to the ramekins.

Serving suggestions:
The creme brulee should be served cold. I take it out of the fridge 30 minutes before serving it. When ready to serve, I add the fine sugar on top and torch it until crunchy. This way, the top is crispy, the first layer of custard is warm, and the refreshing base follows. I enjoy serving it with a dollop of homemade vanilla whipped cream or chocolate whipped cream and fresh berries.
Also, the red velvet crème brûlée pairs well with vanilla ice cream and a drizzle of homemade caramel or strawberry sauce. I usually make red velvet hot chocolate for the kids to continue the theme, and silky-smooth white hot chocolate for the adults. Looking for the best wine to pair this dessert with? I like Moscato, Sauternes, and Riesling.
How to store leftovers:
- Refrigerate: Leftovers can be individually wrapped and refrigerated for up to five days.
- Freezing: Place them in freezer bags and store in the freezer for up to 3 months. Make sure they are wrapped tightly in plastic first to prevent freezer burn.
- Defrost: Thaw overnight in the fridge for the best flavor.
- Reheating: Serve at room temperature with the sugar topping melted.

Frequently asked questions
The best way to be sure the custard does not come out eggy is to bake it in a water bath. Yes, water baths are not just for cheesecakes. The water bath prevents the custard from curdling by keeping it at a consistent temperature as it bakes. However, if the hot cream is poured into the egg mixture too quickly or too soon during mixing, it can cook the eggs, leading to curdling.
When making the custard, I use regular white granulated sugar because it dissolves well and helps cream the butter. However, for the topping, I use fine white sugar because granulated sugar does not melt evenly. The larger crystals cause some to burn while others do not, so there will be raw sugar in some spots and burnt sugar in others. If granulated is all that is available, run it through a food processor or high-speed blender.
Overcooking the eggs or cooking them at too high a temperature is usually the problem. This causes the eggs to separate and become grainy. It will also happen if they are not cooked in a bain-marie or water bath. The direct heat can cause parts of them to overcook. If the sugar is not mixed well enough, it can also cause this problem. Make sure it is well mixed, and remove the custard when the middles are still jiggly.
Before I put the crème brulee in the fridge, it has to be fully cooked. To check, I shake the ramekin slightly. If the custard moves in the middle but does not form a new crust, it is done. It will firm up more as it cools. If it makes a new crust, give it a few more minutes. Once that is done, remove it and let it chill for at least 2 hours, but I recommend 4. I usually chill mine overnight.

More Valentine’s Day desserts to try:


Loved this recipe? I’d love to hear from you! 💛 Leave a 5-star rating ⭐️ in the recipe card below and share your thoughts in the comments – I read and appreciate every single one!
Let’s stay connected! Follow me on Facebook, Instagram, Pinterest, and YouTube for more delicious, sweet and savory recipes. Have a question? Ask in the comments, and I’ll be happy to help! 😊 with love Catalina!
Red Velvet Creme Brulee
Ingredients
- 6 egg yolks room temperature
- 1/2 cup granulated sugar
- 1/4 cup unsweetened cocoa powder sifted
- 2 cups heavy cream
- 1 teaspoons vanilla extract
- 1/8 teaspoon red gel food coloring
- 1/4 teaspoon salt
Topping:
- 1/3 cup fine sugar
Instructions
- Preheat oven to 325 degrees F. Place 6 (7 to 8-ounce) ramekins into a roasting pan.
- Add the eggs to a large bowl, then add 1/2 cup of sugar and salt, and whisk until well mixed. Stop to scrape the sides and bottom of the bowl.
- Add cocoa powder, and whisk to combine. Scrape the sides and bottom of the bowl and whisk again until fully combined. Set aside.
- Add red Gel food coloring and whisk to combine.
- Add heavy cream to a medium saucepan and heat until hot, then simmer lightly; do not boil. Remove from heat.
- With the mixer set to low speed, gradually incorporate the cream into the egg mixture while continuously mixing. Begin by adding the cream little by little, especially at the start, to prevent some parts of the egg mixture from curdling. Finally, add the vanilla extract and more gel food coloring if needed.
- Use a spoon to scoop and discard the foam accumulated on top of the custard mixture.
- Pour the custard mixture into the prepared ramekins, filling them 3/4 full.
- Pour hot water into the pan until it reaches halfway up the sides of the ramekins.
- Bake in the preheated oven for 45-50 minutes. The crème brûlée is done when it looks set, but still just slightly jiggly in the middle.
- Once cooked, remove the roasting pan from the oven and let the creme brûlée cool in the pan before transferring to the fridge.
- Cover the ramekins with plastic wrap and refrigerate for at least 2 hours and up to 3 days.
- Before serving, remove it from the refrigerator 30 minutes prior to browning the sugar on top. Sprinkle a tablespoon of fine sugar on each serving. Using a torch, melt the sugar to create a crispy topping.
- If you don’t have a torch, broil it to melt the sugar. Keep an eye on it to make sure it doesn't burn.
- Allow the dessert to sit for 10 minutes before serving.
Video

Notes
They must be cooked in a bain-marie
The water bath, or bain-marie, is used to surround the ramekins with hot water and maintain a uniform, regulated temperature for even cooking. It also creates a perfectly moist environment that keeps the custard soft as it cooks, preventing a grainy texture and cracks. This gives the whole dessert a silky-smooth feel. By cooking it this way, the water bath keeps the eggs from separating and prevents overcooking and cracking. Just as in baking a cheesecake, using a water bath gently cooks the custard, making it soft and velvety. There are no hot spots and uneven cooking to worry about.More tips to consider:
- Using milk instead of cream can also make it grainy.
- Be sure the sugar is very fine and do not add too much. It has to be a very light topping.
- Use high-quality cocoa for this dessert, as it is one of its main ingredients.
- No torch? No worries. Just use the broiler, but keep a close eye on them.
- The custard must be fully cooked before chilling to set. The middle should be the only area that moves.
- Add the cream a little at a time, especially at the beginning, otherwise it may cook some parts of the egg mixture.
- The custard needs to be chilled for at least four hours, but I usually make mine the night before and let it chill overnight.
Wow, just when I thought I couldn’t love creme brulee anymore than I already do, you share this heavenly creation. It would make a perfect Valentine’s Day dessert too. Yum!
Creme brulee is a favorite of mine. This delightful creation shall be in my house in the near future!
This is such a pretty dessert. I love a good creme brulee and these would be a lot of fun to make next month.
I never make creme brûlée often enough! Looks so good and full of flavor!
I have a friend that is obsessed with creme brulee. I am going to have to share this with her.
Oh what a unique dessert! This looks delicious and I love red velvet anything!
That is so pretty! It’s almost too beautiful to eat! I still would, though. LOL. I need to give this one a try. I have all the ingredients, and I even have the torch!
What a fantastic looking dessert. I can only imagine how good this tastes!
Looks amazingly delicious! I’m excited to make this!
I love how lovely it turned out! Such a nice and festive dessert for any occasion!