
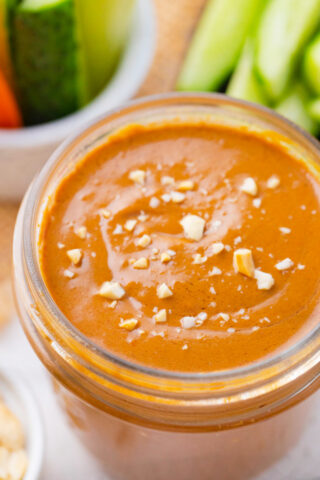
Authentic Hoisin Sauce
I know I have found the perfect trick to add sweet and savory flavors to my meals without spending hours in the kitchen. This homemade Hoisin Sauce is bold, with the perfect balance of nutty, tangy, and spicy flavors, and it’s ready in just 10 minutes. I guarantee you that it can transform even the simplest dish into something special.

If you’re a long-time reader, you probably know my love for homemade Chinese sauces. I always keep some in my fridge to use as a dipping sauce, quick marinade, or to add to stir-fries. This is a foolproof method to elevate your homemade meals to taste restaurant-worthy. You’ll usually find a jar of either orange sauce or General Tso sauce in my fridge. It makes cooking delicious, fuss-free weeknight meals so much easier.
Table of contents
This Hoisin sauce has quickly become another staple in my kitchen. It adds so much flavor to grilled meats and veggies; it also upgrades my rice bowls and sandwiches. This is also the perfect make-ahead kitchen hack. Make a batch at the beginning of the week to use throughout the week. This is a quick and effortless way to elevate your weeknight cooking and entertaining game.

Why you will love this recipe
- Save money: Store-bought hoisin sauce can be expensive. Those who don’t use it often may not need a whole bottle, so making it yourself is a brilliant idea. Plus, you can control the quality of the ingredients.
- It tastes better: I can put my spin on things when I make it myself. I know exactly what I’m using when I make it from scratch, avoiding unnecessary and unhealthy ingredients.
- It’s fresher: When I make it myself, it always tastes fresh and better, just like any homemade sauce from scratch! I guarantee that once you try this version, you’ll stop buying the store version.
What you will need

- Wet ingredients: I use low-sodium soy sauce, sesame oil, chili sauce, and rice vinegar to create a blend of sweet, sour, and tangy flavors, along with a kick of spicy heat. Then there is natural peanut butter, miso paste, molasses, and maple syrup, which add rich sweetness, a thick texture, and umami to this savory sauce.
- Seasonings: I also add minced garlic, freshly grated ginger, and black pepper for bold flavors, along with hints of spicy ginger.
- Cornstarch slurry: The cornstarch slurry adds a smooth thickness to the sauce without imparting flavor or creating lumps.
How to make
Mix the sauce: First, I whisk together the sauce ingredients over medium-high heat in a small saucepan. When it comes to a low boil, I turn it down to medium-low.

Make the slurry: In the meantime, I whisk the cornstarch slurry together in a small bowl, mix it into the sauce, and let it continue to simmer until it starts to thicken.

Cool and store: Then, I remove it from the heat and let it cool completely before pouring it into an airtight jar.

Expert tip
The best substitute for fermented bean paste
My first choice for fermented bean paste is miso, a Japanese form of soybean paste. It is mild, sweet, and smooth, and comes in three colors depending on the levels of sweetness and saltiness. Chunjang is a Korean bean paste that is chunkier with a strong, sweet, and salty, pungent flavor. Doubanjiang is a spicy chili bean paste. Try these and mix them with five-spice powder before making a decision.
More tips to consider:
- Use low-sodium soy sauce. Otherwise, it can make your hoisin sauce taste too salty.
- Remember that the sauce will thicken as it cools.
- Letting it chill for at least 30 minutes before using it gives the flavors time to marry.
- The sauce may separate as it sits. Shake it before each use.

Recipe variations and add-ins:
- Smoky hoisin sauce: To add smoky flavor, I sometimes sauté garlic in a skillet with sesame oil before adding it to the other ingredients.
- Make it spicy: When I am feeling spicy, I add red pepper flakes and sriracha sauce to this recipe.
- Boost of Chinese spice: For an extra Asian flavor, add ¼ teaspoon of Chinese five-spice to your sauce.
- Add fruit: To give this sauce a bit of fruity flavor, I like to add a teaspoon of apricot or peach jam.
- Honey: Alternatively, you can use honey to sweeten this delicious sauce instead of maple syrup.

Serving suggestions:
This sauce can also be a delicious dip, but it also makes a mouthwatering glaze for steaks, seafood, and even vegetables. There are so many ways to use it, but my favorite is for dipping my Panda Express chicken egg rolls. The crispy shell is packed with meat and veggies that all taste delicious, and it’s all soaked in sauce. It’s also a great way to season this chicken and broccoli stir-fry or to serve it with a juicy Asian steak.
This sauce is perfect for dipping these air fryer steak bites. These little pieces of sirloin are mouthwatering on their own, but they’re even better with a bit of hoisin sauce! Anything tastes better with this sweet-and-tangy sauce, like these roast beef sandwiches. It also goes great with veggies; I add some to these cauliflower steaks to take them to a whole new level of deliciousness.
How to store leftovers:
- Refrigerate: Let it cool, and pour the sauce into a glass jar with a lid. It can be refrigerated for up to a week.
- Freezing: The sauce can be stored in a freezer bag or a freezer-safe jar for up to 3 months.
- Defrost: Thaw overnight in the refrigerator for the best flavor.

Frequently asked questions
Do not skip the cornstarch slurry. Some people do not like adding cornstarch to their sauce, but it is necessary to thicken it. Without the slurry, it won’t thicken as it should. After adding the cornstarch slurry, continue heating the sauce on medium-low, stirring frequently, until it thickens. It will continue to thicken as it cools.
If the sauce is coming out lumpy, it probably just needs to be whisked more vigorously. If whisking by hand doesn’t work, try using an immersion blender or food processor. For stubborn lumps, pour the sauce through a fine mesh sieve or cheesecloth. Pushing it through with a wooden spoon will help remove any small particles that refuse to break down.
Because it is an emulsion, it will separate over time, no matter what you do. The oil and other liquids refuse to stay together. To fix this issue, shake it or stir the sauce to combine it. If it’s too thick to mix easily, reheating it can help speed up the process. Adding a bit of warm water or broth can also help.
An oily sauce can result from using too much oil in the recipe or cooking it at too high a temperature. Leaving it out at room temperature for too long can also cause this problem. It will cause the liquid to evaporate, thereby concentrating the fats and making the sauce oily. This makes it impossible to get it to stick to meats, veggies, or anything else. To fix it, add more liquids, such as soy sauce or water.

More Chinese sauces to try:


Loved this recipe? I’d love to hear from you! 💛 Leave a 5-star rating ⭐️ in the recipe card below and share your thoughts in the comments – I read and appreciate every single one!
Let’s stay connected! Follow me on Facebook, Instagram, Pinterest, and YouTube for more delicious, sweet and savory recipes. Have a question? Ask in the comments, and I’ll be happy to help! 😊 with love Catalina!
Hoisin Sauce
Ingredients
Sauce:
- 1/4 cup soy sauce light sodium
- 2 tablespoons natural peanut butter unsweetened
- 2 tablespoons maple syrup or honey
- 1 tablespoon chili sauce
- 1 tablespoon molasses
- 2 teaspoons rice vinegar
- 2 teaspoons sesame oil
- 2 cloves garlic minced
- 1 teaspoon freshly grated ginger
- 1/8 teaspoon black pepper
- 1 teaspoon miso paste
Slurry:
- 1 teaspoon cornstarch
- 2 tablespoons water
Instructions
- Add all the sauce ingredients to a small saucepan over medium-high heat and whisk to combine. Bring it to a boil, then lower the heat to medium to maintain a simmer.
- In a small bowl, combine water and cornstarch until the cornstarch is fully dissolved. Whisk it into the sauce and continue simmering until it starts to thicken.
- If the sauce is too thick, add a bit of boiling water, one tablespoon at a time.
- Remove the pan from heat and let it cool. It will thicken more as it cools. Serve it as you prefer – as a dip, for example, or add it to stir-fries.
Notes
The best substitute for fermented bean paste
My first choice for fermented bean paste is miso, a Japanese form of soybean paste. It is mild, sweet, and smooth and comes in three colors depending on the levels of sweetness and saltiness. Chunjang is a Korean bean paste that is chunkier with a strong but sweet and salty, pungent flavor. Doubanjiang is a spicy chili bean paste. Try these and mix them with five-spice powder before making a decision.More tips to consider:
- Use low-sodium soy sauce. Otherwise, it can make your hoisin sauce taste too salty.
- Remember that the sauce will thicken as it cools.
- Letting it chill for at least 30 minutes before using it gives the flavors time to marry.
- The sauce may separate as it sits. Shake it before each use.
I have a beef recipe that I’m eager to use this on. The flavors are just fantastic.
I have a freezer full of egg rolls with this hoisin sauce’s name on it! I love it!
I’ve never tried my hand at making homemade Hoisin Sauce before, but I’m inspired to now! This sounds like such a delicious and bold flavor. Plus I love that it’s ready in just 10 minutes.
I cannot tell you how much I love hoisin sauce. I put it on everything. Your recipe is really, really good stuff.
You can’t beat homemade sauces. This hoisin sauce is such a great dip or adding more flavor to so many of our fave Asian-inspired dishes and even the ones you mentioned here. Love it!
I’ve never tried to make Hoisin sauce myself. It’s always been store bought, but this would be so much better!
My goodness this looks soooo much better than just buying hoisin sauce from the supermarket. I have to give this a try!
Thank you for sharing the recipe. I always buy the bottled ones. It is good to know that I can now make my own with simple ingredients, most of which I already have on hand. Homemade is always better! We use hoisin sauce when grilling meats. Sometimes we mix hoisin sauce and doubanjiang to brush over the meat as it cooks on the grill. Yummy!
This Hoisin Sauce sounds like the perfect sauce for my husband to use on his homemade chicken nuggets. I need to try this recipe and thanks.
My son is a budding chef – I’m sure he’ll be excited to make this sauce. I’m sharing a link to this recipe with him!
This recipe was easy to prepare and the entire family loved it!! I can’t wait to make it again!
I have often used hoi sin sauce to marinate my ribs or chicken when making some chinese style foods. It is yummy, indeed.
I love this hoisin sauce recipe! It is so good with fried chicken!
A new sauce recipe for me to make and add to my recipe collections. Thank you!
I love hoisin sauce but I have never made it before, I am very tempted to make this now, sounds very nice indeed
I’ve always wondered how hoisin sauce is made. Thank you for sharing all the tips and tricks!
Hoisin sauce sounds wonderful! Honestly, I love any type of sauce, but I haven’t tried this one yet.
I had no idea that we can make hoisin sauce at home. We usually just buy from the supermarket. Thank you for sharing this and I would love to try making my own. I didn’t realize it’s easy.