
Patriotic Easy Fudge – No Bake
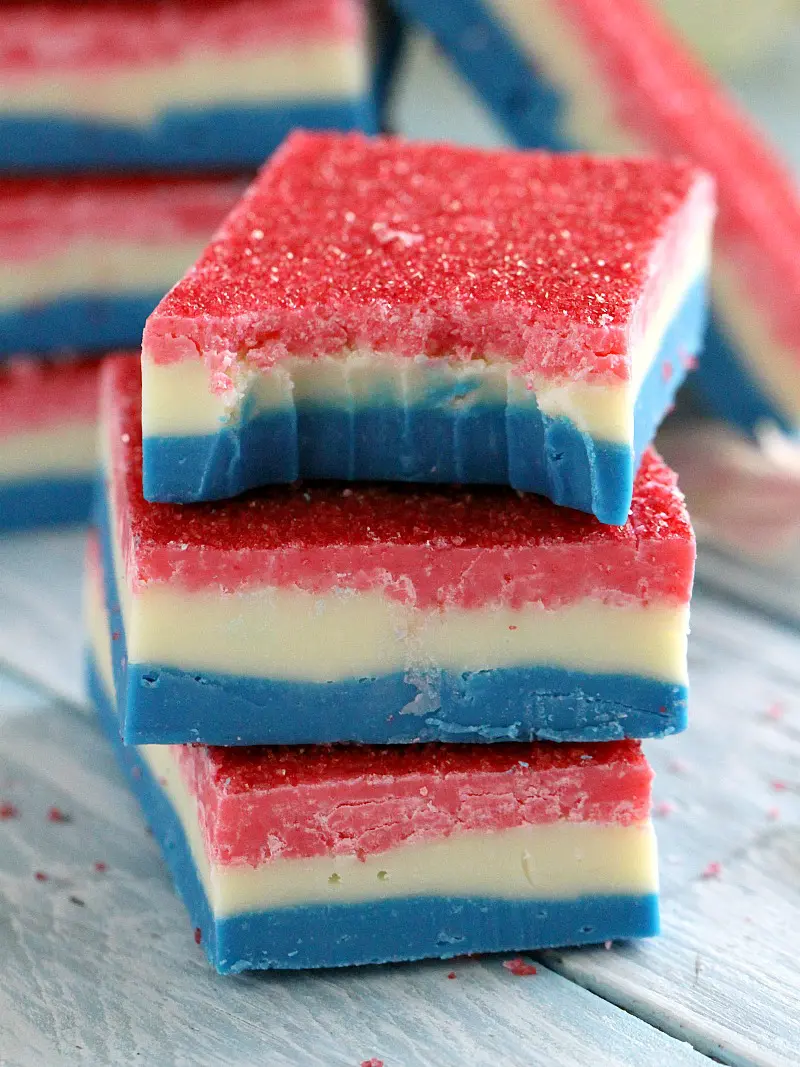
This no-bake Patriotic Easy Fudge is made with just three ingredients: chocolate chips, sweetened condensed milk, and a little food coloring for a festive twist. I love that you don’t need a thermometer, and it is gluten-free. Also known as red, white, and blue fudge, this colorful candy is perfect for July 4th celebrations and tastes rich and delicious.

Celebrating the 4th of July has been a tradition in my family ever since we lived in the US for over a decade, as you can read in my bio. That’s why I love making these classic no-bake treats. That’s right, no need to heat up the house during the hottest month of summer. Just like my Oreo fudge and blueberry fudge, both are must-tries for summer!
Table of contents
I don’t even use a candy thermometer! In this recipe, I melt the chocolate with the condensed milk in the microwave for a few seconds, stir in the food coloring, and layer it nicely in a pan. This is the perfect dessert if you ask me! I like to sprinkle some red, white, and blue sugar or candy on top for a more festive look. When I make this fudge, I always use gel food coloring because it works better than liquid. It also gives the fudge a more vivid color. White chocolate can sometimes be tricky to color, and water-based colorants might make it curdle.

Why you will love this recipe
- Three ingredients: All I need to make this fudge is white chocolate chips, food coloring and sweetened condensed milk. That’s it. It still amazes me how something so simple turns out so yummy.
- Just minutes: This whole recipe comes together in about 30 minutes from start to finish. I love having a treat that I can make quickly, especially when I’m juggling other things or getting ready for a party.
- It is so easy: There’s no baking, no stovetop, and no candy thermometer needed. I just melt everything in the microwave, add some color, and decorate it however I want.
- Very versatile: I usually go with red, white, and blue for the 4th of July, but you can totally switch up the colors for other holidays or birthdays. You can even leave it plain and just enjoy the creamy vanilla flavor.
What you will need

- Chocolate chips: I get the highest-quality white chocolate chips for this fudge because it is the star of the recipe.
- Sweetened condensed milk: Similarly, you should also use high-quality sweetened condensed milk for creamy and rich fudge.
- Food coloring: Choose gel food coloring to make the red and blue layers.
How to make
1. Prep the chocolate and pan: I divide the white chocolate chips into three microwave-safe bowls, adding one and a half cups to each. Then, I pour one-third of the sweetened condensed milk into each bowl and give them a little stir. I line an 8×8 inch baking pan with parchment paper and set it aside.
2. For the blue layer: I microwave the first bowl for 20 seconds, give it a good stir, then microwave it again for another 20 seconds and stir until the chocolate is smooth. I add about eight drops of blue food coloring and mix until the color is even. Then, I pour it into the lined pan and pop it in the fridge to chill for 10 minutes.

3. For the white layer: I microwave the second bowl the same way, heating and stirring until the chocolate is melted and smooth. I leave it as is without adding any food coloring. Then, I gently pour it over the chilled blue layer and place the pan back in the fridge for another 10 minutes.
4. For the red layer and serving: I microwave the last bowl just like the others, then stir in about eight drops of red food coloring until the color is nice and even. I pour it over the chilled white layer, smooth it out, and sprinkle a little red sugar on top. Then I pop it back in the fridge for another 10 minutes to set. When it’s ready, I take the fudge out and let it sit at room temperature for five minutes. I dip my knife in hot water, wipe it dry, and slice it into neat squares for serving.
Expert tip
Say no to grainy fudge
Nobody wants grainy fudge, and I’ve definitely had a few batches like that when I was first learning. Over the years, I’ve found that the key to smooth fudge is all about temperature and timing. If I’m making it on the stove, I keep a close eye on the thermometer and stir gently until it hits 235 degrees Fahrenheit, no more. If it goes much higher, the texture gets gritty. I also let it cool to around 120 before I stir it again, and once it starts to look dull and thick, that’s my cue to pour it into the pan. With this microwave version though, I’ve had great luck avoiding graininess altogether since the chocolate melts smoothly and evenly right in the bowl.
More tips to consider:
- Use high-quality white chocolate. It is the recipe’s star, so it should be the best way to get the right taste and texture.
- Be careful when melting it because white chocolate is temperamental. Instead of 30-second intervals like regular chocolate, do 20-second intervals.
- For a non-festive fudge, skip the food coloring. Or, for a different occasion, use other colors.
- Gel food coloring works best for white chocolate.
- Do not stir too much, and avoid getting sugar on the sides while stirring.
- If your fudge will not set, it was probably not hot enough. Make sure you heat it to 234 degrees F to 239 degrees F.
- No candy thermometer? Just boil it for exactly three minutes on medium heat while stirring constantly.

Recipe variations and add-ins:
- Add nuts: I like to chop up about 1/2 cup of walnuts, pecans, cashews, or almonds for a little crunch on top. They add great texture and a nutty flavor that goes really well with the fudge.
- Sprinkles: I use red, white, and blue sprinkles to dress it up for the 4th of July. It’s such an easy way to make the fudge look festive.
- Chewy topping: For a chewy twist, I sprinkle about 1/3 cup of raisins, dried cherries, or cranberries on top. T
- Other décor: Sometimes I swap the red sugar for star-shaped sprinkles or colored jimmies. It’s a fun way to make the top pop a little more.
- Different colors: I change the colors based on the holiday. Red and green for Christmas, pink and white for Valentine’s Day, green for St. Patrick’s, or pastels for Easter all work beautifully.
- More flavors: A few drops of extract can change the flavor completely. I’ve tried vanilla, almond, cherry, lemon, and even mint, and they’re all fun twists.
- Adult fudge: I’ve used a teaspoon of rum or Amaretto extract before for a grown-up version. It gives the fudge a little extra flair without needing actual alcohol.
Serving suggestions:
I love serving this red, white, and blue fudge for our 4th of July get-togethers, but it’s also perfect for any summer party. If I’m making it for a birthday, I usually set it out with some colorful treats like a red, white, and blue icebox cake and my patriotic poke cake.
When we’re keeping it simple at home, I’ll pair the fudge with a scoop of my 3-Ingredient Oreo Ice Cream for an easy treat the kids always ask for. And if it’s hot outside, I’ll serve it with a cold glass of pineapple lemonade or a pitcher of homemade Iced tea.
How to store leftovers:
- Refrigerate: Wrap leftover fudge in plastic wrap and place it in a heavy-duty storage bag in the fridge for up to a week.
- Freezing: Place wrapped fudge in a freezer bag for up to four months to keep in the freezer.
- Defrost: Thaw your frozen fudge overnight in the refrigerator for the best results.

Frequently asked questions
Not exactly. White chocolate uses cocoa beans, even when making white chocolate. Cocoa butter is the main ingredient, along with milk solids, sugar, vanilla, and lecithin, to produce a sweet, buttery flavor. However, fudge’s main ingredients are dairy and white chocolate chips. So, fudge is made with white chocolate and dairy, while white chocolate is made with dairy, sugar, vanilla, and lecithin.
It could be from sugar crystallization. If the fudge splashes up on the sides of the pan, it can seize up and turn back into crystals. This sets off a chain reaction that can cause all of the sugar to turn back into crystals, making it gritty. Also, if all the sugar is not dissolved before boiling, your fudge will be grainy because there is insufficient fluid to help the sugar dissolve. For more details, see my expert tip.
It will not set correctly if you do not bring your sweetened condensed milk and chocolate chip mixture to the right temperature. If you have a candy thermometer, it should read between 234 degrees F and 239 degrees F when it is done. If you do not have one, boil over medium-high heat, then turn it to medium and simmer for three minutes while stirring constantly. After that, it should be the right temperature. It works for me every time.
More Patriotic desserts:


Loved this recipe? I’d love to hear from you! 💛 Leave a 5-star rating ⭐️ in the recipe card below and share your thoughts in the comments – I read and appreciate every single one!
Let’s stay connected! Follow me on Facebook, Instagram, Pinterest, and YouTube for more delicious, sweet and savory recipes. Have a question? Ask in the comments, and I’ll be happy to help! 😊 with love Catalina!
Patriotic Easy Fudge
Ingredients
- 4 1/2 cups white chocolate chips
- 21 ounces condensed milk
Optional:
- food coloring: red and blue
- mix ins: walnuts , raisins etc
Instructions
Simple Easy Fudge:
- Combine the chocolate and condensed milk in a large, microwave-safe bowl. Microwave in 30-second increments, stirring after each one, until the chocolate has melted. Stir well until smooth, stir in any mix-ins, and transfer to an 8×8 baking dish lined with parchment paper. Top with red sprinkles. Refrigerate for 10-20 minutes. Enjoy!
For the layered fudge:
- Divide the white chocolate chips equally in 3 microwave-safe bowls, 1 1/2 cups per bowl. Add the condensed milk ⅓ to each bowl.
- Line an 8×8 baking dish with parchment paper and set aside.
Blue layer:
- Microwave the first bowl for 30 seconds, stir, and microwave for another 30 seconds until the chocolate has melted. Add eight drops or more of blue gel food color and stir until well combined. Transfer the mixture to the baking dish and level it with a spatula. Refrigerate for 10 minutes.
White layer:
- Microwave the second bowl for 30 seconds, stir, and microwave for another 30 seconds until the chocolate has melted. Stir until well combined. Transfer the mixture to the baking dish on top of the blue layer and level it with a spatula. Refrigerate for 10 minutes.
Red layer:
- Microwave the third bowl for 30 seconds, stir, and microwave for another 30 seconds until the chocolate has melted. Add eight drops or more of red gel food color and stir until well combined. Transfer the mixture to the baking dish and level it with a spatula. Top with red sprinkles. Refrigerate for 10 minutes.
- Remove fudge from the fridge and let it stand at room temperature. Cut it into squares with a very sharp knife.
- Serve and enjoy!
Video
Notes
Say no to grainy fudge
Nobody wants grainy fudge, and I’ve definitely had a few batches like that when I was first learning. Over the years, I’ve found that the key to smooth fudge is all about temperature and timing. If I’m making it on the stove, I keep a close eye on the thermometer and stir gently until it hits 235 degrees Fahrenheit, no more. If it goes much higher, the texture gets gritty. I also let it cool to around 120 before I stir it again, and once it starts to look dull and thick, that’s my cue to pour it into the pan. With this microwave version though, I’ve had great luck avoiding graininess altogether since the chocolate melts smoothly and evenly right in the bowl.More tips to consider:
- Use high-quality white chocolate. It is the recipe’s star, so it should be the best way to get the right taste and texture.
- Be careful when melting it because white chocolate is temperamental. Instead of 30-second intervals like regular chocolate, do 20-second intervals.
- For a non-festive fudge, skip the food coloring. Or, for a different occasion, use other colors.
- Gel food coloring works best for white chocolate.
- Do not stir too much, and avoid getting sugar on the sides while stirring.
- If your fudge will not set, it was probably not hot enough. Make sure you heat it to 234 degrees F to 239 degrees F.
- No candy thermometer? Just boil it for exactly three minutes on medium heat while stirring constantly.
Does anyone know how long this would keep for??
Definitely for more than a week! I had some in a container for a week and it was still fresh and delicious!
i have an issue with the measurements of the condensed milk. the can says 14oz but when poured in a measuring cup it’s like 8oz. two different ounces. is this recipe fluid ounces?
The 14 ounces can is enough.
My red, white and blue fudge was more pink, white and teal! I used more food coloring than the recipe called and I never can melt white chocolate chips. Bottom line I am taking to a BBQ to add color to my dessert tray. I do not recommend making this as condensed milk is expensive as well as white chips and the end result isn’t patriotic looking.
I love how easy this is! It’s such a great treat for the 4th. I love that I’m not in the kitchen for a long time, too.
This looks gorgeous but was actually super easy to make. I make it every 4th of July for the neighbors.
I’m still in awe how tasty and effortless this is to make! The vibrant colors and easy preparation made it a go to dessert for any celebration! I will surely make it again!
I was so excited to try this recipe but at the same time worried if it was gonna turn out good! Finally gave it a try and I’m so happy with the results!
Easy fudge recipe just in time for a 4th celebration! I made a practice batch and loved it can’t wait to share with others
This was so easy and yummy! We loved the sprinkles on top!