
Icebox Cake Recipe
Making this no-bake Icebox Cake recipe is always such a fun little project for me. I don’t have to turn on the oven, which is a win during the hot summer months, and I get to layer all my favorite things; sweet cream, Oreo cookies, and fresh berries. I just love the mix of sweetness, a little tartness, and how cool and refreshing it is. This is the perfect light and fluffy treat for summer BBQ parties and holiday celebrations.

I mean, just look at this cake, those perfect layers are reason enough to make it. I originally put this icebox cake together with the Fourth of July celebration in mind, but honestly, I’ve already made it a bunch of times since. You know how it goes: testing, tweaking, and tasting is the best part of recipe creation. And my kids? They’re obsessed, especially because I used their favorite cookies, Oreos; the same ones I use in my strawberry crunch cheesecake. Total win all around!
Table of contents
You know what I love most about this no-bake dessert? You can totally make it your own. Use what you have, switch things up, and have fun with it. I usually stick with strawberries, blueberries, and raspberries because those are our favorites, and instead of the usual graham crackers, I go all in with Oreos, because my crew would honestly riot if I didn’t. Ha! But hey, if graham crackers are more your thing, go for it. That’s the beauty of this icebox cake recipe. I give you the base, and you get to run with it.

Why you will love this recipe
- No oven needed: I make this icebox cake when it’s just too hot to bake. Basically, it is just about layering sweet cream, fresh berries, and Oreos without turning on the oven.
- It’s easy to make your own: You can swap in any fruit or cookie you love. I stick with strawberries, raspberries, and blueberries, and my kids always vote for Oreos over graham crackers.
- Light, cool, and perfect for parties: This one is seriously a favorite at summer BBQs and holiday gatherings like 4th of July. It’s creamy, refreshing, and just sweet enough to keep everyone coming back for more.
- My kids can help: What I love most is that my kids get to help me make this cake. They take turns layering, sneaking cookies when they think I’m not looking, and we always end up laughing and making a mess, totally worth it.
What you will need

- Raspberries: I love tossing in raspberries for a sweet-tart pop of flavor.
- Blueberries: Blueberries bring a juicy little burst that pairs so well with the cream.
- Sliced strawberries: Fresh strawberries make this cake extra pretty and sweet.
- Golden Oreos: I use Golden Oreos for a classic vanilla crunch my kids always beg for.
- Cream cheese: Softened cream cheese gives the filling a creamy texture.
- Instant vanilla pudding mix: The pudding mix helps everything set up nice and smooth.
- Milk: Cold milk keeps the pudding mix light and fluffy.
- Cool Whip: I fold in Cool Whip or homemade whipped cream when I have time, to make it airy and soft.
- Chocolate chips: A sprinkle of white chocolate chips adds a little sweetness.
How to make
Whip the cream cheese: I beat the softened cream cheese with the pudding mixes in a big bowl using my electric hand mixer until it’s thick and smooth.

Whisk it up: I slowly mix in the cold milk, then gently fold in one cup of the Cool Whip, saving one cup to use later.

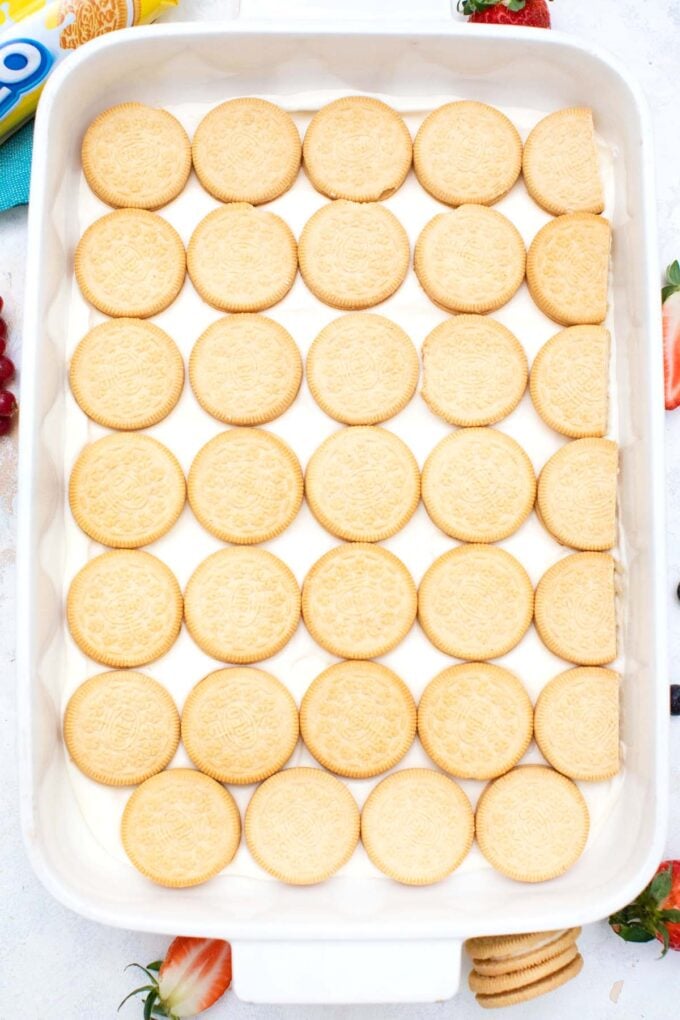
Start layering: I spread a thin layer of remaining Cool Whip on the bottom of a 9×13-inch cake pan, just enough to lightly coat it. Then I add a full layer of Oreos right on top, covering the bottom.
Pudding mixture and fresh fruit: I spoon the pudding mixture over the Oreos and gently spread it out, then I sprinkle on a mix of fresh berries. A cake spreader or spoon works great for smoothing everything evenly.
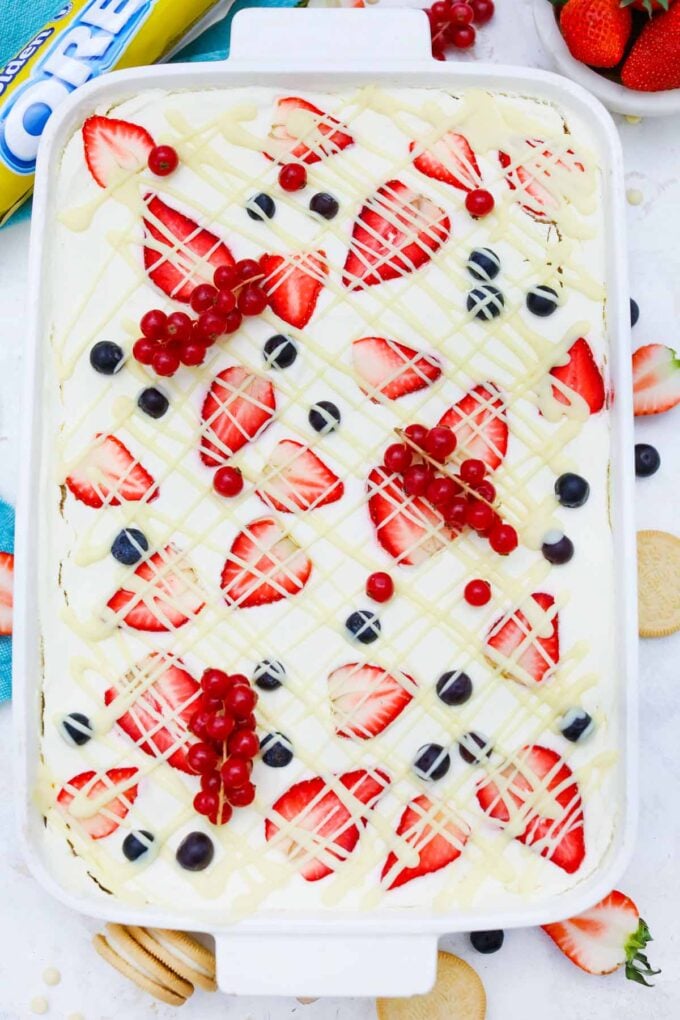
Make three layers: I keep layering by adding more cookies over the berries, then spreading on more of the cream mixture. I repeat the layers until I’ve got three total, finishing with a colorful topping of fresh berries.

Cover and chill: I loosely cover the whole cake with plastic wrap and pop it in the fridge for at least four hours, but overnight is even better so the golden Oreos turn soft and cake-like. When it’s time to serve, I melt the white chocolate chips and drizzle them right on top before slicing and passing out pieces.
Expert tip
Chill overnight for best results
What works best for me is letting the whole cake chill overnight. I know it’s hard not to sneak a slice early, but every time I’ve waited, the results have been way better. The cookies soften perfectly into the cream, the layers stick together, and the whole thing slices without falling apart. So good!
More tips to consider:
- No piping bag? No problem, just grab a sandwich bag, pour in the chocolate, snip the corner, and you’re good to go.
- I always spread thin layers of filling so I don’t run out before I get through all three layers.
- If I want more layers but a smaller cake, I use a square or loaf pan instead of the big 9×13.
- When I want to dress it up, I sprinkle chopped nuts or mini chocolate chips on top, or even drizzle caramel, whatever we’re in the mood for.

Recipe variations
- Extra creamy layers: If I want this cake extra rich, I swap the milk for 2 cups of heavy cream or whipping cream.
- Chocolate lovers version: My chocolate-loving crew goes wild when I make this with chocolate Oreo cookies and a 5 oz box of instant chocolate pudding.
- Switch the cookies: Sometimes I mix it up and use vanilla wafers or 24 chocolate wafer cookies instead of Oreos. You can really use whatever cookies your family loves.
- Add a lemon layer: I like to spread about 1-2 tablespoon of lemon curd between the cookie layers when I want a tangy twist. It pairs so well with berries.
- Play with pudding: I’ve also made this with banana or coconut pudding (one 3.4 oz box works great). It’s such an easy way to give it a totally new flavor.
- Flavor with extracts: Just 1 teaspoon of vanilla or almond extract adds an amazing flavor.
Serving suggestions
When I’m planning a 4th of July cookout or a last-minute backyard hangout, this no-bake icebox cake is always on the menu. It pairs so well with grilled favorites like my grilled salmon skewers or a tray of bacon wrapped pork medallions. I usually prep the cake the night before, and while it chills, I fire up the grill and get everything else ready.
If we’re having friends over, I’ll also serve some air fryer pork belly bites or my favorite grilled avocados as starters. I just love how this icebox cake wraps up the whole meal in the best way. It’s got those sweet creamy layers and juicy berries on top that make it extra indulgence. It’s light enough to enjoy even after a big cookout, and guess what… there’s never a crumb left.
How to store leftovers
- Store: I just cover the leftover icebox cake with plastic wrap or pop it in an airtight container and keep it in the fridge. It stays fresh for three to five days, easy.
- Freeze: If we somehow don’t finish it (which is rare), I wrap the extra slices tightly in plastic wrap and freeze them. They hold up well for about a month.
- Thaw: When I’m ready to serve it again, I just move it to the fridge and let it thaw overnight.
Frequently asked questions
Yes, they do soften, but that’s actually what you want. The cookies turn into soft, cake-like layers after sitting in the fridge for a few hours. I let it chill for at least 4 hours, but overnight is even better. The texture is so creamy and dreamy, it slices beautifully and tastes even better the next day.
That’s totally fine. I’ve used frozen berries plenty of times, especially when fresh ones are too expensive or out of season. Just be sure to thaw them first and drain off any extra juice so the layers don’t get too soggy.
I’ve made a version using dairy-free pudding mix, almond milk, and coconut whipped topping, and it turned out great. Just make sure your substitutions are thick enough to hold up in layers. Sometimes I let the pudding sit a bit longer to thicken before assembling, and that helps keep everything nice and firm.

More no-bake recipes to try:


Loved this recipe? I’d love to hear from you! 💛 Leave a 5-star rating ⭐️ in the recipe card below and share your thoughts in the comments – I read and appreciate every single one!
Let’s stay connected! Follow me on Facebook, Instagram, Pinterest, and YouTube for more delicious, sweet and savory recipes. Have a question? Ask in the comments, and I’ll be happy to help! 😊 with love Catalina!
Icebox Cake Recipe
Ingredients
- 20 oz Oreos plain or chocolate, or use graham crackers
- 8 oz cream cheese softened to room temperature
- 2 (3.4 oz) packages Vanilla Instant Pudding or Cheesecake or Strawberry Instant Pudding
- 2 1/2 cups milk cold
- 16 oz Cool Whip or the same amount of homemade whipped cream
- 3 cups fresh strawberries sliced
- 1 cup fresh blueberries or blackberries
- 1 cup fresh raspberries
- 4 oz white chocolate chips
Instructions
- In a large bowl, using an electric mixer, beat cream cheese, and dry pudding mixes until combined.
- Gradually, with the mixer on low, pour in the milk and whisk until fully blended.
- Gently, using a rubber spatula, fold in Cool Whip, reserving 1 cup to start layering.
- Spread a thin layer of cool whip on the bottom of a 9×13 baking pan.
- Layer 5 cookies across the center of the pan, then 2 more, breaking them as needed to fit around the top and bottom edges.
- Spread a layer of the pudding mixture over the cookies and top with a layer of berries and sliced strawberries.
- Place another Oreo cookies layer on top of the berries, lightly press it down with your hands, then add a layer of the pudding mixture, then a layer of berries again.
- Repeat the Oreo-pudding-berries layers 1 more time, you should reach the top of the pan.
- Refrigerate for at least 4 hours or better overnight until the cookies have softened completely.
- When ready to serve, melt the white chocolate chips in a bowl and drizzle over the top. Slice and serve.
Notes
Chill overnight for best results
What works best for me is letting the whole cake chill overnight. I know it’s hard not to sneak a slice early, but every time I’ve waited, the results have been way better. The cookies soften perfectly into the cream, the layers stick together, and the whole thing slices without falling apart. So good!More tips to consider:
- No piping bag? No problem, just grab a sandwich bag, pour in the chocolate, snip the corner, and you’re good to go.
- I always spread thin layers of filling so I don’t run out before I get through all three layers.
- If I want more layers but a smaller cake, I use a square or loaf pan instead of the big 9×13.
- When I want to dress it up, I sprinkle chopped nuts or mini chocolate chips on top, or even drizzle caramel, whatever we’re in the mood for.
- No fresh berries? Frozen works. I’ve made it with frozen fruit plenty of times, especially when berries aren’t in season, and it still turns out great.
I’ve really gotten into ice box (or ‘chilled’ cakes in general) recently, especially now that the temperature is going up where I live. I’ll definitely hold onto this for awhile! Thanks so much for sharing!
Oh my goodness, I am drooling looking at these pictures lol! I would love to try this recipe!!
I need to make this cake. It sounds so darn delicious.
This is my kind of cake. It looks amazing! We’ll be making it this summer for sure.
Oh, yum! I love all the layers of this one. It’s the deepest icebox cake I’ve ever seen! I’m going to make this for dessert tomorrow night.
Yum! This icebox cake is so delicious and easy! On top of the great taste it looks spectacular. I am sure I will make again this summer – especially for the 4th of July as it is so festive and refreshing.
I love a good icebox cake and this one looks to fit the bill perfectly.
This looks so amazing. I love a good icebox cake. I will definitely be trying this. It sounds delicious.
Thanks for sharing this delicious icebox cake recipe! It looks absolutely mouthwatering, and I can’t wait to give it a try.
My kids would love this, wow it looks so delicious and easy to create. I will have to try this recipe out over the summer.
Such a great classic yummy dessert. My kids would enjoy making this together.
I do love desserts with fresh fruit. The fact that this is light and creamy adds to its appeal. It sounds lovely x
Looks impossible to resist! Can’t wait to make this!
This is so mouthwatering! I would really love to try this recipe it looks really delicious
This is way different looking than my moms recipe but it looks so good! I pinned this one to make soon as this is the perfect cake for the warmer months and I love the ingredient list! Cannot wait to make it!
This is such an amazing dessert!! I will definitely make this again and again!
i had not heard of this term before – icebox cake; but now i wonder why (and it makes so much sense).. plus your recipe looks and sounds amazing.. with warmer weather upon us, i want to try it soon
This recipe is looking so delicious! This will be on my list of things to try in the future.
Yum. This looks so good. I’ll have to make this ice box cake.
I’m a fan of sweets! And I can say that this one is looks delicious!
Can I use fresh whipped cream instead of Cool Whip?
yes! Stabilized is better.