Bloody Halloween Desserts 4 Ways
Bloody Halloween Desserts are a fun and easy way to take your Halloween treats to a new scary, delicious, and fun level! Watch the recipe video tutorial below and see how easy they are to make! Kids and adults are guaranteed to love them!

These bloody Halloween desserts are one fun way to make your Halloween even scarier, spookier and tastier!! These recipes are very easy to make! Impress your friends with the most colorful and bloody dessert table. They are quite festive, spooky looking, and yet surprisingly delicious.
Table of contents
With these easy recipes, you can make four fun desserts: bloody chocolate-dipped apples, toxic bloody cupcakes, bloody witch fingers, and brownie ghost graves. My recipe made it easy to make something special for everyone. And each one can be changed to suit your needs.
I know everyone is only able to spend some of that time cooking everything from scratch, so I made it so it can be done with store-bought ingredients. The cupcakes and brownies can certainly be picked up from the grocery store and decorated with my instructions.
The bloody chocolate apples and witch fingers are simple to make at home without baking anything. I wanted to ensure everyone could make scary desserts without too much trouble.
Why you will love these recipes:
- Four easy treats: Just a handful of ingredients and you can make four different desserts.
- Stay home and save money: This year, have everyone over instead of going out and save money. They will love these yummy treats.
- Easy to make with or without baking: Even those who do not like to bake can make these delicious treats with my easy recipe.
- Start a new tradition: Let the kids help decorate to start a new family tradition.
What will you need
- White chocolate wafers – Get the highest quality. I use Wilton or Ghirardelli.
- Red chocolate wafers – Also by Wilton, get a bright red color to coat the apples too.
- Small candy eyeballs – Made by Wilton, they have a variety of sizes and styles.
- Large candy eyeballs – They should be about the size of a quarter to top the cupcakes.
- Edible knives – There are a variety of edible candy knives on Amazon made of sugar and even chocolate.
- Blood gel – Wilton has some great blood red sparkle gel that works great for these desserts.
- Apples – Any kind of apples will work for this dessert. I chose Granny Smith because they are tart, sweet, and firm.
- Oreo cookies – Six cookies to set the apples on top of.
How to make
Bloody chocolate dipped apples
First, I insert a craft stick into the core of the apples and put them aside. Then, I melt the chocolate in the microwave, stirring every 30 seconds until melted. After dipping the apples in the melted chocolate, I place them on top of a cookie on wax paper to dry for 20 minutes.
The red chocolate gets melted the same way and I drizzle it on top of the apples with a spoon. Finally, I garnish the apples with candy eyeballs and knives and let them settle for 20 minutes before serving.
Toxic bloody cupcakes
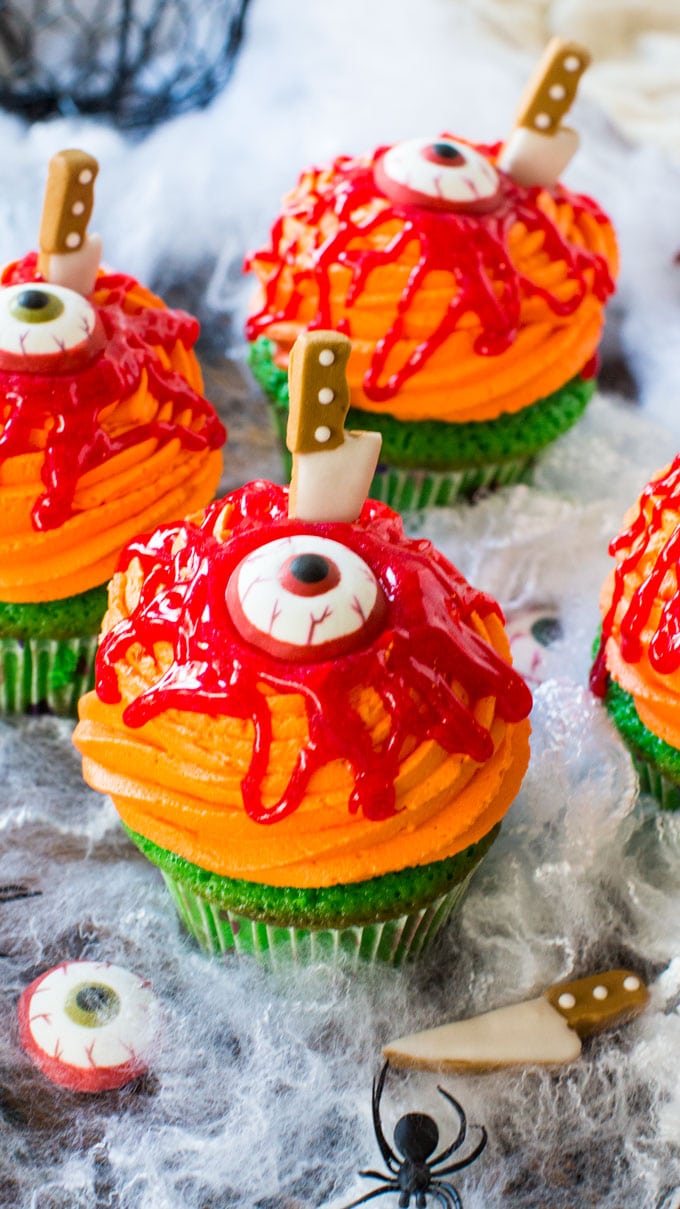
To make the toxic cupcakes, I use my vanilla cupcake and frosting recipe from my Galaxy cupcakes and dye the cake green and the frosting orange. Or use a cake mix for the cupcakes.
Then, I cut a small well out of the cupcake and put a spoonful of my cherry pie filling in each one, or use store-bough pie filling. After I put the cake back on top of the cherry pie filling and top it with frosting, I drizzle it with red gel for blood and place a large eyeball and candy knife on top.
Bloody witch fingers
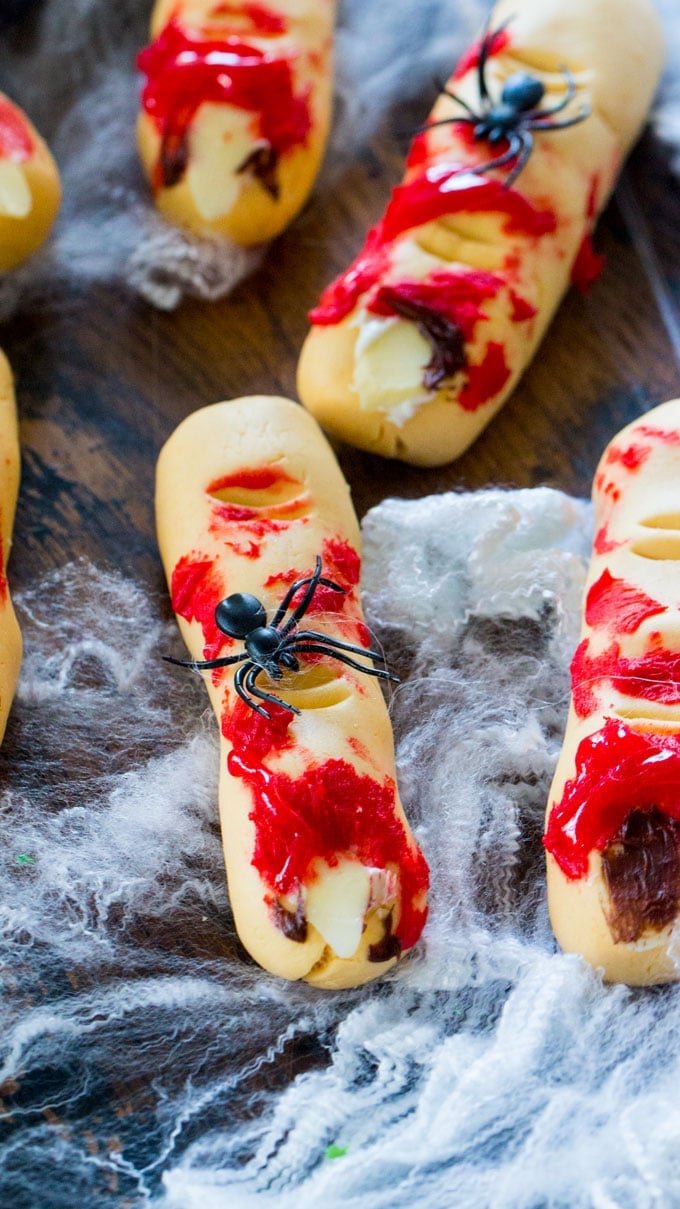
Now, to make the witch fingers, I mix the orange cake mix with the vanilla frosting until it is a doughy batter. Then, I form six “fingers” using a spoon to make knuckle marks, almond slivers to make nails, red frosting to make blood, and chocolate frosting to make dirt. Then they go in the fridge to chill for about an hour.
Brownie ghost graves
For this, I make my own brownies, but you can use store-bought. Then, I make small wells in each brownie. After, I cut the legs off some marshmallow ghosts and melt the bottoms, so they stick in the holes. The blood gel is drizzled around the bottom of the ghost and scary eyes are glued on.
Expert tip
How to get candy decorations to stick
In most cases, candy decorations will stick on the surface of what you are sticking them to because it is usually a sticky surface like chocolate or frosting. Other times, I use frosting to stick them on. Some types of candy decorations are made to stick with water. Others are made to stick with heat. Some, like bloody gel, are just supposed to stick by themselves.
But there are always one or more candy decorations that have to be difficult. Sugar decorations are supposed to stick with moisture or water. Sometimes they don’t. I try using a paintbrush and add more water but if that does not work, I usually use fondant and tap it a little bit until it is sticky again. Other times, if that does not work, I use my trusty royal icing. This stuff is like glue when it dries, and it only takes a little bit.
Another way to stick these decorations is with chocolate, which I find is the tastiest. I use any kind of chocolate I happen to have handy. Dark chocolate sticks the best, though, because it gets the hardest. Finally, Wilton sells an edible glue that I have used, which works wonderfully.
More tips to consider:
- Most candy decorations will stick with water. Others can be stuck with frosting, icing, fondant, chocolate, or edible glue.
- Chocolate or candy on apples may not stick if they have too much moisture in them.
- It may also be that there is a wax coating on the apples. Wash them in warm water with a scrub brush.
- To make blood thicker, use corn syrup, cornstarch, or flour.
- To help the candy melt better, add some oil or shortening.
- It can also help to melt the chocolate in shorter bursts of about 15 or 20 seconds instead of 30 seconds.
- Make almonds stick better with frosting, icing, or melted chocolate.
Recipe variations and add-ins:
- Different weapons: Instead of knives, use hatchets, swords, scissors, screwdrivers, or hammers.
- Other fruits: Can’t find apples? Use pears, apricots, or plums. Be creative and think of other fruits to use.
- No ghosts: Instead of ghosts on the brownies, use pumpkins, monsters, and skulls.
- Cupcake switch: Make different cupcakes by changing the colors and the decorations. I have used brown frosting with tombstones and gummy worms to make dirt cake cupcakes that the kids loved.
- Frankenstein fingers: Turn the fingers green and make them Frankenstein’s bloody fingers for a change.
Serving suggestions:
- They go great with this sweet and festive pumpkin hot chocolate bombs.
- Another nice snack to serve with these desserts are these roasted pumpkin seeds.
- Drinks to enjoy with these fun Halloween desserts include apple cider or, for adults only, apple cider mimosas.
- You could also try my Starbucks pumpkin spice latte copycat. It tastes like the real thing, only better.
- Before serving these yummy desserts, make sure everyone has had some pumpkin pot roast to fill up on.

Frequently asked questions
It is possible that the chocolate has too much moisture. Maybe it somehow got water in it. Another reason is that the apples may have had a wax coating. Always make sure there is no coating on the apples before dipping them. The best way to do this is to wash them with a brush under lukewarm water. However, be sure to dry them well before dipping them, or the chocolate will slide off.
The best way to thicken candy blood is with corn syrup, also known as Karo syrup. Mix a little bit in with the blood until it is thick enough. To make it thick and cloudy, like real blood, add cornstarch or flour. Stir well, and it should be the consistency needed in no time. Note that if the blood is too red, add some green or blue food coloring.
The temperature has a lot to do with it. If they have melted already and got hard again, it is because the temperature is too cool in the room. It may also be that it is too moist, and it causes the melted candy to seize. Another issue can be that the candy has not been stored properly. If it has been stored too long, it can go bad. Adding oil or shortening is another way to help it melt. Try melting it in shorter bursts like 15 to 20 seconds instead of 30. Or use a double boiler instead of a microwave, stirring constantly.
The easiest way to get it to stick is to make a little indention at the end of the “finger” and then place a dab of frosting there. Then, place the almond sliver there and press down on it slightly. It should stick. If not, use some of my royal icing. It sticks like glue. Melted chocolate will also help them stick.
More Halloween desserts:
Loved this recipe? I’d love to hear from you! 💛 Leave a 5-star rating ⭐️ in the recipe card below and share your thoughts in the comments – I read and appreciate every single one!
Let’s stay connected! Follow me on Facebook, Instagram, Pinterest, and YouTube for more delicious, sweet and savory recipes. Have a question? Ask in the comments, and I’ll be happy to help! 😊 with love Catalina!

Bloody Chocolate Dipped Apples
Ingredients
- 1 pack white chocolate wafers
- 6 edible candy eyeballs
- 6 edible knives
- 1 blood gel
- 1 pack red candy melts
- 6 apples
Instructions
- Insert wooden craft sticks or lollipop sticks into the cores of the apples at the stem. Set aside.
- Place the white chocolate in a heat-proof glass bowl and set over a pan of barely simmering water. Stir frequently until melted, then remove from the heat.
- Dip apples into the melted chocolate, turning to coat thoroughly. Place each apple onto an Oreo cookie and let the chocolate settle and harden for about 20 minutes on a surface covered with waxed paper.
- Place the red chocolate candy melts in a heat-proof glass bowl and set over a pan of barely simmering water. Stir frequently until melted, then remove from the heat.
- With a spoon, spoon some of the red melted chocolate onto the apples. Let settle for about 10 minutes for the dripping to stop. Garnish with eyeballs and an edible knife.
- Allow apples to set at room temperature until the chocolate is firm, about 20 minutes, before serving.
Nutrition
Loved this recipe? I’d love to hear from you! 💛 Leave a 5-star rating ⭐️ in the recipe card below and share your thoughts in the comments – I read and appreciate every single one!
Let’s stay connected! Follow me on Facebook, Instagram, Pinterest, and YouTube for more delicious, sweet and savory recipes. Have a question? Ask in the comments, and I’ll be happy to help! 😊 with love Catalina!

Toxic Bloody Cupcakes
Ingredients
Toxic Cupcakes:
- 2 1/2 cups all purpose flour
- 2 cups sugar
- 3 teaspoons baking powder
- 1 teaspoon salt
- 1 cup whole milk
- 1/2 cup vegetable oil
- 1 tablespoon vanilla extract
- 2 large eggs
- 2/3 cup water
- Green Gel Food Color
Frosting:
- 2 cups butter unsalted room temperature
- 8 cups powdered sugar
- 2 teaspoons vanilla extract
- 3 tablespoons milk
- Orange Gel Food Color
Instructions
- Preheat oven to 350°F degrees and add cupcake liners to a cupcake/muffin pan.
- Add flour, sugar, baking powder, and salt to a large bowl and whisk to combine. Set aside.
- Add milk, vegetable oil, vanilla extract, and eggs to a mixer bowl and whisk until thoroughly combined, about 1 minute at medium speed.
- Add the dry ingredients to the wet ingredients and beat until well combined. Stop once to scrape the sides and bottom of the bowl.
- Slowly, with the mixer on low speed, add the gel food color and the water to the batter and mix just until combined. Scrape down the sides of the bowl as needed to ensure everything is well combined.
- The batter is thin, so I find it easier to add it to a pancake dispenser. This makes filling the cupcake liners much easier.
- Fill the cupcake liners just a little over half and bake for 15-20 minutes, or until a toothpick comes out with a few moist crumbs, not raw batter. The cupcakes were perfectly done in my oven at the 20-minute mark. Do NOT open the oven until 15 minutes have passed. Start checking on the cupcakes at the 15-minute mark. If you are baking mini cupcakes, they may be done in 9-12 minutes; start checking after 9 minutes.
- Remove the cupcakes from the oven and allow them to cool for 3-5 minutes in the pan, then transfer them to a cooling rack to finish cooling.
- Cut a small well into the cupcake, add one tablespoon of cherry pie filling, and cover with the cut top.
Frosting:
- Add butter to a large mixer bowl and mix until smooth. Add 4 cups of powdered sugar and mix until smooth.
- Add the vanilla extract and milk and mix until smooth.
- Add the remaining 4 cups of powdered sugar and mix until smooth.
- Garnish with sparkling red gel, an eyeball, and a knife.
Notes
Nutrition
Loved this recipe? I’d love to hear from you! 💛 Leave a 5-star rating ⭐️ in the recipe card below and share your thoughts in the comments – I read and appreciate every single one!
Let’s stay connected! Follow me on Facebook, Instagram, Pinterest, and YouTube for more delicious, sweet and savory recipes. Have a question? Ask in the comments, and I’ll be happy to help! 😊 with love Catalina!

Bloody Ghost Graves
Ingredients
- 1 package brownie mix plus the ingredients listed on the back
- 1/2 cup cherry pie filling can be store-bought
- 12 marshmallow ghosts
- Sparkling red gel
Instructions
- Preheat oven to 325 degrees F.
- Place parchment paper on the bottom of a square pan to cover the bottom and hang on two sides (to facilitate the brownie removal). Butter the pan and set aside.
- Prep the brownie batter according to the package instructions and transfer it to the pan. Bake according to the box instructions.
- When done, remove from the oven and place the pan on a cooling rack.
- Once cooled, cut into rectangles, and make a small well into the brownies using a small teaspoon.
- Cut the bottoms of the ghosts and melt the bottoms just a bit with a torch. Secure the ghosts into the wells and garnish them with sparkling red gel.
- Enjoy!
Nutrition
Loved this recipe? I’d love to hear from you! 💛 Leave a 5-star rating ⭐️ in the recipe card below and share your thoughts in the comments – I read and appreciate every single one!
Let’s stay connected! Follow me on Facebook, Instagram, Pinterest, and YouTube for more delicious, sweet and savory recipes. Have a question? Ask in the comments, and I’ll be happy to help! 😊 with love Catalina!

Bloody Witch Fingers
Ingredients
- Orange Cake Mix or use Vanilla and add orange food coloring
- 2 cups vanilla frosting store bought
- 1 tube red frosting store brought
- silvered almonds
- melted chocolate or chocolate frosting
- white frosting
Instructions
- Add Orange Cake Mix to a larger bowl, and mix in vanilla frosting. Add frosting little by little, mixing with a fork or your hands until you achieve play dough consistency. The dough should be easy to work with and not stick to your hands.
- Take about 1/2 cup of dough and shape it into a smooth ball. Press it into a long log and shape it to resemble a finger.
- Place it on a waxed paper-covered cookie sheet. With your fingers, lightly press onto one end of the finger to create space for the nail. Add just a bit of white frosting and top with a silvered almond that will resemble a nail.
- Garnish the fingers with red frosting and some chocolate frosting.
- Refrigerate for at least 1-2 hours before serving. Enjoy!

These are so fun! Great treat for the kids to take to school!
ALL of these are AMAZING! Great ideas!
I seriously cannot pick a favorite! The bloody witch fingers are the spookiest for sure!
These are perfect for a Halloween party!
Wow, this are some amazing Halloween desserts!!
Bloody good!!!
I love these spooky treats…so much fun!
So creative and fun, everyone will love these!
Creative ideas! In a house full of boys, I’m certain they’ll love all of these!
I can’t wait to make these for Halloween!
These are such great ideas! They are all delightfully spooky, and they look so good. I have to make all of them.
So creative! They look absolutely fantastic!
These are super creative and super cute!!
I love these! They are perfect for Halloween!!