
Instant Pot Baked Apples – Ready in Minutes!
Anytime I crave a quick and comforting treat, I make these nourishing yet indulgent Instant Pot Baked Apples. The recipe takes only under 30 minutes to make, and the apples cook under pressure for just 5 minutes. The nutmeg and cinnamon aroma fills my kitchen with a magical scent, while I treat myself to this healthy dessert.
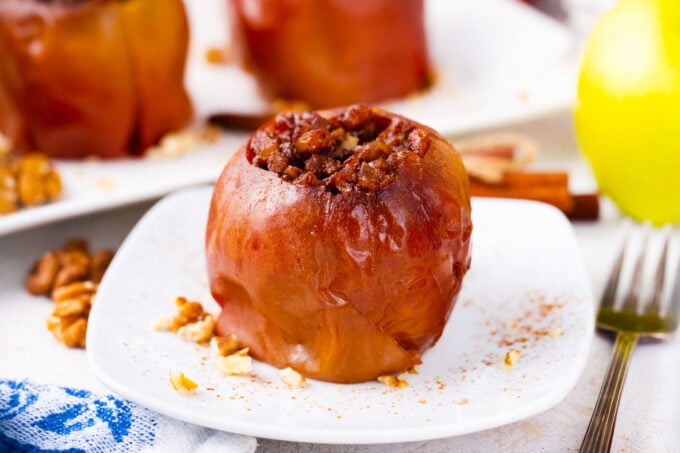
These Instant Pot Baked Apples are one of my family’s favorite treats, and they and apple pie filling are usually the first thing that I make after we go apple picking. The apples turn out tender and flavorful, naturally sweet, perfectly spiced, with a chewy, nutty, and raisin texture. They make the ideal snack, breakfast, or wholesome dessert. I personally love mine over a bowl of creamy oatmeal with a pumpkin spice latte in the morning.
Table of contents
I love how versatile and easy it is to customize the recipe. As a family of four, we all pick different fillings for them. I prefer mine with cookie dough bites and dark chocolate chips; that’s my secret combo, which is to die for. These baked apples are so easy to make in the Instant Pot that I make them on weeknights for cozy moments with the family. I serve them with a scoop of vanilla ice cream right after dinner, and it feels so comforting and memorable.

Why you will love this recipe
- Healthy treat for the kids: I enjoy making these for the kids because they are healthy, filling, and a nourishing snack that tastes like dessert.
- Just a few ingredients: All I need to make these besides apples are butter, raisins, nuts, and seasonings.
- Less than 20 minutes: It is the perfect treat to make in less than 20 minutes, and it’s also a great recipe to make with the kids.
- Versatile: The best part of this recipe is how fuss-free and versatile it is. I usually stuff the apples with what I have on hand: nuts, seeds, raisins, or even a mixture of chopped dried fruits. Nut butters are also delicious, and my little one loves hers stuffed with coconut flakes.
What you will need
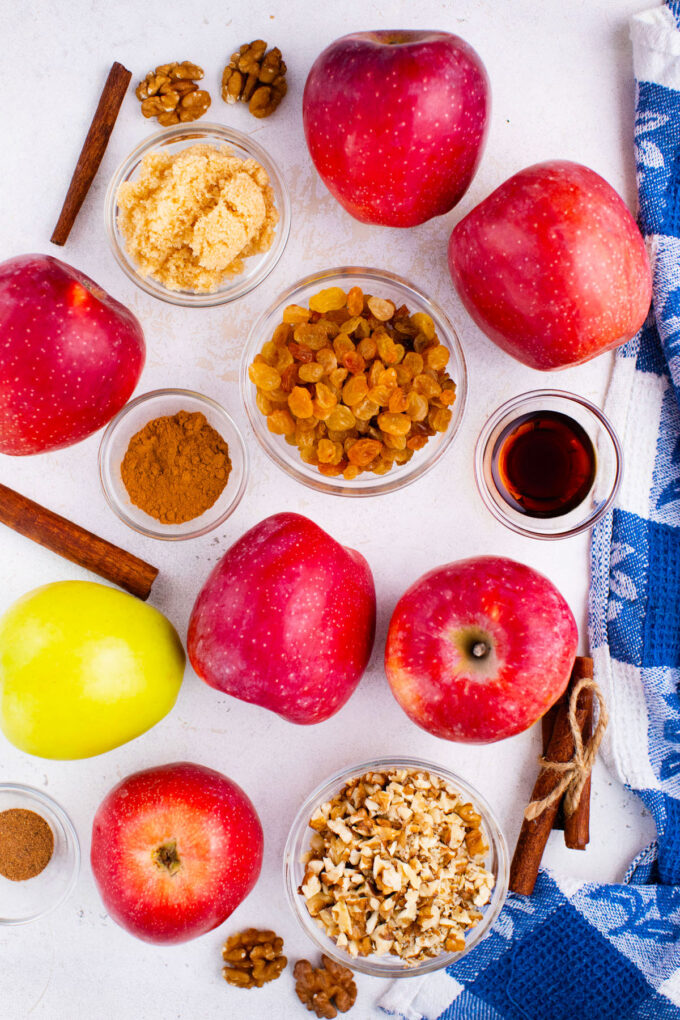
- Fruit: I like to use Granny Smith apples because they are tart and tangy as well as firm, so that they will hold their shape. Raisins are also added to the filling for chewiness, sweetness, and caramelization.
- Wet ingredients: Softened unsalted butter is the main ingredient in the filling. Rich, sweet, and creamy, it holds all the spices, nuts, and raisins together. The vanilla is blended with the butter to make it a more complex and intense flavor.
- Nuts: I add chopped walnuts to the filling for a contrasting crunch and nutty taste that complements the sweetness of the raisins and sugar.
- Seasonings: Brown sugar is added to give the filling a rich, buttery caramelized sweetness. Cinnamon adds a warm, spiced flavor that, when mixed with nutmeg, provides the taste and scent of fall.
How to make
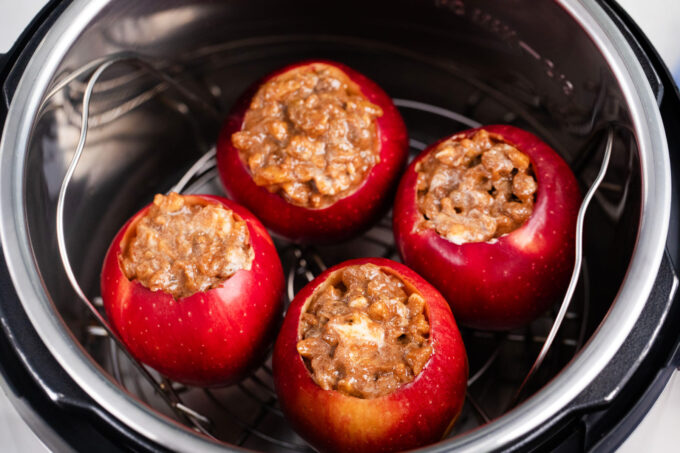
Prepare the pot: First, I pour 1½ cups of water into the bottom of the Instant Pot and place a trivet with handles on top.
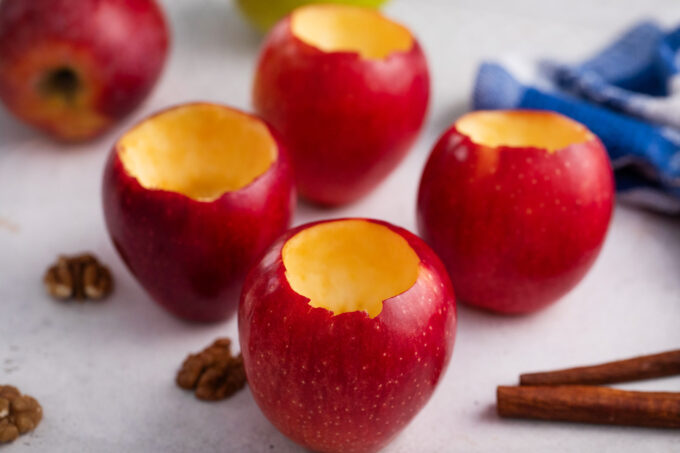
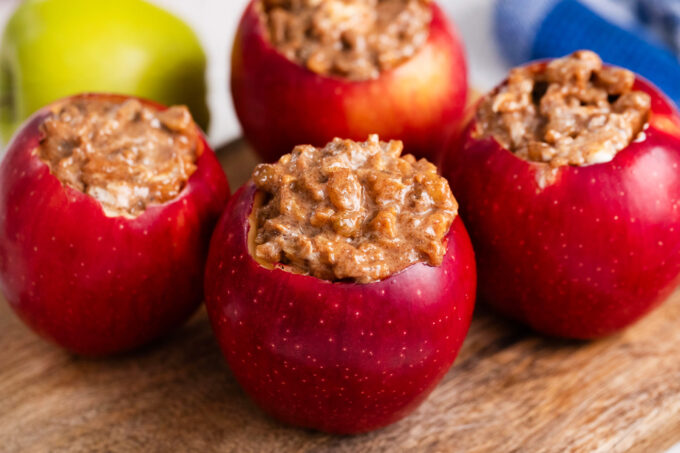
Prepare the apples: Then, I wash and core the apples (leaving the bottoms intact), making a hole large enough for the filling.
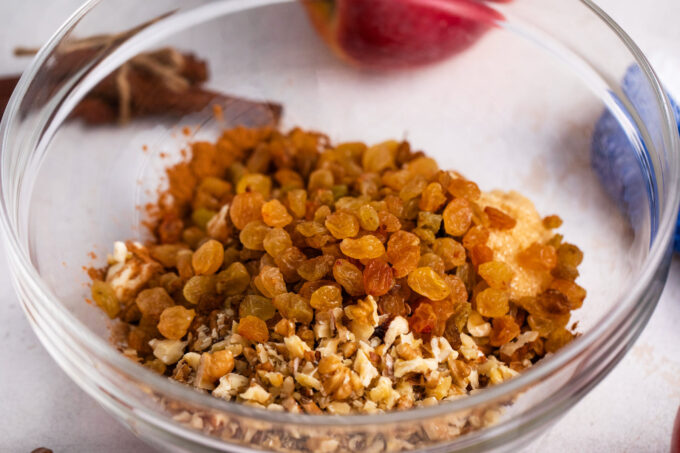
Make the filling: Now, I mix the softened butter, raisins, chopped nuts, brown sugar, cinnamon, nutmeg, and vanilla in a small bowl.
Stuff: I spoon the filling into the apples.
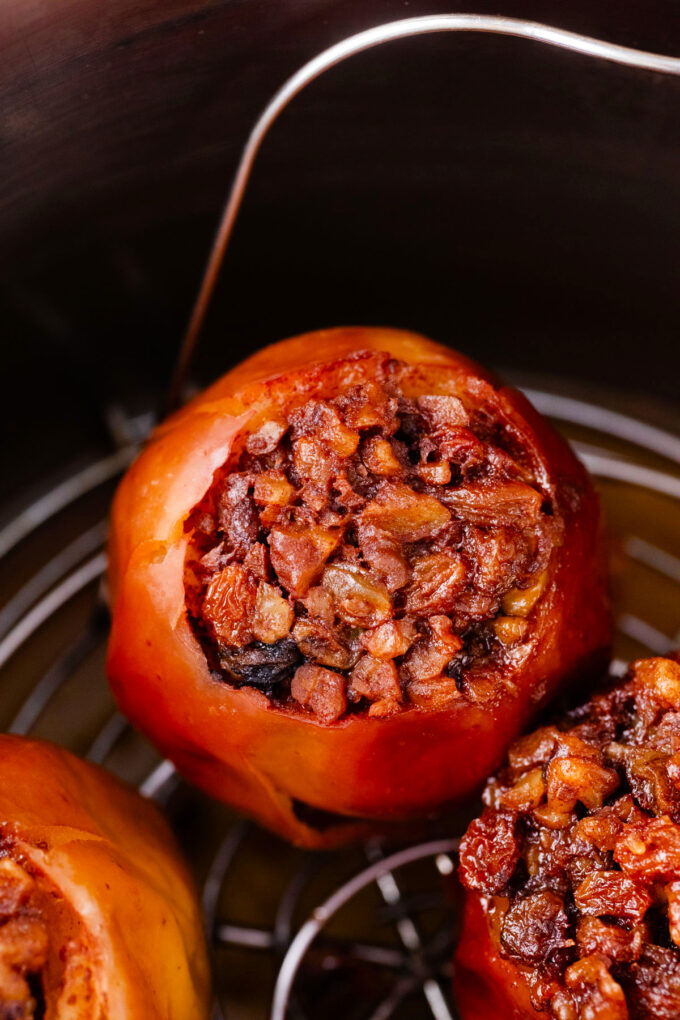
Cook the apples: Next, I arrange the apples on the trivet and seal the lid, setting it for five minutes on high. After that, I let it naturally release for five minutes. If they are still firm, I let them cook for another minute.
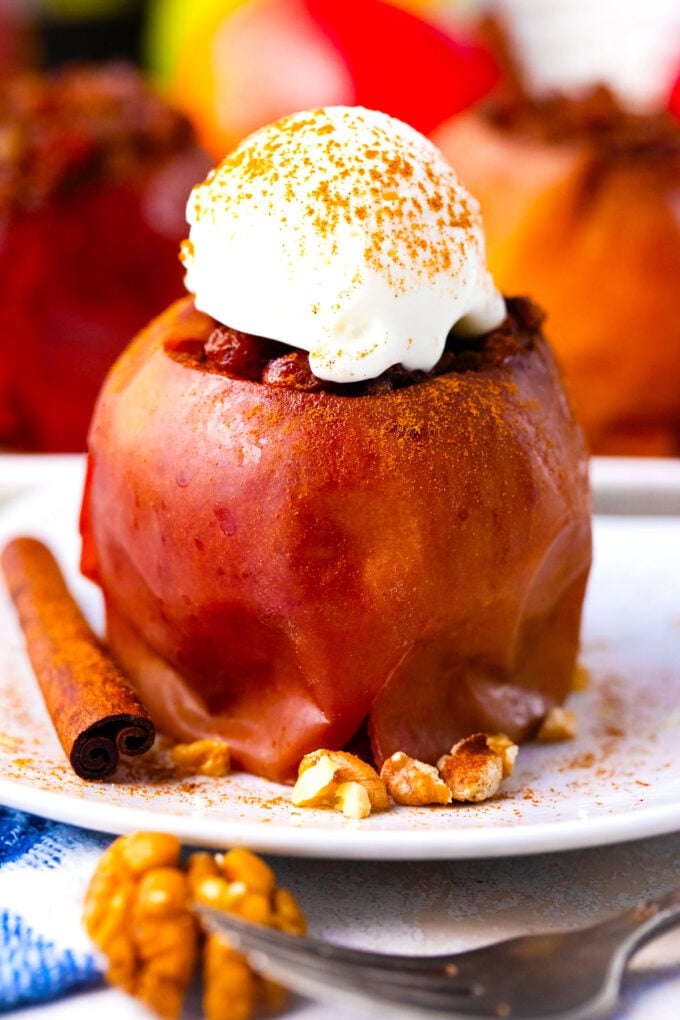
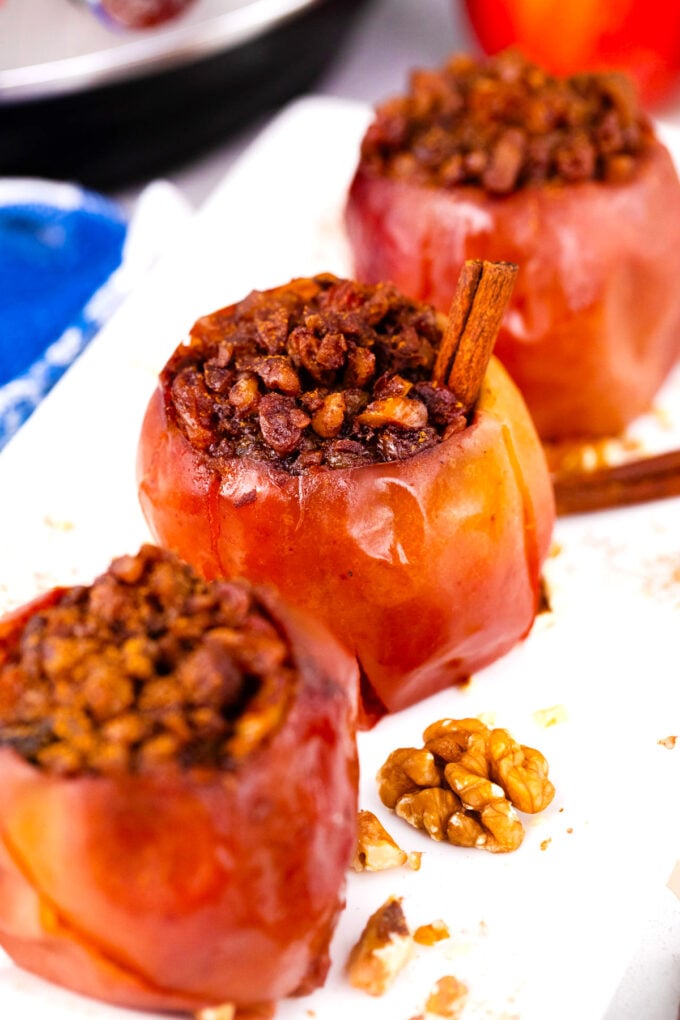
Serve hot: Afterward, I open the lid and use tongs to transfer the apples to serving plates.
Expert tip
The best apples for this recipe
For this recipe, I always choose the firmest type of apples because the Instant Pot cooks with steam and high heat, so softer apples tend to come out mushy. That is perfect if you’re making applesauce. My favorites for this recipe are Granny Smiths, Honeycrisps, Braeburns, Fuji, Pink Lady, Jonagolds, and Cortlands. The ones to avoid are Red Delicious, McIntosh, and Empire.
More tips to consider:
- My recipe was tested with a six-quart Instant Pot. If your Instant Pot is smaller or larger than the standard model, the cooking time may need to be adjusted accordingly.
- Since I used four medium-sized apples, adjust the cooking time accordingly if your apples are smaller.
- If I use softer apples like McIntosh (I don’t recommend it), I would only cook them for three minutes before checking them.
- Be sure to leave enough apple flesh in the apple for it to hold together, but remove enough to keep the filling.
- A safer way to clean them would be to use a melon baller to remove the core and seeds from your apples.
Recipe variations and add-ins:
- Other nuts and fruit: Another way I like to fill these is with chopped pecans and dates.
- Different nuts and fruit: I also like these apples with dried cherries and slivered almonds.
- Thanksgiving flavors: These are also amazing with dried cranberries blended with orange marmalade and coconut.
- Gingerbread spices: For more of a holiday flavor, add some ginger, cloves, and allspice to the filling. The whole house will smell like Gingerbread.
- No apples: Make these completely different by using pears instead of apples. They will still taste incredible with the filling, but only cook them for five minutes because they are softer.
Best fillings for Instant Pot baked apples
I like to flavor them with walnuts, some brown sugar, and cinnamon. However, the possibilities are endless, and you can stuff and flavor them based on your liking. Some of my recommended combos would be:
- Cranberries, pecans, brown sugar, and raisins.
- Pecan, dates, and raisins.
- Hazelnuts, Nutella, and coconut flakes.
- Crushed Ladyfingers, cream cheese, with cinnamon spices.
- Buttery with spiced-brown sugar and oats.
- Pumpkin pie spices and cream cheese – tastes like cheesecake
- Biscoff and chopped pecans

Serving suggestions:
My favorite way to serve these apples is warm, accompanied by a scoop of ice cream and a drizzle of caramel sauce. I typically serve myself vanilla ice cream, but the kids like my Oreo ice cream, which is easy to make with just three ingredients. It is also delicious with my no-churn pineapple ice cream, which only has five ingredients.
Since I already have the Instant Pot ready to go, I can make these Instant Pot cinnamon apple pork chops for dinner to go with my apples. They are so moist and tender with a caramelized, crisp crust; everyone always asks for seconds. So, it is a good idea to double the recipe. I also like to serve these pressure-cooked apples with my homemade apple cider made with oranges, cinnamon sticks, vanilla beans, and a dozen apples.
How to store leftovers:
- Refrigerate: I place leftovers in an airtight container and store them in the fridge for up to five days.
- Freezing: After cooling, I can also freeze what’s left in freezer bags for up to three months.
- Defrost: I thaw the frozen apples overnight in the fridge before serving.
- Reheating: They can be eaten cold, or I heat them in the microwave for 30 to 90 seconds, depending on how much I am reheating.
Frequently asked questions
First, consider the type of apple being used. I only use firm apples like Granny Smith, Honeycrisp, Fuji, Braeburn, and Gala. I do not recommend McIntosh or Red Delicious apples because they are soft and will get even softer as they cook. They do not hold their shape and will end up more like applesauce. Another reason this can happen is if they are cooked for too long. I usually cook mine for five minutes with a five-minute natural pressure release.
The most important thing is to choose the right type of apple variety. They must be firm so they will retain their shape. Another tip I’ve found that works is to poke a few holes in the skin to prevent the apples from splitting. That way, the skin will not burst and will hold the fruit together. Finally, when coring the apples, do not remove too much of the flesh and leave the bottom of the apple intact.
I like to use an apple corer to remove the core without going all the way through to the bottom. Then, I pull the core out and leave just the bottom intact. If I accidentally remove the bottom, I simply put it back in place to plug the hole, allowing me to pack it with the filling when cooking. Another way to do this is to use a paring knife or a corkscrew. Then, use a melon baller or small spoon to remove a bit of the flesh to make enough room for the filling.
The Instant Pot works by using steam, so there has to be enough liquid in the bottom of the pot to create plenty of steam. I use 1 ½ cups of liquid for my recipe, which requires four medium apples in a six-quart Instant Pot. But if you’re using larger apples or more than four apples, use two cups of liquid. Also, I use water in mine, but if juice or cider is being used, add an extra ¼ cup. The reason? Juice is thicker than water and tends to be absorbed faster.

More Instant Pot treats:


Loved this recipe? I’d love to hear from you! 💛 Leave a 5-star rating ⭐️ in the recipe card below and share your thoughts in the comments – I read and appreciate every single one!
Let’s stay connected! Follow me on Facebook, Instagram, Pinterest, and YouTube for more delicious, sweet and savory recipes. Have a question? Ask in the comments, and I’ll be happy to help! 😊 with love Catalina!

Instant Pot Baked Apples
Ingredients
- 4 medium to large apples
- 1 1/2 cups Water
- 1/2 cup unsalted butter softened to room temperature
- 1 teaspoon vanilla
- 1/2 teaspoon nutmeg
- 1 tablespoon cinnamon
- 4 tablespoons brown sugar maple syrup or honey
- 1/2 cup walnuts chopped
- 1/2 cup raisins
Instructions
- Pour 1 1/2 cups of water into the Instant Pot's inner liner. Add a trivet with handles or a steamer basket.
- Thoroughly wash the apples and core them, leaving the bottom intact for the filling. Scoop out some flesh to create a well for the filling.
- In a small bowl, mix together the butter, vanilla, cinnamon, nutmeg, brown sugar, walnuts, and raisins. Fill the apples with the mixture, distributing it evenly among the four apples.
- Arrange the apples on the trivet in the pressure cooker.
- Lock the lid and point the steam release knob to the Sealing position.
- Cook under pressure for 5 minutes, then allow a natural pressure release for 5 minutes. Afterward, release any remaining pressure manually. If the apples are still a bit firm, pressure cook for an additional 2 minutes.
- Open the lid and use tongs to transfer the apples to serving plates. Serve warm with vanilla ice cream.
Notes
The best apples for this recipe
For this recipe, I always choose the firmest type of apples because the Instant Pot cooks with steam and high heat, so softer apples tend to come out mushy. That is perfect if you’re making applesauce. My favorites for this recipe are Granny Smiths, Honeycrisps, Braeburns, Fuji, Pink Lady, Jonagolds, and Cortlands. The ones to avoid are Red Delicious, McIntosh, and Empire.More tips to consider:
- My recipe was tested with a six-quart Instant Pot. If your Instant Pot is smaller or larger than the standard model, the cooking time may need to be adjusted accordingly.
- Since I used four medium-sized apples, adjust the cooking time accordingly if your apples are smaller.
- If I use softer apples like McIntosh (I don’t recommend it), I would only cook them for three minutes before checking them.
- Be sure to leave enough apple flesh in the apple for it to hold together, but remove enough to keep the filling.
- A safer way to clean them would be to use a melon baller to remove the core and seeds from your apples.
Your baked apples look delicious and I hadn’t thought about some of the fillings you suggested, but they all sound like yummy additions.
OMG – I cannot wait to try this! We LOVE baked apples!
I love that these are made in the Instant Pot!! They looks absolutely amazing!!
I’m so into baked apples and cannot wait to try this recipe in my IP. Love this idea!!
I had never tried baked apples before but these were delicious! Thanks for the great idea!
I bet the cinnamon and brown sugar really make these apples pop! These look amazing!
What a great use of the instant pot! I have to try this!
These sound delicious! Dangerously good…
This looks super tasty!! I can’t wait to give it a try! It’s all delicious ingredients 🙂
I need to break out the IP more for desserts! The apples look delicious, I think I will need to try everyone of those filling ideas!!
I found the 7 minutes a little too long for my liking but loved the flavour.Will try 5min next time