
Christmas Oreo Ornaments
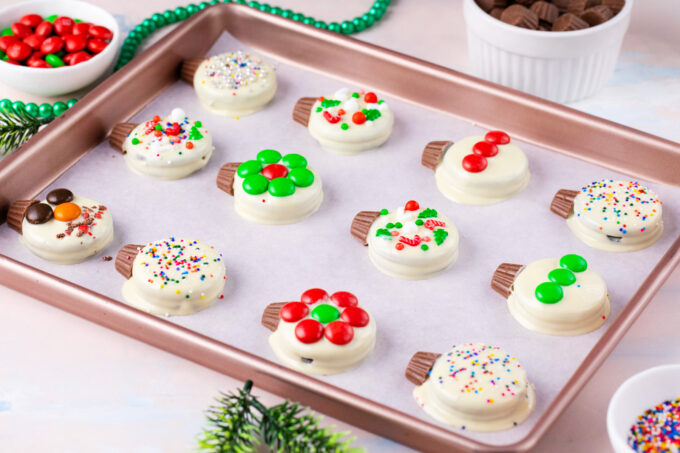
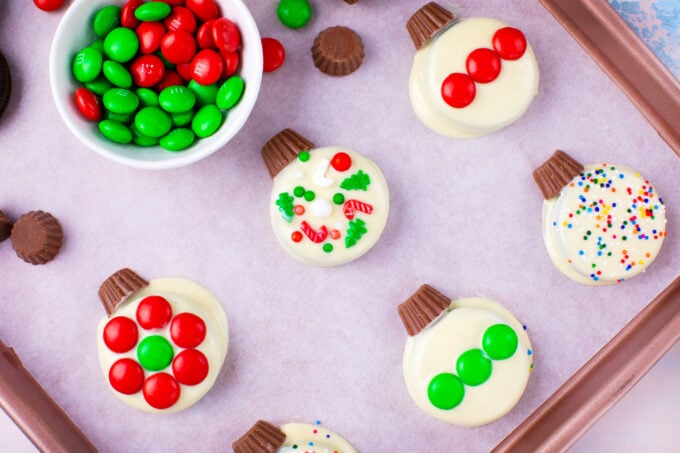
Winter holidays are my favorite part of the year. I love creating memories and traditions with my family. These edible Christmas Oreo ornaments are among our favorite things to make, and yes, we do decorate our tree with edible decorations. They are very festive, dipped in white chocolate and garnished with mini peanut butter cups, M&M’s, and sprinkles.

These Oreo Ornaments are the perfect treat during the Christmas holiday season. They add a pop of color to our tray of Christmas Sugar Cookies and M&M Cookie Bars. Also, I always make extras to give as hostess gifts, and my kids pack them as thank-you gifts for their teachers.
Table of contents
In my opinion, these Christmas Oreo Ornaments should be on everyone’s table during this time of the year. They are a great way to entertain the guests and loved ones. Additionally, if you love Oreo Cookies, you will enjoy every bite. They are super simple and easy to make. I simply dip the Oreos into melted white chocolate, then attach a mini peanut butter cup on top, and decorate with sprinkles or mini candies.
I choose to decorate them with a mixture of miniature M&M’s and holiday sprinkles. The best part is that these are so versatile that you could use your favorite candies. Even mini marshmallows or pretzels can be added. If you have kids, it would be a fun project for them; they will absolutely love it!
Why you will love this recipe
- It is so fuss-free: Since it is so quick and easy, I can make a bunch of these in just minutes.
- A fun project with the kids: I like to make holiday memories with the kids, and this is one of them.
- No baking: I don’t have to worry about turning on the oven. I melt the chocolate in the microwave and decorate them. With the kids helping me, we get them done in 10 minutes.
- Adorable gifts: These pretty cookies make lovely holiday hostess gifts for anyone because just about everyone loves Oreos.
What you will need

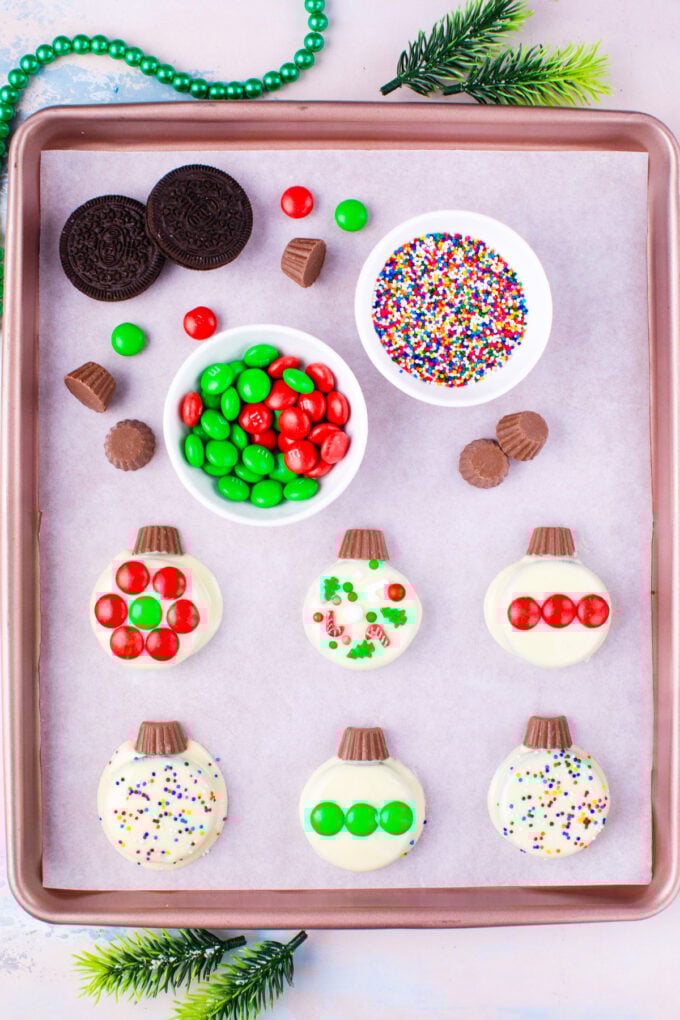
- Cookies: I use double-stuffed Oreos because they are wide enough for the peanut butter cup to fit on top perfectly.
- Candy: I like Reese’s mini peanut butter cups for the top because they look like ornament caps. I chose M&M’s for the decorations because they are my favorite and they come in Christmas colors. I also used some rainbow sprinkles for some of them for those who don’t like M&M’s.
- Chocolate: I use CandiQuik because it is made for this type of thing, and it melts so velvety smooth. It has a nice fluid consistency when melted and is perfect for dipping.
How to make
Prep the pan: First, I line a cookie sheet with waxed paper and set it aside.
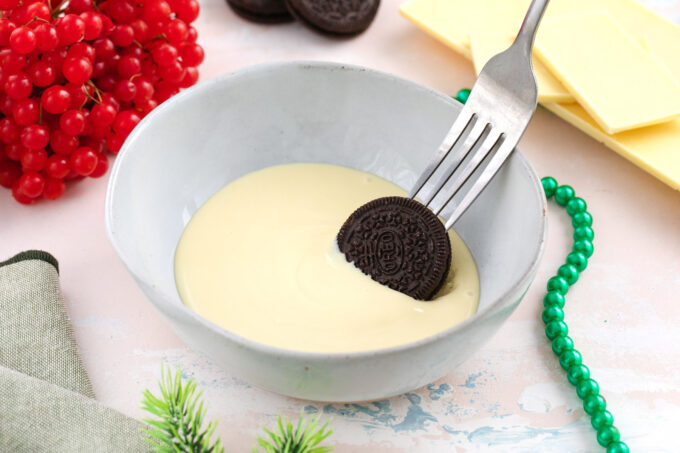
Melt the chocolate: Now, I melt the CandiQuik according to the package directions, then dip each cookie and set it on the baking sheet.
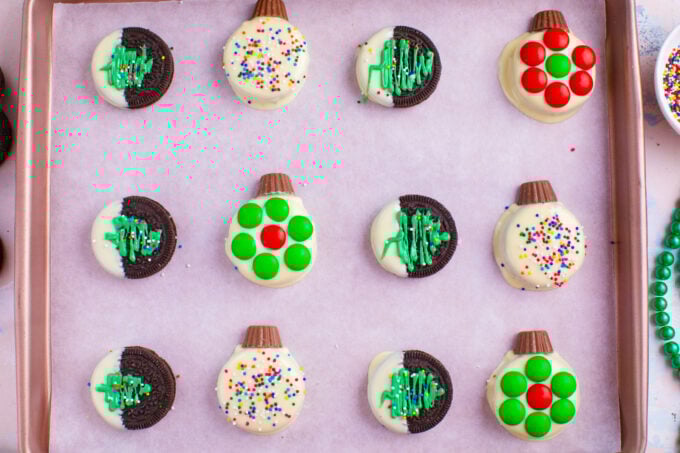
Decorate: I immediately place the peanut butter cup on top, pressing it firmly so it stays in place, then decorate the cookie with candy before moving on to the next cookie.
Chill and serve: After decorating all the cookies, I chill them for 30 minutes before serving.
Expert tip
How to keep the decorations on
Some people have trouble keeping the decorations on the cookies. This may be due to the chocolate they are using. It has to be a melting chocolate or candy melt like CandyQuik. Almond bark works for this, too. They melt more smoothly and set faster. But, work fast so it doesn’t set before you put the candy on. Only doing one cookie at a time may take longer, but at least the decorations will stay where they belong.
More tips to consider:
- Use double-stuffed Oreos so they are thick enough for the candy to fit on top better.
- Try not to move the cookies around in the white chocolate. The crumbs will dirty the color.
- Also, leaving the wrapper on the peanut butter cup can be a good idea for kids, so they have something to hold onto while they eat the cookie. They look festive, too.
- Add a ½ teaspoon of coconut oil to the chocolate for smoother, glossier chocolate.
- To make these even easier and faster, use white fudge-covered Oreos and use a little tube of frosting to stick the candies on them.

Recipe variations and add-ins:
- Different flavors: Oreo has so many wonderful flavors; these ornaments can come in all sorts of flavors, too.
- Other toppings: Instead of white chocolate, use green, red, or any color of chocolate. They also have a candy coating that would work.
- Candy on top: Rather than using M&M’s or sprinkles, feel free to use different favorites like Skittles, Reese’s Pieces, or even chopped candy canes.
- Prepared toppings: It is also fun to use those edible candy decorations that come in so many adorable themes.
- Nutty Oreos: My kids love these ornaments when I make them with peanut butter Oreos and top them with chopped peanuts.
Topping ideas:
- Skittles
- Marshmallows
- Chocolate chips
- Dragees
- Rolos
- Peanuts
- Almonds
- Mini pretzels
- Slivered almonds
- Sanding sugar
- Chopped dried fruit
Serving suggestions:
These cookies always make it onto my holiday cookie platter, but I usually have to make a few batches. The kids and I do a lot of sampling as we work. I like to serve them with my other holiday favorites, like my no-bake snowman truffles, which take only a few minutes to make. Oreo balls, pecan pie fudge, and drunken cherries all make it to the cookie platter, and, of course, I serve them with my signature red velvet hot chocolate.
For something more savory, this Santa Claus cheese board is always a hit, whether I am serving a crowd or just the family. Not only does it look amazing, but it is packed with cheese, meat, nuts, and crackers to enjoy. Also, for parties, I love making Christmas tree sweet and savory treats; they are always a hit, not only festive but also delicious.
How to store leftovers:
- Refrigerate: I store my leftover ornaments in a single layer in an airtight container at room temperature for up to five days. They will also stay fresh in the fridge for two weeks. I put parchment paper between the layers if I have to stack them.
- Freezing: If I have enough to freeze, I flash-freeze them first, then I wrap them individually in plastic before packing them in a freezer bag. They can stay frozen for up to three months.
- Defrost: I thaw my frozen cookies overnight in the fridge. Be careful not to lose any decorations.
Frequently asked questions
Clumping chocolate means it was probably overheated. This can easily happen when melting it in the microwave. Be sure to follow the directions and check it often. Some microwaves cook at higher temperatures than others. Another reason this may happen is that moisture can get into the chocolate, causing it to seize. Make sure all utensils, bowls, and pots are dry.
I would try it the easy way first. Add a teaspoon of coconut oil (or another vegetable oil) and stir it gently. This can help smooth it out. If that does not work, I would recommend a teaspoon of warm cream. Use a whisk to stir it, and let it warm gently over medium-low heat until smooth.
If the cookies absorb any moisture before being dipped, they can become soft. Buy them fresh and keep them wrapped until ready to use them. Another reason this happens is if the chocolate is too hot. Dipping the cookies when the melted chocolate is too hot will melt the filling and can make the ornament soft. Give it a minute to cool down.
Mini-marshmallows, chocolate chips, chopped fruit, dried fruit, Nerds, gummies, and holiday candy toppings they have for Christmas cookies. Honestly, though, I saw some recipes with candied bacon, crushed potato chips, and crackers. Try what you like!

More Christmas desserts:


Loved this recipe? I’d love to hear from you! 💛 Leave a 5-star rating ⭐️ in the recipe card below and share your thoughts in the comments – I read and appreciate every single one!
Let’s stay connected! Follow me on Facebook, Instagram, Pinterest, and YouTube for more delicious, sweet and savory recipes. Have a question? Ask in the comments, and I’ll be happy to help! 😊 with love Catalina!

Christmas Oreo Ornaments
Ingredients
- 20 Oreo Cookies
- 1 pkg Vanilla CandiQuik or chopped white chocolate
- 20 Mini Reese’s Peanut Butter Cups
- M&M’s holiday sprinkles for decoration
Instructions
- First, line a cookie sheet with waxed paper and set it aside.
- In a medium bowl, melt the CandiQuik according to package directions.
- Once melted, dip each Oreo cookie into the CandiQuik using a fork, allowing excess chocolate to drip off.
- Next, place the coated Oreo onto the prepared baking sheet.
- Attach one mini Peanut Butter Cup on top of each Oreo as an ornament topper, then decorate the Oreos with assorted candies or sprinkles.
- Refrigerate for at least 10-20 minutes before serving or packaging, or until the white chocolate coating hardens.
Notes
How to keep the decorations on
Some people have trouble keeping the decorations on the cookies. This may be due to the chocolate they are using. It has to be a melting chocolate or candy melt like CandyQuik. Almond bark works for this, too. They melt more smoothly and set faster. But, work fast so it doesn’t set before you put the candy on. Only doing one cookie at a time may take longer, but at least the decorations will stay where they belong.More tips to consider:
- Use double-stuffed Oreos so they are thick enough for the candy to fit on top better.
- Try not to move the cookies around in the white chocolate. The crumbs will dirty the color.
- Also, leaving the wrapper on the peanut butter cup can be a good idea for kids, so they have something to hold onto while they eat the cookie. They look festive, too.
- Add a ½ teaspoon of coconut oil to the chocolate for smoother, glossier chocolate.
- To make these even easier and faster, use white fudge-covered Oreos and use a little tube of frosting to stick the candies on them.
I’ve never seen these before! Those are adorable! I want to use white and chocolate candy quick!
These are absolutely adorable!! I know that my kids will love making some!
This is genius! Need to make this immediately with my kid! He will love it for sure!
I’ve been so busy with everything else that these look like the an easy yet fun and festive cookie to add to my to do list this weekend! Thanks!
What a great cookie recipe to do with kids! They’re going to get a kick out of seeing their ornaments all decorated!
oh my goodness! what fun these are!
This recipe worked really well and was super fun to do. A great activity for all ages (supervision for kids) and you can really get creative with this one on how you decorate your ornament! Definitely recommend!! Thanks Sweet and Savory Meals!
Thank you!
If I make these for a party will they survive a half hr drive? And then sitting on the counter at the party?
Yes, they will survive the drive and taste great!
If you don’t mind, what did you use for the stem coming out of the Reese’s in your photo?
I found those straws at Target, I remember, but even birthday candles in that shape would work.