
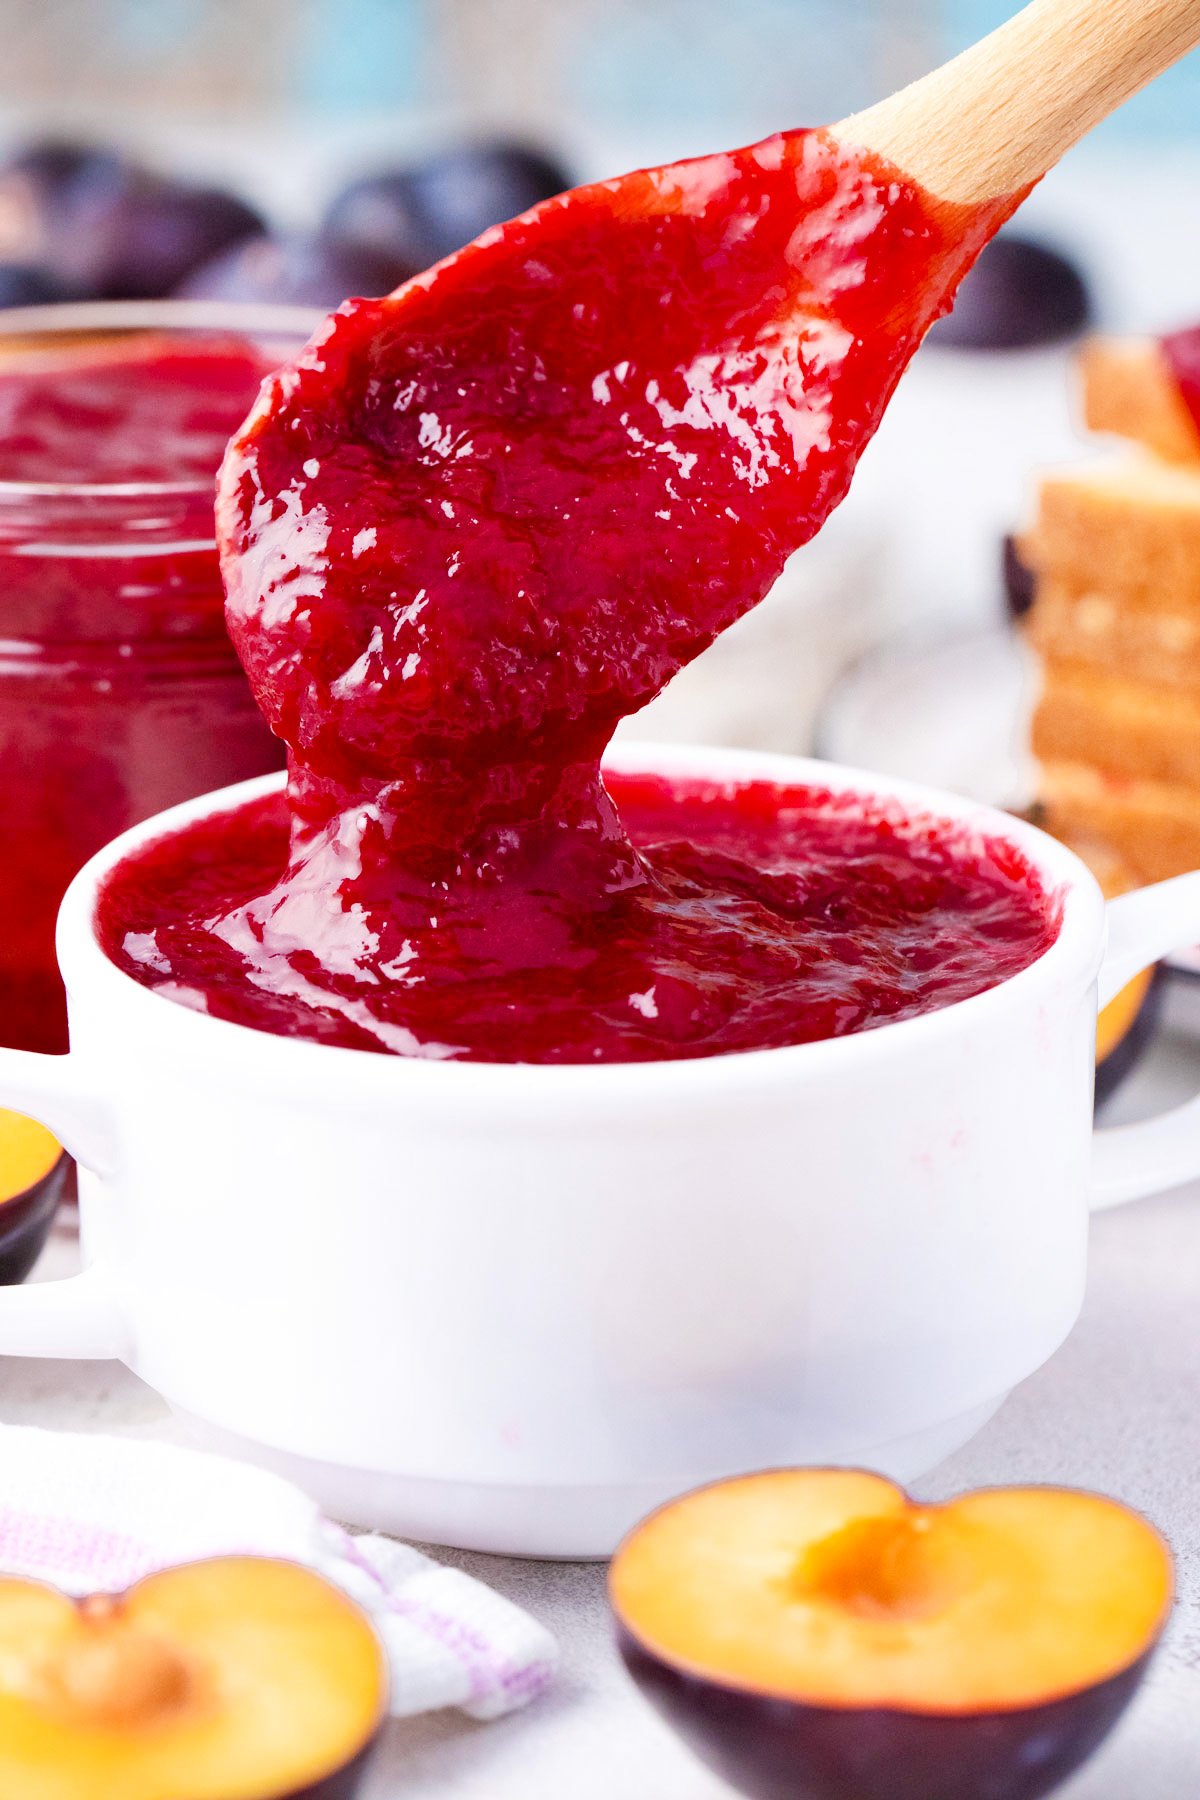
Plum Jam Recipe – No Pectin
I have learned the art of making homemade jams from my very talented grandmother. Now, in the era of the internet, I can share this delicious Plum Jam with all of you to try. Simple, yet sophisticated, made with just three ingredients, and without pectin. The recipe is effortless, but bursting with flavor.
If you want to add other fruity delights to your pantry, make sure to check out my fabulous recipes for strawberry jam, peach jam, and persimmon jam. They are essential items in my kitchen, as they can be added to peanut butter sandwiches, served with biscuits and scones, spread onto toast with butter, and included in charcuterie boards with cheese and meats for chic and fuss-free entertaining.
Table of contents
I know that in the US, making jam is often more of a hobby, but back in Eastern Europe, our grandparents were—and still are—pretty serious about canning summer fruits. I have spent many summers of my life picking fruits and berries and making delicious jam that would last us all year long. These are one of my most precious memories, stirring the jam and stealing spoonfuls of it.
I used to make this plum jam with my grandma, and it’s one of my favorites. Usually, she would bake homemade bread, which I would top with butter and this incredibly delicious jam. I am telling you, no dessert from a three-star Michelin restaurant can beat the authenticity and taste of this combination. Plums from the orchard that my grandfather planted, bread made by my grandmother, butter from their cow – the smell of summer in the air. This is pure joy and happiness that makes food taste truly good.
Why you will love this recipe
- There are only three ingredients: With just a few ingredients, I can make eight jars of this delicious homemade jam that will last for up to a year.
- It is so easy to do: The only hard part about this recipe is the waiting time. But during that time, I go about my life as usual and forget about the plums sitting on the stove, except for when I need to stir them a few times.
- So delicious! I love to spread this yummy jam on everything from toast to savory recipes, such as pork chops, and use it as a sauce for roasted duck breast or pork roast.
- Cost-effective: At the store, if I can find it, I pay at least $5 a jar. With this recipe, I can make eight jars for less than $10.
What you will need
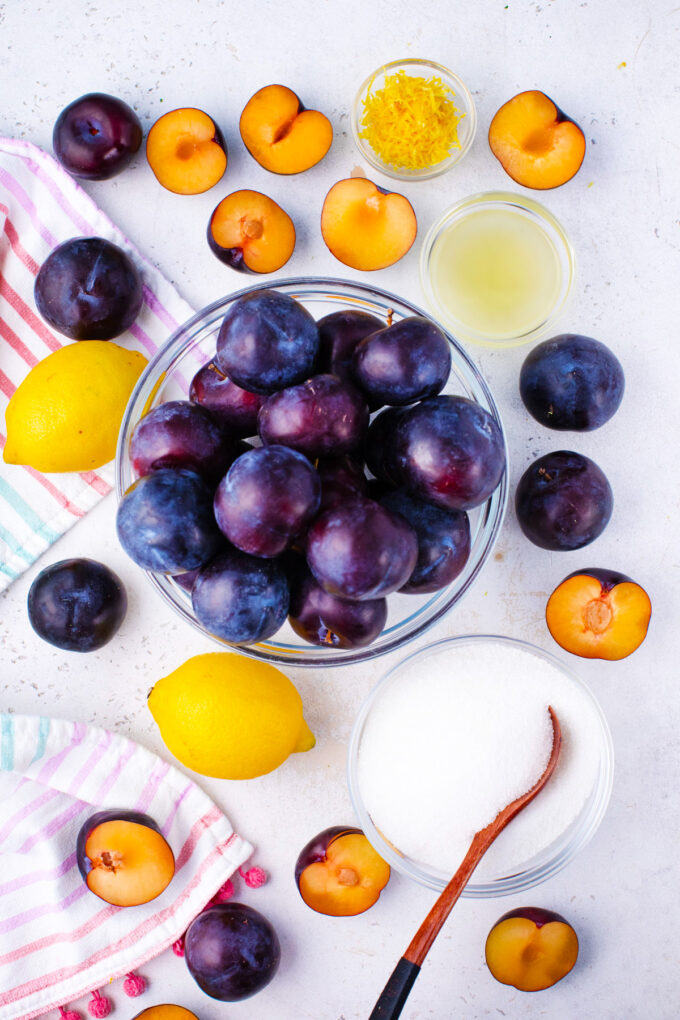
- Fruit: I use fresh organic plums from my favorite local farmers’ market. I also get one organic lemon to make lemon juice and zest. This adds freshness and balances the sweetness of the plums. It also helps lower the pH of the jam, thereby preventing bacterial growth.
- Sweetener: My choice is always pure white granulated sugar. It dissolves easily, helps the jam set, and does not interfere with the flavor. Also, the large crystals make the jam clearer.
How to make
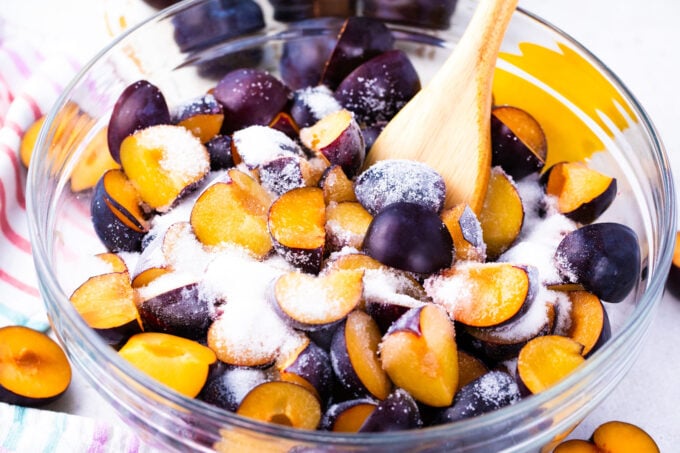
Prep the plums: First, I clean the fruit well, cut them in half, and remove the pits. Then, I add them and the sugar to a large bowl, stirring well, and let them soak for two hours.
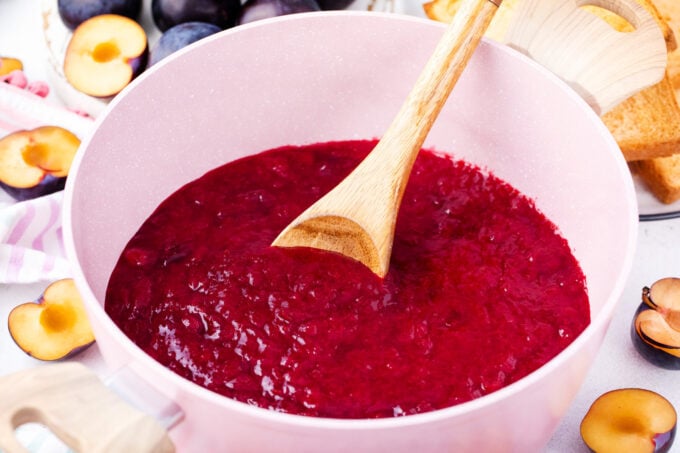
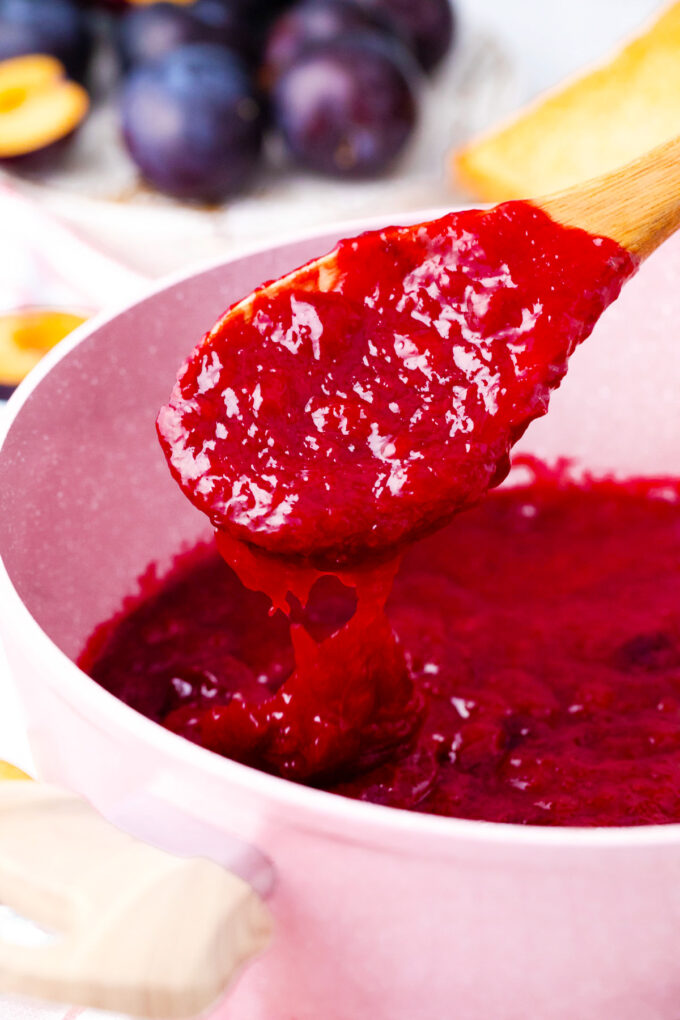
Boil the plums: After that, I pour the mixture into a large pot, uncovered, and bring it to a boil, stirring occasionally.
Flavor: Once boiling, I add the lemon juice and zest, stir again, and simmer for an additional 2 hours on low heat, stirring occasionally. After that, I let it cool to room temperature. This usually takes about five to six hours. I repeat this four times. This process takes a while, so plan on it taking a couple of days. The last time it boils, I turn the heat lower and stir it often to prevent burning, and I do not let it cool.

Sterilizing the jars: While the plums are boiling, I wash the plum jars and let them completely dry. Then, I boil the tops for five minutes.
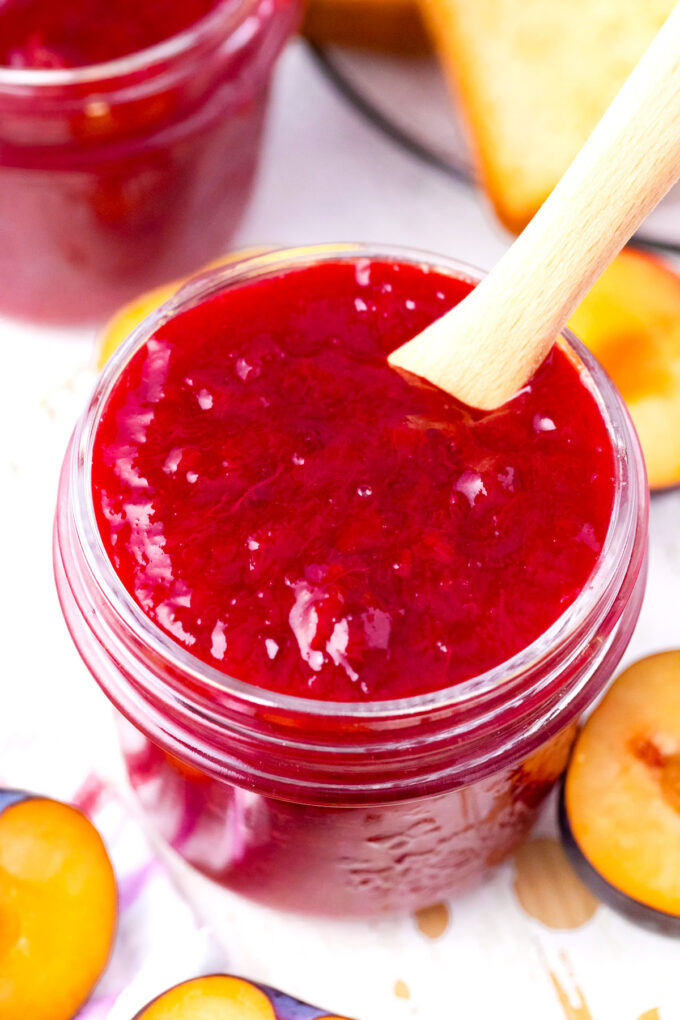
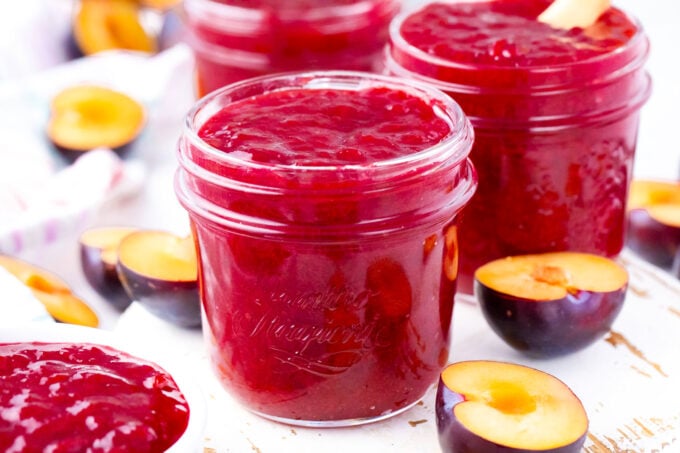
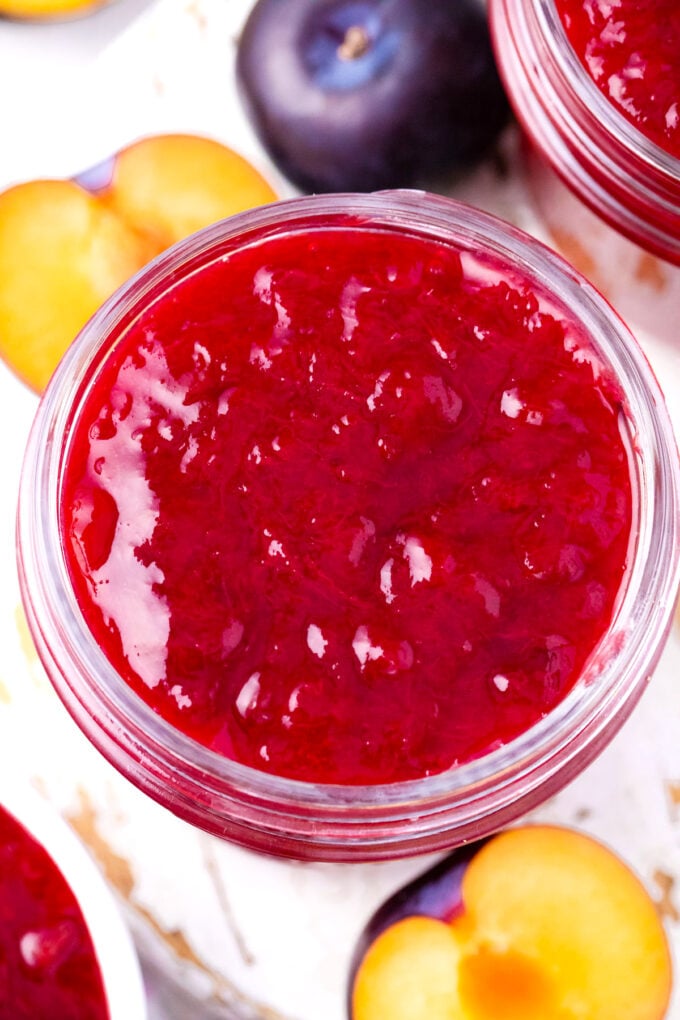
Pour in the jam: When the jam is done boiling, I pour it into the sterilized jars, leaving a ½-inch space at the top of each jar. I screw on the lids tightly and place them in a canning pot with enough water to cover them, leaving two inches of water above them. They are boiled and processed for 15 minutes before I remove them and let them sit at room temperature for 24 hours.
Check the seal: Then, I check the seal. They should not spring back after I press them down. If the seal doesn’t work, I put it in the fridge and use it in three months. If it has sealed, I place the jars in a dark, dry space where they can be stored for up to 12 months.
Expert tip
Choosing the best plums
Selecting the right fruit is essential for making delicious jam that turns out perfectly. I highly recommend using organic fruit because they are not exposed to dangerous pesticides, have higher levels of antioxidants, and taste fresher without the inorganic additives. I like dark purple or black plums with red flesh. Whichever color you choose, ensure it is a consistent color throughout. Finally, they should be very ripe and almost soft rather than hard.
More tips to consider:
- To make the jam fresher and cleaner, add a bit of butter and stir it before canning, and remove the foam. This will remove any scum and leftover peels that may have been floating in the mixture. Just be sure to get it all so the jam is clear.
- To help reduce spillage, I use a large measuring cup with a spout to transfer the jam into the jars, rather than a ladle.
- If the plums are not yet ripe enough, place them in a paper bag with a banana or apple.
- Do not peel the plums. It is the peel that contains the pectin, which is used to thicken the jam. If any excess peel is left over afterward, it can be strained out; however, it usually melts when boiled.
- Don’t forget to lower the temperature on the last boil to prevent scorching it.

Recipe variations and add-ins:
- More fruit: To make this jam even fruitier, I sometimes add other types of stone fruit, such as peaches, cherries, nectarines, and apricots.
- Lime taste: To give this plum jam a tangier taste, I tried substituting the lemon juice and zest with lime, and it was pretty good. I liked the exotic taste.
- Other flavors: Add some extra flavor without adding more liquid with extracts. I have used almond, vanilla, and orange, and received many compliments.
- Spices: Instead of extracts, use spices like cinnamon, ginger, cloves, or nutmeg to add extra flavor to this jam.
- Using pectin: Cut down the boiling time for this jam by using pectin. It does not alter the flavor at all, but the texture is slightly firmer.
Serving suggestions:
Plum jam is something I keep around year-round, but I serve it often during the fall with breakfast on waffles, pancakes, or French toast. I even like to slather it on my Jordan Pond popovers. However, it is also a perfect addition to one of my cheese plates, such as my air-fried brie charcuterie board. I like to spread it on the crackers with the melted brie.
I enjoy serving it for breakfast or brunch with homemade English scones or buttery strawberry scones. It also pairs well with sweet and savory sandwiches, such as this strawberry grilled cheese sandwich. My kids enjoy it as part of tortilla roll-ups with cream cheese; it’s their favorite lunchbox treat, along with mini dollar pancakes that they dip in jam.
How to store leftovers:
- Refrigerate: If the jars seal properly, they can be stored in a cool, dark place for up to a year. If not, they should be refrigerated and used within three months.
- Freezing: Unsealed jars can also be frozen for up to six months.
- Defrost: Thaw overnight in the refrigerator for the best flavor.
Canning plum jam
- Prepare the boiling water canner. Heat the jars and lids in the simmering water (do not boil) until ready for use. Set the bands aside.
- Transfer the slightly cooled plum jam into the hot jars, leaving 1/2 inch headspace, and tap the jars to remove air bubbles.
- Wipe the rim, place the hot lids on the jars, apply the band, and adjust until the fit is fingertip-tight.
- Add the jars to a boiling water canner and process for 30 minutes; the processing time remains the same for both pints and quarts.
- Remove the jars and let them cool to room temperature. Check the lids to ensure they are tightly sealed after 24 hours; they should not flex up and down when the center is pressed.
- The canned jam is good for one year when stored in a cool, dry place. Once you open the jar, it can be stored in the refrigerator for 3 to 4 weeks.
Sterilizing the jar is crucial for maintaining the health of the jam and extending its shelf life. Before transferring the mixture, ensure that you have washed the jars with warm, soapy water. Afterward, let them dry in a preheated oven at 250°F for 20 minutes. For the lid, you can also let it boil to kill off any bacteria.

Frequently asked questions
This can occur if the sugar does not dissolve completely or if pectin is misused. When the fruit and sugar are heated, continue stirring and heating them until the sugar has completely dissolved. If using pectin, add it only after the sugar has dissolved. Then, follow the instructions on the package carefully.
It is likely due to a lack of pectin. Since my recipe does not use pectin, it may be due to the type of fruit used. Ensure the plums have skin on them. Do not peel them because the skin contains a high amount of pectin. Getting plums that are too ripe can also be a problem because the pectin lower as they ripen. To fix, reboil it and add some pectin, which should help it set properly.
The different densities between the fruit pieces and the liquid are usually the cause of this happening. The pulp will consistently rise to the top as the jam cools because it is lighter than the thick syrupy liquid. Unripe fruit can cause this problem to occur, or even the lack of pectin from overripe fruit. Undercooking may also be the issue, so continue to cook and stir the jam until all four processes are complete.
There are many reasons for this. Improper processing is the most common reason. Not heating the jam enough during processing is one issue. Also, check that the jars are not damaged before cleaning and sterilizing them. If there is even the most minor chip or crack, that jar will never seal. The same goes for the lids. Check for bent lids or rims, as well as worn-out seals. Finally, be sure to leave enough headspace and avoid tightening the lids too tightly.
More spreads and sauces:


Loved this recipe? I’d love to hear from you! 💛 Leave a 5-star rating ⭐️ in the recipe card below and share your thoughts in the comments – I read and appreciate every single one!
Let’s stay connected! Follow me on Facebook, Instagram, Pinterest, and YouTube for more delicious, sweet and savory recipes. Have a question? Ask in the comments, and I’ll be happy to help! 😊 with love Catalina!
Plum Jam Recipe
Ingredients
- 10 lbs plums ripe
- 4 1/2 cups white sugar
- Zest of 1 lemon
- Juice of 1 lemon
- mason jars with lids
Instructions
- Rinse the plums, halve them, and remove the pits.
- Add the plums to a large mixing bowl, sprinkle with sugar, and stir to coat. Let them sit for 2 hours.
- Transfer the mixture into a large cooking pot.
- Over medium heat, bring the mixture to a boil, stirring occasionally, without covering it.
- Add lemon juice and lemon zest. Boil until the mixture is bubbling uniformly.
- Simmer for 2 hours on low heat, then turn off the heat. Cool to room temperature. Repeat this step 4 times. I usually complete this task over two days, or I start early in the morning.
- During the final boiling, stir frequently to prevent scorching and do NOT allow it to cool.
Sterilize The Jars:
- Thoroughly wash the jars and lids with warm, soapy water, then allow them to dry completely. This step is crucial.
- Boil the lids for 5 min.
Canning:
- Pour the hot jam into the jars, leaving about 1/2 inch of space at the top of each jar.
- Screw the lids on to create a tight seal, but avoid over-tightening them.
- Place the jars into the canning pot and cover with 2 inches of water. Bring to a boil and process for 15 minutes.
- Remove the item from the pot and leave it at room temperature, undisturbed, for 24 hours.
- After 24 hours, verify that the seal has formed by pressing down on the center of the lid; it should remain stationary.
- If the seal does not form, refrigerate the plum jam in an airtight container and enjoy it within 3 months.
Video

Notes
Choosing the best plums
Selecting the right fruit is essential for making delicious jam that turns out perfectly. I highly recommend using organic fruit because they are not exposed to dangerous pesticides, have higher levels of antioxidants, and taste fresher without the inorganic additives. I like dark purple or black plums with red flesh. Whichever color you choose, ensure it is a consistent color throughout. Finally, they should be very ripe and almost soft rather than hard.More tips to consider:
- To make the jam fresher and cleaner, add a bit of butter and stir it before canning, and remove the foam. This will remove any scum and leftover peels that may have been floating in the mixture. Just be sure to get it all so the jam is clear.
- To help reduce spillage, I use a large measuring cup with a spout to transfer the jam into the jars, rather than a ladle.
- If the plums are not yet ripe enough, place them in a paper bag with a banana or apple.
- Do not peel the plums. It is the peel that contains the pectin, which is used to thicken the jam. If any excess peel is left over afterward, it can be strained out; however, it usually melts when boiled.
- Don’t forget to lower the temperature on the last boil to prevent scorching it.
This looks like a lot of fun to make. Looking forward to trying this recipe.
Can you believe I have never had plum jam? Looking forward to trying this recipe.
Yum, sounds amazing! I need to try this. I do love plums but haven’t ever tried plum jam.
I have never tried plum jam. Plums are not readily available in my country but I will check and see if they have prepared bottled plum jam at our local supermarket. It sure looks really tasty.
I haven’t had a plum in ages, but this sounds so good! They are one of my favorite fruits. Thanks for the recipe idea!
Plum jam sounds delicious! I haven’t had plums in years, but I may have to pick some up next time I’m at the market and try this recipe!
This looks delish! Perfect for morning toast or even toppings for cupcakes and muffins!
I’ve always wanted to learn to make jam but wasn’t familiar with pectin. This is the perfect recipe to try!
I love homemade jam. It’s the best. I don’t think that I have tried plum jam before though. I bet it would taste amazing.
One thing I love to picked fruits on harvesting season. Is that I can make a jam out of it, loving the variety if jams that you can choose.
I just tried plum jam for the first time a couple weeks ago. My neighbor made me some. It’s quite delicious!
This homemade plum jam looks delicious I would love to try it. Thanks for this wonderful recipe.
Oh great! Thank you for this recipe. I can’t wait to make some for the family.
My daughter was just saying how she wanted to make some jam. This would be a fun project for her to try and to help pass the time.